Using the Marquee Tool in Photoshop
Introduction to selection in Photoshop
This tutorial is the first of the next several that will deal with the toolbar. They’ll be shown in a sequence that allows you to see how they work together, and later tutorials will combine some of these tutorials into practical examples. The Marquee tool allows you to select areas of your image (or the whole image) so that you can edit or modify that area. It can also be used for copying sections from one part of the image to the other or making a stamp. Also, the marquee tool has a flyout so you can choose different shapes. A video at the end of this page will show you how the tool is used.
Selecting Areas of the image (Part 1)
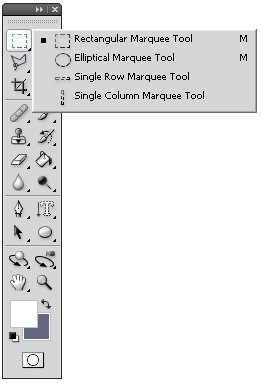
Before making modifications to part of an image, you first need to select part of the image (makes sense). This tutorial will show you how. Below is an image of the marquee tool flyout (remember to left click and hold the marquee icon that is visible). ![]()
![]()
![]()
![]()
Tip: See the “M” to the right of the fly out? Let’s say that you have the eyedropper selected and you want to use the marquee tool… hold down the SHIFT key and hit the “M” key on your keyboard. You will see that the marquee tool is now your active tool. This is a handy quick keyboard command and most of the tools have them (if it doesn’t work, you will need to turn it on in Edit > Preferences > General drop down menu found on the menu bar). Once you get familiar with the shortcuts, people will think that you “fly”.
On the flyout, you will see that there are four options:
| Option | Result |
| Rectangular | Creates a rectangular shaped selection |
| Elliptical | Creates a circular or elliptical shaped selection |
| Single Row | Creates a selection that is one pixel high across the width of the image |
| Single Column | Creates a selection that is one pixel wide across the width of the images |
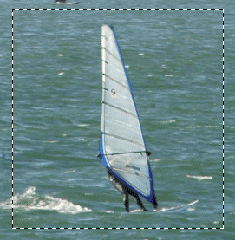
Creating a selection is simple. Just move your cursor over the images and left-click and drag the cursor across the screen, releasing the left button when you are to the size that you want. This works for the rectangular and elliptical marquees. If you want to select a perfect square or circle, repeat the process, but hold the SHIFT key as you drag. Holding hold the ALT key will center your selection at the click point. So if you “SHIFT + ALT + CLICK + DRAG” you will have a perfect constrained square or circle that centers off the click point. The image below shows how the marquee tool in Photoshop is displayed when functioning.
![]()
![]()
![]()
![]()
This concept is quite easy to follow. Open up any photograph you have on your computer and try this. Try using the shift key as you left click to create a constrained square or circle shaped marquees. Then try holding down the ALT key to center your start point. Use the SHIFT key for a square selection.
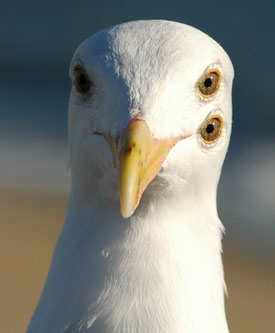
Note: If you don’t have a photo available, you can download this one of a seagull to practice with. (click on the link, then when it opens, right-click the image and chose “Save images as” and save it to your hard drive, and open the file in Photoshop).
Adding to the selected area – Hold the Shift key and make another marquee selection (you’ll see a cross hair and + sign) – it will add to the area selected. This can either overlap the first area, or be a new, separate area working with the first area you selected.
Subtracting from the selected area – Hold the Alt key and make another marquee selection (you’ll see a cross hair and – sign) – it will subtract from the area selected. This second area needs to overlap the first area or there will be no change.
To select the 1 pixel row or column, just select the tool’s icon (Single Row or Single Column) then pick anywhere on the image to select a row or column of pixels – it’s that easy.
Play with the marquee tool until you feel you have the hang of it – ’cause we’re going to add to the power now.
Things you can do with the marquee tool in Photoshop
Delete – with a marquee selection made, press the Delete key on your keyboard. This will erase the selected part of the image and replace it with the background color (which is shown on the toolbar). If the area deleted is on a layer other than the Background, it will leave a hole.
Cut and move – select an area, and then place your cursor inside the marquee. Hold the CTRL key while holding down the left mouse button. You should see a pair of scissors appear. Now move your mouse to move the marquee. What will happen is that the area selected will move and either it will leave a hole or the background color will fill the formerly selected area.
Duplicate – select an area, then (with your cursor in the area) hold the CTRL and Alt keys while pressing the left mouse button. As you move the cursor the selected area will be copied to where ever you move it. this is a very quick and easy way to copy elements of your image. This simple technique allows me to use the circular marquee to give the seagull a 3rd eye.
![]()
![]()
![]()
![]()
Cut and Paste – With the area selected, “CTRL + C” on your keyboard will copy the section. “CTRL + X” will cut the image out, leaving a hole or the background color, depending on which layer you are on. “CTRL + V” will paste whatever you copied or cut into a new layer above the layer you are on.
Fine tuning – Once you have made a selection, you may find that your circle is just a little off center or a little too far to the left, etc. In which case, you can use the arrow keys on your keyboard to move the selection up, down or across one pixel at a time. Or 10 pixels at a time by holding down the SHIFT key and using the arrows.
Invert the selection – You can select an area of the image, and then invert that selection by holding down CTRL+Shift+I (or use the menu Select > Invert). This is useful if you want to modify most of the image, but leave an area untouched. It’s easier sometimes to select the small area, or a bunch of small areas and then invert the selection.
Deselect – Once you’ve made a selection, you may need to change it or pick a different area. There are a few ways to do this. If you image is zoomed out to show the border, pick in the border area (doesn’t work with row and column selection). Or click in the image, but don’t drag the cursor (be careful not to accidentally select a very small area). You can also press CTRL+D to deselect the selection.
Select the entire image – To select the whole image, you can either use the rectangular marquee around the extents of the image, by clicking outside of the image and drag across to the other side (I would do this from the upper left down to the lower right), or you can quickly press CTRL+A.
Remember, you can access the marquee tool when another tool is active by pressing the M key or clicking on the icon.
Here’s a short video that shows the Marquee tool in Photoshop:
Conclusion
Knowing how to use the marquee selection tools is critical to your ability to use Photoshop. Many tools will be based on the techniques shown above, or involve them somehow. Learn how to select and use the options.
Reference
Read about movie marquees.
Practice
Open up the seagull photo and see if you can add the 3rd eye like the sample image above.