Introduction to Aperture Priority Mode
The first few tutorials talked in general terms about what is needed to create a photograph. Remember that you have 5 basic components. This tutorial will just focus (pun intended) on aperture and depth of field. I can’t discuss one without mentioning the other – they are two peas in a pod. At the end I’ll explain how you can use the “Aperture Priority” setting on your camera.
Personally I feel that controlling the depth of field via the aperture is the most creative aspect of the five components. When I am shooting something that doesn’t involve movement, I will be using the the Aperture Priority setting on my camera. This allows me to set my f-stop and concentrate on what the range of focus will be in the image, while the camera controls the other settings. I will keep an eye on the other settings, but my attention will be on the aperture.


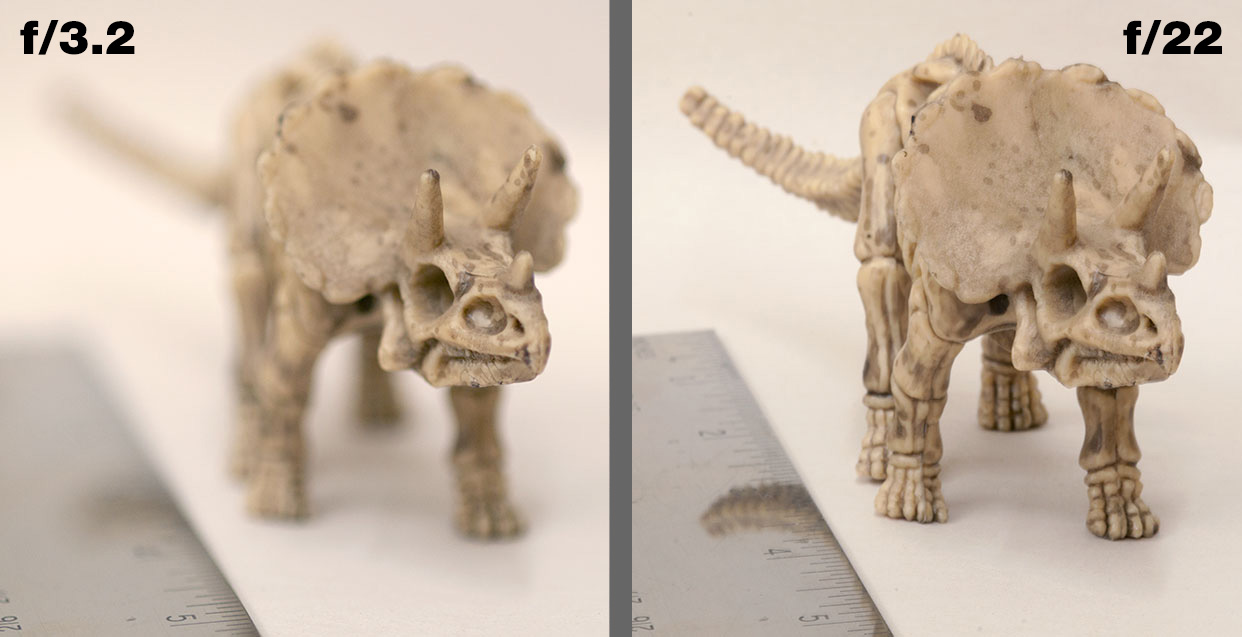
The image on the left has “limited depth of field”. Note how the front of the skull is in focus, while the tail is totally out of focus. This is due to how close I was to the toy and the setting f3.2 for the aperture.
The image on the right has more depth of field. Note how you can see the individual segments of the tail bone now. They may not be perfectly sharp and in focus, but they are much clearer when compared to the image on the left.
In the example above everything is the same except the F-stop. Notice the difference? Is there one that you like more than the other? To shoot this, I had the White Balance on Auto, the ISO set at 200 and the camera set to Aperture Priority (the camera selected the correct shutter speed). I used only the light in the room (same for both images). Since I am quite close to the subject, the depth of field is very limited. This is due to physics or some other black art that I’m assuming you don’t really care about (or you can read about ‘Circles of Confusion‘).
At this point you really just need to remember:
- The lower the F-stop – the lower depth of field you will get.
- The lower the F-stop – the more light that comes in.
- The lower the F-stop – the faster the shutter speed will need to be.
- The larger the F-stop – the larger depth of field you will get.
- The larger the F-stop – the less light that comes in.
- The larger the F-stop – the slower the shutter speed will need to be.
What you set your F-stop to can be limited by the amount of light that you are dealing with and the settings allowed by your lens. In a low-light situation, you may have no choice but to open to the widest setting (lowest F-stop). This will limit your creative options. But thanks to your ISO setting, you can set a higher ISO to give you more range on your aperture. Instead of the circle of life, you’re dealing with the circle of light.
Here’s one more look at how the aperture setting you choose can affect your photos. Which one do you like more, and why?


If you are new to photography and are still not sure exactly what the aperture and how it works, have a look at this short video which shows the ‘actual’ aperture mechanism I’m talking about.
The example above showed what your depth of field looks like on a close subject. How about when you are outside? In a landscape photo, your subjects are further away and so your depth of field will increase.

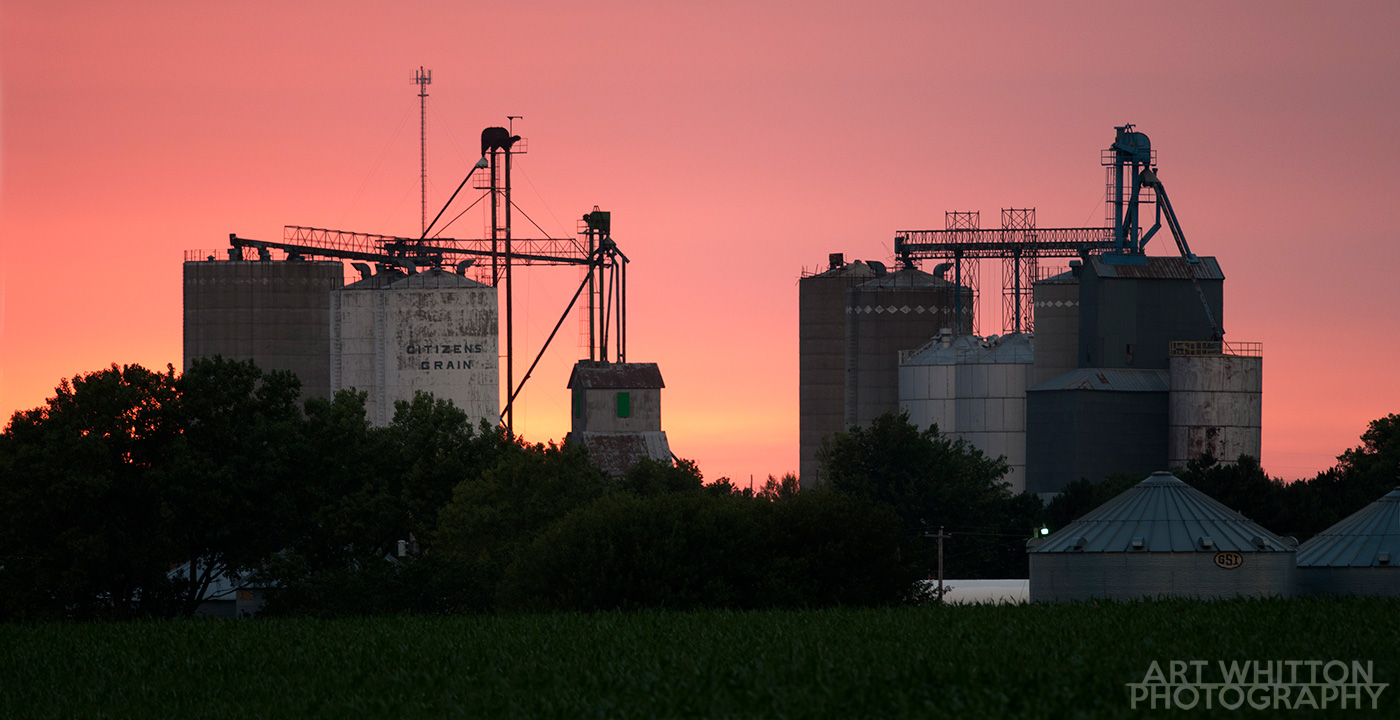
In the above image, I had to use a low f-stop as the light was so low. Still, with a setting of f4, most of the grain elevators are in focus, while the corn in the foreground is not. The smaller grain bins on the right are a little out of focus. The only thing that changed from the photos of the toy dinosaur above was the distance from the camera to the subject.
This is where you start flexing your creative muscles. This is where you start making the choices that change your image from a snapshot to a photograph. This is where it starts to get fun.
A few things about Aperture:
Many cameras have an “Aperture Priority” mode which allows you to select the aperture while the camera sets everything else.
Depth of field is defined as the area in front of and behind your subject that is in acceptable focus. This range falls roughly 1/3 in front of your subject and 2/3 behind the subject.
On many lenses, there is a ‘sweet spot’ of an aperture that provides the sharpest possible image. This is a consideration when you require sharpness above all else. In most lenses, this is in the mid-range. You will have to read reviews of your specific lens to find out what this is. For example, I use a Rokinon 14mm lens a lot. After reading reviews I found that f/8 provided the sharpest images as well as giving almost limitless depth of field. I use this setting on almost every photo I take with this lens.
Depth of field is determined by the focal length of your lens. A wide angle lens has more ‘apparent’ depth of field at a particular F-stop than a telephoto lens.
Some cameras have a “Depth of Field Preview Button” (check your camera’s manual if you are not sure). This button will set the camera to the aperture you will be shooting at (instead of at its widest aperture that is used for regular viewing). This allows to see exactly which objects will be in focus and which will not be. The viewfinder can get quite dark when using this.
Sometimes a shallow depth of field can be handy for shooting through wire fences. Why? Because if you’re very close to the fence, the wires will be so out of focus that you will hardly notice them. But if you are 3 feet away and shoot the same scene, the fence will be quite visible.
“Standard Full f-stops”
What are ‘standard’ f/stops? These are the f/stops that film photographers used because the mechanical lenses back then were limited in how many full stops (or settings) could be put on a lens. Today’s electronic apertures don’t always use full steps. Many cameras allow for 1/3 steps. This means that an old lens might allow you to set f/2.8 and then the next step would be f/4. Today’s electronic apertures might allow f/2.8, f/3.2, f3.5 and f/4. This allows for much more flexibility when shooting.
Here is a table that shows some of these standard, full f-stops and the corresponding shutter speed that would be needed to gain the same exposure:
| f/2 | f/2.8 | f/4 | f/5.6 | f/8 | f/11 | f/16 | f/22 | f/32 |
| 1/4000s | 1/2000s | 1/1000s | 1/500s | 1/250s | 1/125s | 1/60s | 1/30s | 1/15s |
Note at the left, the difference between f/2 and f/2.8 are numerically small while at the other end, there’s a greater numeric difference between f/22 and f/32. The actual difference between each full stop is a factor of 2. f/8 lets in half as much light as f/5.6. f/32 lets in half as much light as f/22. This is proven by noting that the shutter speeds related to each f-stop are also twice as long in the amount of time that the shutter is open.
This isn’t a chart that you need to memorize – BUT – it is very handy to remember the general relationship between f-stop and shutter speed.
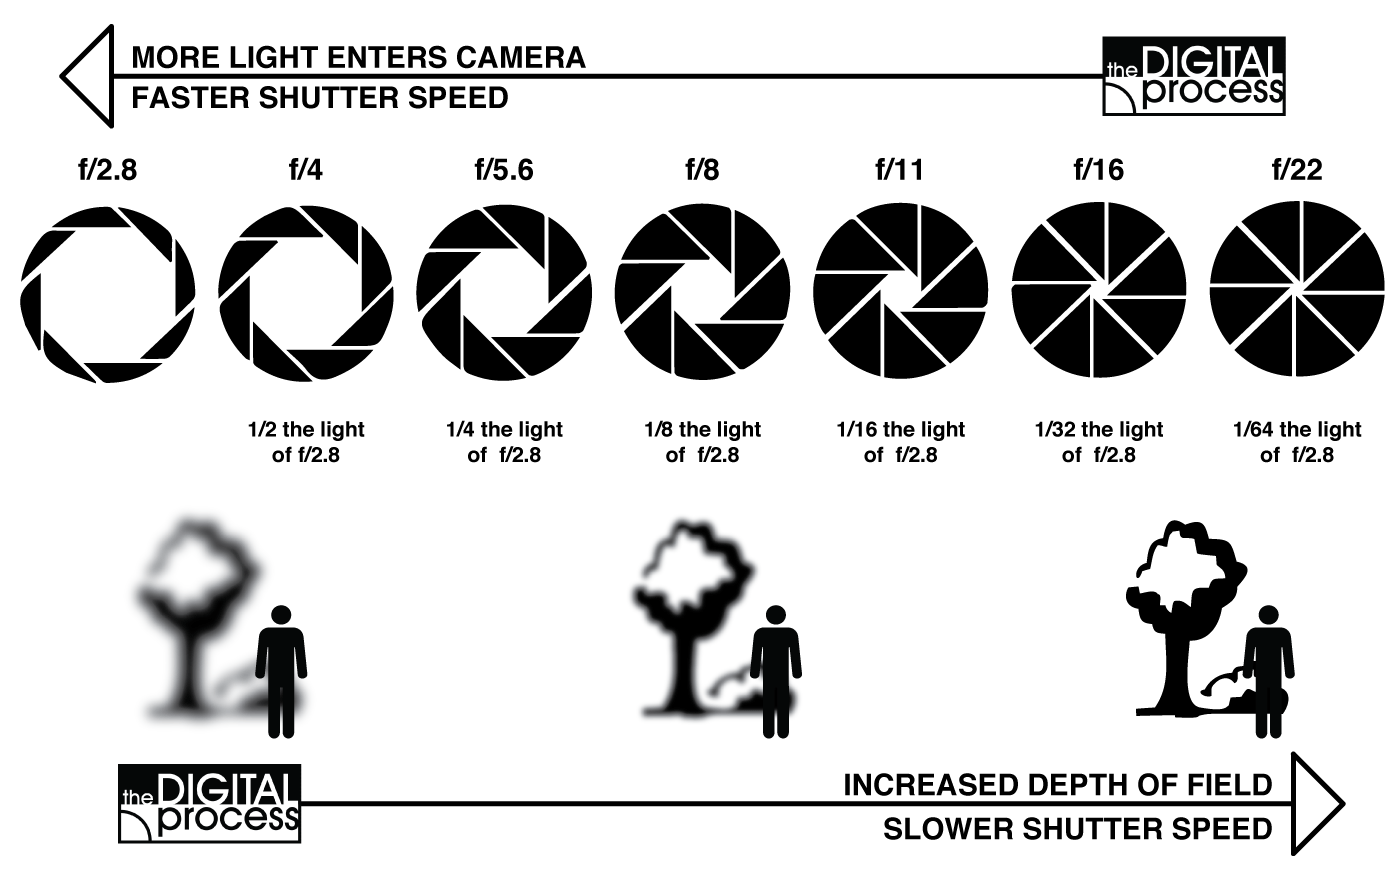
If you think is is a lot to learn, don’t worry – just get the concepts down. Until you get more comfortable with this, here’s a handy image you can use for reference, or you can download and print a PDF to keep with you.

Using Aperture Priority Mode


For many new photographers, they are happy to keep shooting on the ‘Program’ mode, or the ‘green’ setting, or the “Auto Everything” mode. If you want to start experimenting, you can start now. See if your camera has an “A” setting for Aperture Priority Mode. On Canon cameras this usually called the “Av” setting for Aperture value. What this setting does is allow you to set the aperture while the camera selects the shutter speed for you. You will have to select your ISO (but you may have an Auto-ISO setting that you can use to deal with this). Leave your White Balance on Auto if you are not comfortable setting this.
With your camera set, see what happens when you take a bunch of photos at the smallest f-stop your lens allows. Then start raising the number (and making the aperture smaller) and shoot the same things you did previously. Or just switch to the largest f-stop and see what happens. You might not notice much in your camera’s image review, but you should see some big differences when you view the photos on your monitor.
Remember when shooting in Aperture Priority Mode, the camera will keep setting the correct shutter speed. This is great, but if there is not much light, your shutter speed might get too slow for your to hold steady. Remember the “1 over the focal length” rule? If you get some blurry photos after shooting at f22, this could be the reason.
This technique is explained further in this practice lesson: “Aperture Priority Mode“
Summary
The lens aperture controls how much light enters the camera. This in turn determines what your shutter speed will be as well as how much depth of field you will see in the image.
How this depth of field looks can be your choice as a photographer. Since it doesn’t cost anything but time to view digital photos, practice this often. Digital cameras will also record what F-stop was used, so that you can check your results and remember them for future use.
Use the Aperture Priority setting when you are not concerned about movement in your image (we’ll talk about this opposite approach in the next chapter). Before jumping to the next tutorial, get out of your chair, grab your camera and take some photos!
Quiz
Aperture SettingsA short quiz about the basics of what the lens aperture is used for. |