Introduction to the Crop and Move Tool in Photoshop
Introduction
Now that you have learned to select parts of the image, it’s time to start doing something with those selections. The first part of this short tutorial will show you the move tool in Photoshop and move something that you have selected using the Move tool or” Arrow”. The second part of this tutorial will show you how to crop an image. There is a video at the end of the tutorial to help you review.

Movin’ with the Move Tool in Photoshop
At the top right corner of the tool bar you will see a black arrow. This is the move tool. Pick on the tool and have a look at the option bar across the top. You can also get there by hitting “V” for the keyboard short cut.

For now, we’re not going to delve into the options and instead just use the basic controls. I’d rather teach you these options in a more realistic way later in the course.
Open up a photo and make the Move tool active. Place the arrow anywhere in the image and then left-click and drag. If you are in a locked Background layer image, you will get this error message.

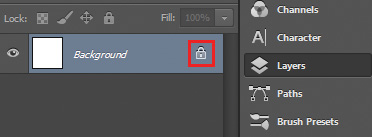
The reason you got this message is because the only layer available when you open photos or start a new image is the Background layer. It cannot be moved because it is locked (you can unlock it by clicking on the lock icon in the Layers panel). When first learning Photoshop, getting errors like this can be frustrating. It’s my goal to try to show these as they pop up and make the learning process smoother. I started out learning the program by trial and error (mostly error!). These kind of messages that appeared when I thought something should work drove me up the wall!
Now make a selection using any of the options that you learned in the previous tutorials. Make the Move tool in Photoshop active again and see if you can move the selection. If the cursor is in the selection, you can. If it’s not – you can’t. But if you move it first, and then move your arrow outside the selection, you can keep moving it. Your selection will stay active until you deselect it (CTRL+D). Amazing stuff!
You’ll also find that the keys that you used with the selection work for the move tool as well. Hold down the CTRL+Alt keys and you can copy the selection. Use the Shift key and it moves your selection while constrained either horizontally or vertically. This is an important feature when you want to duplicate something in a row or keep something aligned.
Move Tool in Photoshop
Now for some fun using these tools. Download this photo of the Statue of Liberty. You can open it in your browser, right-click and choose “Copy Image” then start a new image and paste the image into the new drawing (Photoshop will automatically size the new drawing to the size of the image on your clip board). When you have the drawing, see if you can make the Statue disappear. There are a few ways of doing it, but the easiest is to select a section of cloud next to the Statue and just a bit bigger than the statue, then move the cloud section over the statue (Move + CTRL + ALT). Press CTRL+Z to undo and make it reappear. This is the “UNDO” and one of the most important tools in PS!
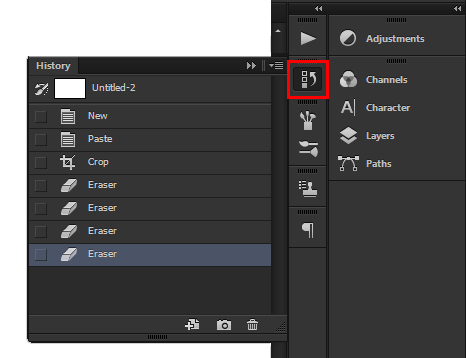
UNDO Detour: Photoshop has the annoying trait of only allowing 1 undo when you press CTRL+Z. For people used to using other software, this can be a pain in the butt. By default PS has 20 History States, you can increase this or decrease this number under Edit > Preferences > Performance > History & Cache. We’re going to jump off the toolbar for a second to show you the History Window. If it’s not there, go to the pulldown menu for Window and choose History.
Pick on this icon (shown below) and a list of the most recent changes you made will appear. You can select any item on the list to revert back to the images state at the time you made the change. Or you can “Step” back and forth through History using “Shift +CTRL +Z” to go forward (redo) and “Alt +CTRL +Z” to go backwards (undo). Click on the very first image icon to take the image back to the original state when you opened the file (You can also “Revert” back to the original image from the “File” drop down on the “Menu Bar”).
That’s all I wanted to say, now you can continue on…
Ok, sorry for the detour, I just thought I should mention the history at some point by now.
Now that you’ve made the Statue of Liberty disappear, and brought it back (Bravo), you can copy to make a second one. For this trick, select the Statue using the magnetic lasso tool and then copy it over (move + CTRL+ALT) to the left. If all goes well, you should have 2 Statues. Now this is a very quick and crude way to do this sort of work, but in later tutorials you will get a closer look at these kinds of projects.
Sidetrack: A while back, the Iranian government used this trick to show more missiles than they really launched.
Crop Tool in Photoshop
Another tool at the top of the Toolbar is the Crop tool. This is used to select part of the image and remove everything surrounding it. If you’ve used any kind of graphics software before, you have probably done this before.
If you still have the Statue image open, good. If not, just open another image. With any image at any time you can crop it. Activate the Crop tool and you will use it just like you would the rectangular selection tool. This time there is one small difference: the area around the selection will darken so that you can see the results of your Crop. Everything that is grayed out will be removed, leaving just the cropped area.

You’ll also notice some squares around the edge of the crop selection. These are called handles and can be used to modify the selection you have made. You can also move the crop area around as well. If you go to the corner, you’ll see a small curved handle symbol appear. This allows you to rotate the crop area. Press Shift to constrain horizontally and vertically and rotate in 15 degree angles.
When you select the Crop tool, you will see the Option bar change to give you some more control.

The first icon is a flyout for presets. Photoshop includes some default settings for standard proportions for printing photographs. Second from the left is a list of common presets, which allows you to add your own custom ratios. Next, you can set the width and height of your final cropped image. For example if you need a 800 pixel by 200 pixel image for your website, you can set that here. The arrows in the middle allow you to swap the width and height. Resolution allows you to choose how many pixels per inch you need. Remember the table you looked at in Tutorial 1-2? I will usually use a preset or enter custom ratio, like when I crop an image for Facebook.
The clear button will quickly clear the contents in the ratio boxes. the Straighten tool is VERY handy. Click on the icon that looks like a level and then click and drag across your image (ideally on something you know should be perfectly horizontal or vertical.
So if you think you’ll be making an 8×10 print from the image, just select the 2×3 ratio and crop. I usually avoid the preset for “4×5 300dpi” as it will usually crop my image smaller – I’ll resize when I’m done, or save the larger file.
Trimming you Image
This tool isn’t on the toolbar, but is in the Image menu – Image > Trim. Sometimes you might have an image that has a few layers and parts of the image may expand past the visible image size. If you have a lot of this happening, your file size can get much larger than it needs to be. If you are sure you don’t need to use any of the non-visible area, you can trim to image. This will remove everything except what is inside the visible area. It won’t look like anything happened, but it has.

Slice Tool in Photoshop
Since this level of the tutorials deals with the toolbox, I’ll briefly cover the slice tool, which is part of the Crop tool flyout. This tool allows you to break one image into several smaller images so that websites can load them in bits (and seemingly quicker). This will be covered in a later tutorial. Below is an example that shows what slices look like. In this case, each slice would be a separate image, and the white part in the middle would be left for text.

This tool will be shown in more detail with Tutorial 4-7, which will show you how to design a website in Photoshop.
Summary
So far you have been learning the basics of Photoshop. I agree that it’s not the most exciting thing you do with the program, but a sound foundation will help you later as you move forward. Simple actions like selecting, moving and cropping can be a large amount of the total time you spend working on a design. If you learn it now, the rest will come easier.
Reference
Visit the Wikipedia Page about Cropping
Watch Steve Cropper play Green Onions