Night Photography Tips
Introduction
Shooting during daylight hours is always fun, but what about after the sun has set? Lately I’ve been taking a lot of photos in the twilight and night hours. This has opened up a lot of opportunities for me and given me the chance to try some things on my ‘photography bucket list’. This post will talk a little bit about sunsets, then astrophotography and other night scenes that you might want to try. All of these night photography tips will help make you a better photographer.
 Most of my sunset photos are taken after the sun has gone down. In many cases the color will get more vibrant, the clouds get more colour and exposure isn’t affected by a bright yellow circle. I generally underexpose by a stop or two to bring out more colour and once the sun is down, I don’t need to worry about a burned out section of the frame like the example below.
This is an HDR (High Dynamic Range) exposure and although it’s a good image, it can be really tough to print as the sun area is blown out (overexposed) and bright yellow.

I’m not going to spend much time talking about sunsets. But I will suggest that if you’ve waited in a spot for a sunset photo – just keep waiting a little while longer and see what happens. I see so many people as soon as the sun sinks below the horizon.
The photo below was taken almost 2 hours after sunset – I needed a longer exposure, but it gave me a totally different look that I saw as the sun was setting.

Wait around, see what happens, enjoy the quiet time. 😀
ASTROPHOTOGRAPHY – THE MILKY WAY
I’ve been intrigued by astrophotography for years – and really, who hasn’t? What larger subject can you find than the night sky? I live in rural Nebraska, so I don’t have to worry about light pollution very much so I can enjoy grand vistas of the Milky Way on a moonless night. I’m not an expert at this, but I’d like to share these night photography tips and what I’ve learned so far and maybe it will encourage more people to explore the night sky.

As you can see, even a small farm or town of 50 people will show up on a long exposure.
Before going out to shoot this summer, I did some research online to find out about basic settings and approaches to astrophotography. Here’s a short version of what I learned and this should give you a starting point to start trying this yourself.
 Shutter Speed – Most people go by the “500 Rule” which states that your shutter speed should be no longer than 500 divided by the focal length of your lens. I use a 20mm lens, so 500 / 20 = 25 therefore, I shouldn’t use a shutter speed longer than 25 seconds. The reason this rule is used is that longer shutter speeds will let the stars move across the frame during exposure and become ovals or streaks rather than points of light. The longer the focal length of your lens, the more this becomes noticeable.
Of course a 25 second shutter speed means that you’ll be using a tripod, cable release and mirror lockup to keep your camera as still as possible. The better your tripod and technique, the sharper your photos.
Aperture – As a general rule, you’ll use your lens’s widest aperture to let in the most light during your long exposure. You might able to click down a stop or two, but try it wide open to start.
ISO – Setting your ISO is the tricky part in the exposure triangle (the balance between shutter speed, aperture and ISO). This is where some experimentation comes in. Many modern DSLRs will allow you shoot up to 6400 ISO and still get usable images. What you set the ISO to will depend upon two things. First, you need to get the best exposure for your image. You might find that you can use 800 ISO and you’re set! But you could find that you need an ISO setting of 6400 and your camera adds too much ‘noise’ to the image to keep it clean. Finding this perfect balance will be up to you and the amount of light that is available from the night sky.
White Balance – according to physicists, the Milky Way has a white balance of 4840 Kelvin. Some cameras allow you to manually the Kelvin temperature as your white balance, so you might use this as a starting point. In other places I have read that 4100K was a good place to start. The final white balance you use will depend upon the amount of light pollution in your image and the look that you want to achieve. Some people don’t like the yellow haze of light pollution, while others will keep it to show what is happening in the area they shoot. I use 4100k where I am and am happy with the results.
Also, it’s a good idea to use a constant white balance (rather than Auto) as you might want to stitch together some photos for a panorama image.
Focus – For me, this was the hardest part of shooting the Milky Way. My eyes are getting old, and even with glasses, this was a challenge. You likely won’t be able to focus through your viewfinder, and just setting your lens to infinity won’t always work (sometimes you need to dial it back just a little). Focus using the live-view feature of your camera if you can. This gives you the most accurate focus method and unless you move the lens, you only have to set it once.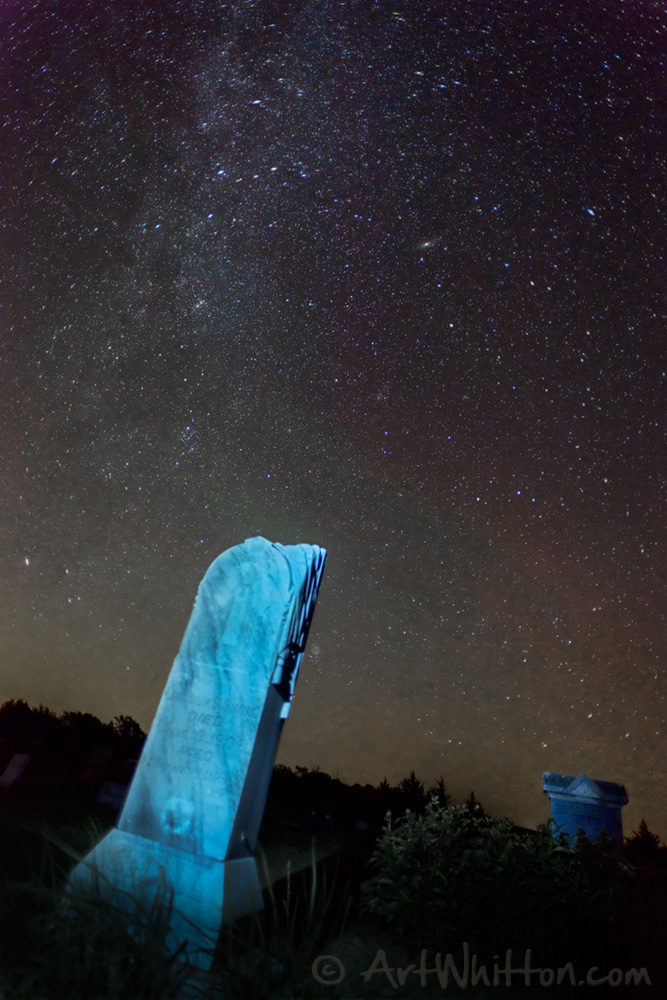
Composition – All of the usual rules of composition apply here just as with other forms of photography. The more interesting you can make your composition with foreground objects, the more enjoyment you’ll get from your images. Include ‘something’, even if you only have a horizon line, a photo of the sky without anything to ‘anchor’ it will not keep a viewer’s attention. Living in a rural area that is mostly corn fields makes this a big challenge in my night photography.
Post Processing – Once you’ve captured the Milky Way on your sensor, you will still want to adjust the image in your editing program. You shoot RAW, right? So you can adjust your White Balance and Exposure easily. I usually adjust the Curves setting on most images to get a richer black in the sky.
Final Thoughts -Focus is critical, get it right before anything else and then check it occasionally. The rest of your settings will be quite straightforward as listed above, but don’t be afraid to experiment. Keep track of what works best for you. Remember that you might be out in the night for a hour or longer, so dress accordingly, bring bug spray if needed, a flashlight (preferably with a red lens) and something to eat or drink.
Remember – you’re shooting digital – so experiment, review your images in your camera and try different settings – EXPLORE!
And sometimes you have everything come together in one image.

ASTROPHOTOGRAPHY – THE MOON
 Shoot for the moon! Just like shooting the Milky Way, your technique is important when shooting the moon. You’ll need a tripod, cable release and use your Mirror Lockup to get the sharpest images. Here’s the settings I would recommend to get started, but then of course you should experiment as conditions can change.
Lens – Grab your telephoto for this one, get as close as you can and consider the surrounding sky. You might want to include clouds or a foreground element, but you’ll still want the moon to be large, so a long lens is perfect for shooting the moon.
White Balance – When the moon is lit, it’s lit by direct sunlight. For this reason, I always use my camera’s Direct Sunlight White Balance setting.
Exposure – Again you need to consider your exposure triangle of shutter speed, aperture and ISO to get the best exposure for your images. Consider the moon on a clear night about the same as shooting a subject in bright daylight. If you’re not concerned about the surrounding night sky (usually black) then you can just base your exposure on the moon. You can even try spot metering if your camera has that option. Unlike shooting the Milky Way, you should be able to get away with ISO 100 (or lower) and you can base your exposure on the best shutter speed for your tripod and technique. Keeping the image sharp through stabilization is key here. Aperture isn’t much of a concern here, but you might find that your lens performs better at some f-stops than others.
The image above was shot at ISO 100, 1/160s, f6.7 with a 300mm lens and 1.7x teleconverter.
Try shooting the moon during various phases, try on different nights as humidity and heat can affect your images. Check the web to see when eclipses will occur and try to shoot the different phases.
LIGHTNING
 Here in Nebraska we will see a number of storms roll through from spring until fall. Some can be spectacular and some will be grey and overcast. I’ll never know what the storm will bring until it comes into the area. The best storms will have a lot of lightning to capture. 😀 I hope these night photography tips will help you capture some stunning images!
First off – photographing lightning can be dangerous. You need to know which direction the storm is coming from and be aware of what is going on around you. A metal tripod makes an excellent lightning rod.
Shooting lightning is fun, exciting and sometimes just a little frustrating.
Shutter Speed – If you are shooting at night, you will want to have a long shutter speed to capture lightning. You don’t know when it will hit, so if you keep your shutter open for a long time, you have a better chance of catching it. I usually use a 15 second exposure as this will allow for enough time for a strike to hit (maybe two) and help expose the sky as well.
Aperture – This will depend on your particular surroundings while you are shooting. I start by using the mid-range apertures of f6.7 or f8. As a general rule, these settings will allow for the balance of exposing the scene, give me some depth of field in the scene and is a sharp setting (sweet spot) for most lenses. Start here and adjust accordingly.
ISO – Try to keep your ISO setting low. When you capture your amazing lightning shot, you’ll want to print it as large as you can! Start at your lowest setting and adjust up if needed.
Lens – Most of the time I’ll use a wide angle lens as the sky is big and I don’t know where the lightning is going to strike. Using wide angle lens increase my odds of catching some lightning.
White Balance – This is a personal choice. I use a tungsten setting to get a rich blue sky that really brings out the clouds. A Daylight White Balance will work as well, but if you are new to this, try a few settings and see what you like best.
Composition – It helps to have some point(s) of interest in your frame when you shoot lightning. It can be easy to capture a lightning shot, but tough to capture an ‘interesting’ lightning shot. Below is one of my most popular photos as it incorporates a classic rural scene with a large bolt of lightning.

Here’s another shot from the same night that took out of the front door of my home.

Although the strike is stunning, the lack of an interesting composition makes a lesser photo. Composition is key to all images, never forget that!
Remember – be safe! Watch for rain drops that might fall on your lens and ruin that great shot you could have had. Shoot a LOT of frames; remember, it’s only digital. You might have to delete 300 shots after catching that 1 awesome shot.
In conclusion, don’t put your camera away when the sun goes down. There is so much to explore in the night sky. I’m just getting started myself and plan to start shooting more with my telescope. I hope to update this post or expand it to second post as I do more photography after dark.
Thanks for reading. If you liked these night photography tips, please leave a comment below, or feel free to email me with questions (or just to talk photography).