Travel Photography Tips and Techniques for your next Vacation

Introduction
Travel photography can mean so many things to different people. For some, it’s the idea of traveling to exotic locations. For others, it means some time alone in the wilderness. It can also be a photo-centric journey to the nearest big city. What traveling can do is make you adopt a new mindset to your photography in new as well as familiar places.
Does a Parisian consider shooting in their home town “travel photography”? Or is it just us tourists who take on this mantle? And for starters, just what the heck is travel photography?
The goal of this lesson is to give you some travel photography tips as well as try to guide you to look at new mindsets when you have your camera in a special location. The one thing I’ll start off by saying is that travel photography (however you define it) is more about attitude than technique.
I’ve been fortunate to have traveled a lot over the years and most of those trips had a camera tag along. In this lesson, I’ll try to share my experiences and hopefully you’ll find some new ideas and thoughts to take with you on your next trip.
It’s All About your Attitude
If there is one thing I’ve learned while traveling, it’s that ‘things go wrong’. I don’t care how carefully you planned a trip (or didn’t plan) – something will change your plans. It’s how you deal with these changes that will make or break your trip.

Here’s a recent example: last summer I took a wonderful trip to the Maritime provinces of Canada. The one big photo-op was a life long dream of whale watching. All through winter and spring and up to the trip, I built up a grand idea of whales breaching in the sunset and dramatic dives that show the water dripping off their tail flukes. As it turns out, the sunset trips were all booked and the whales on the day of our tour were not in open water breaching and diving. Instead, they were in a cove feeding on small fish.
I learned long ago that nature does what it wants on its schedule, and apparently whales are no exception. Instead of worrying about the shots I wasn’t getting, I enjoyed a couple of hours of shooting an epic scene of the whales feeding and was grateful to experience this. A little bummed? Sure – but some whale photos are better than none.
My first trip to Europe was in 1990. I was fortunate enough to read “Europe Through the Back Door” before leaving. This book contains excellent advice about how to adjust your attitude while traveling. How to look for the smaller, out of the way locales rather than just hit the big tourist filled areas. It encourages you to forego the luxury end of travel for the greater experience of mingling with the locals.
This attitude is one I try to take with me where ever I go. It’s not always easy when you’re tired, jet lagged, lost or just generally confused. I’ve learned that planning will do wonders, but it’s usually the unexpected that creates the fondest memories.
Another example: I had visited Paris a few times and seen the sights and walked the streets of many of its distinctive neighbourhoods. One of my favourite memories is turning a corner one night and finding traffic was stopped because a circus had started up on the back of a flat deck truck. My quiet walk back to the hotel was interrupted by jugglers, fire breathers and dancers! You can’t plan for these things.
I could write pages about this subject, but rather than lecture you, I’ll just offer a few important thoughts. Plan ahead, but be ready for drastic change and go with the flow. Enjoy the ride, relax make some memories.
What to Bring
Of all the questions about travel photography tips, this seems to be the most common question for every destination. There is no easy answer, and for a big trip, I’ll spend weeks planning my camera gear and minutes planning my clothes. Everyone’s situation is different. Every destination is different. So how do you know what to pack in your camera bag?
I’ll try to help you narrow it down by providing a series of questions that you need to ask yourself. And then ask yourself again before you go.
Mandatory Items
Here’s a list of standard items that are in my bag for any trip:
Camera and lens
Cleaning supplies (cotton pads, blower)
Large plastic bag or garbage bag (just in case)
Spare camera battery and charger
Spare memory card(s)

How are you traveling?
Is this a road trip by car? Are you hiking up a mountain? Are you backpacking through Europe? Are staying at one hotel or a different hotel every night? There are dozens of ways to travel, and some are more conducive to travel photography than others. How you travel will likely determine the camera bag that you decide to take with you.
If you are planning on carrying a bag full of gear as you walk around a new city, that’s fine. Make sure you are physically able to carry the weight for as long as you plan to be out while traveling. The best way to test this is to carry your bag full of gear with you for a day. Walk around town, or cart it back and forth to work and carry it with you from morning until you go to bed. Is this the bag you still want to bring with you?
What type of photography do you enjoy?
This question might also lead into why you chose your destination. If you like wildlife photography, then maybe you planned a trip to Florida to shoot birds and alligators. If that’s the case, then your telephoto is almost mandatory. If you like shooting street scenes, then you main lens might be a wide angle. It’s very easy to think you need to bring everything, but if you’re not going to use, why carry it everywhere and risk the possible damage or theft?
I used to travel a lot with work and I took my Nikon D300 with an 18-200 zoom on almost every trip. This was a way to have a good camera with a wide range of focal lengths. On my Maritime roadtrip, I took my D800e, 70-200, 14, 50, 28-70, a flash, a travel tripod and a few other accessories. I knew I wasn’t going to be carrying the full bag all the time, so it worked out great as I could shoot scenery, wildlife, city scenes and anything else we came across.
The type of you photography you most enjoy will dictate your first choice of lens. Go with your strengths. If it fits into your travel arrangements, take that 400mm 2.8 and get the shots you dream about!
Do you like night photography? Make sure you leave room for your tripod (who needs that 2nd pair of pants, anyways?).
Think about what you enjoy most about photography and take the gear that will enable that style of shooting.
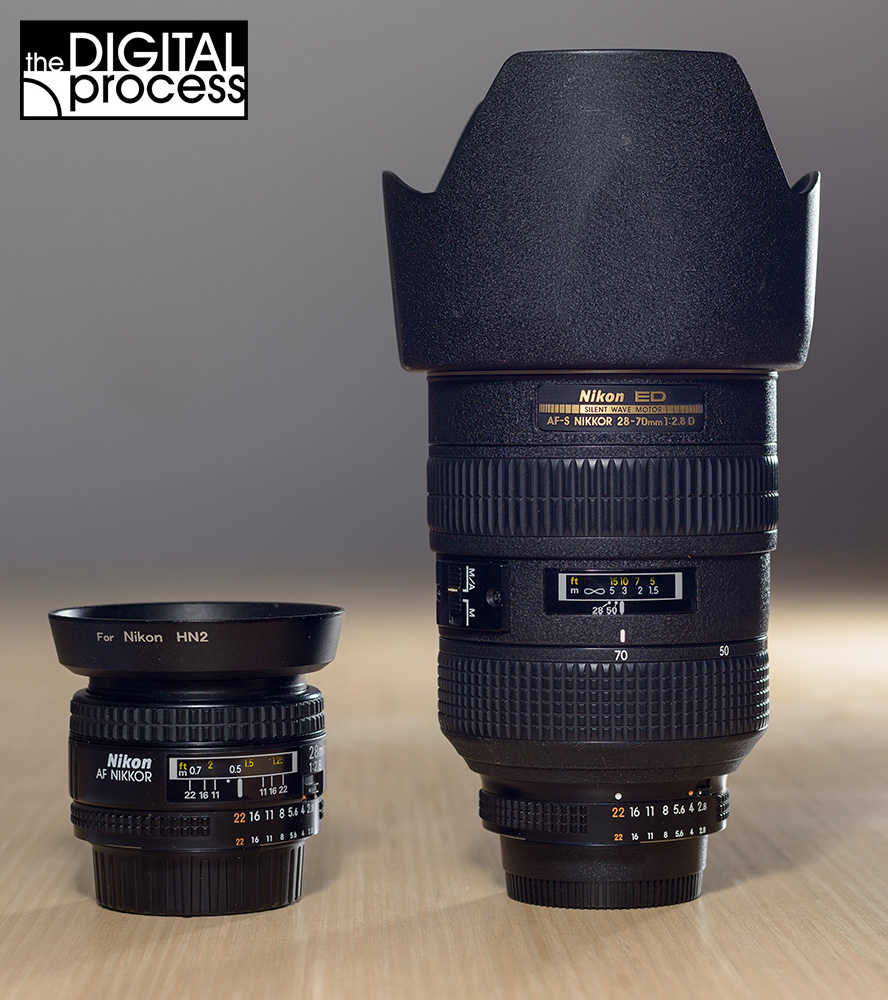
Zoom Lens vs Prime Lens
I’ve already written about the differences between zooms and primes, and while I’m a big fan of prime lenses, I’ll usually pack a zoom first. I can’t predict where I’ll be standing in relation to my subject, so I can’t expect to zoom with my feet. Instead, I want to make sure I can get the shot and the framing I want by using a zoom lens. Maybe my 18-200 isn’t as sharp as my 85, but given the many, many variables I would rather go with the zoom for ‘insurance’ to get the shot.
Depending on which lenses you have available, you might be able to pack two lenses and be covered. With a wide angle zoom (28-70 range) and a telephoto zoom (70-200 or 300), you are set for almost anything.
It’s up to you if you feel your beloved prime lens and its special qualities are worth packing. If you have the space, you might want to – just for the one special shot.
With that said, if you want to travel light with a camera and one lens, a 50mm prime is a perfect lightweight choice. The 50mm is also shorter and less conspicuous for street photography (also consider a 28mm or 35mm).
Bring a Flash?
I rarely use a flash on my travels, but if I have room I’ll throw one in. But that also means throwing in spare batteries (4 or 8 pack). So that’s some added weight that I might not use. It’s the gear I “might use” that starts to add weight to my camera bag. If you use your flash a lot while outdoors, or have some special situation where a flash will be needed – bring it. But if you’re just going to lug it around for 2 weeks “just in case”, consider relying on the built in flash unit of your camera.
Some Examples of What to Bring
To pack light for a given situation, here’s what I might do.
Weekend in a new city: If I’m exploring a new town and want to walk around a lot and see the sights while shooting what ever comes up, I will likely stick to a body and a wide zoom.
Day Hike: I’ll be the first to admit I’m not much of a hiker, so if I’m hiking for the day or afternoon, I’ll pack light. I know that most shots will be landscapes and I’ll be thinking wide angle. For this, I’ll pack the body and wide prime (20 or 28mm). If I’ll be out at sunset or twilight, I’ll likely bring a travel tripod as well.
Week long Road Trip: Traveling by car means I’ll be bringing more gear than almost any other trip. Even if I fly to my destination and then drive, I’ll bring a backpack camera bag and fill it. It will sit in the back seat or trunk ready for the next stop. At a minimum, I’ll have a body, wide zoom, telephoto zoom, super wide (14mm), flash, 50mm and travel tripod. I’ll usually bring a smaller day bag as well.
The bottom line is that it’s ok if you over pack, but don’t whine about having to carry a heavy bag around town all day (remember, plans can change!) and gear only gets heavier as the day goes on. If you have a compact point and shoot camera, or a good phone camera, consider that part of your overall plan. You might think a casual afternoon without ‘the big camera’ is fine, but bring a compact or camera phone along for those casual moments.
Remember the Memories

It’s very likely that you’re taking a trip to relax, or see something that interests you, or to challenge yourself by going outside of your comfort or any other number reasons. In the end after the time has gone by, the money has been spent and you’re back at work – you are left with one thing: memories.
Think back to other trips and trigger some memories. It’s likely that your most recent trips will let you recall sights, sounds and smells – perhaps a memorable day walking through the outdoor market. With older trips, maybe from your childhood, you might recall a special moment or two, but also end up relying on the photographs that are in the album to fill in most of the trip. That’s why we take our camera.
Did you see the photo of the Eiffel Tower at the top of the page? I shot that in 1990 and it is my first close view of the famous landmark. I turned a corner, looked up, and BAM – there it was! My first reaction, oddly enough, was “Wow… it’s brown?”. That’s a unique memory, but the photo I shot from that very spot will always remind me of that moment.
You never know what will inspire you. I always shoot a lot when I’m traveling. Not every image is going to be framed and hung up, but each image I look at later takes me back to single moment on that trip. Not every image is going to have a deep emotional impact when you look at it 10 years later, but there’s a good chance that some photos will remind of something already forgotten.
I consider travel photographs a link back to my past. I have some favourite photos that take me back to the exact place and time that I shot them. I have some I look at at wonder, “Where the heck was that??”. One thing is for sure, I’ve never regretting taking a photo – but I have a lots of instances when I’ve regretted not taking one.
The Postcard Syndrome

All of us have seen classic images of world famous landmarks and then copied that oh-so-familiar view when we see it in person. There’s nothing wrong with getting that “postcard view”, but please don’t stop there. Think about what YOU enjoy about the scene. Try to take the photo which represents how YOU feel at the time.
Here is a photo of the Lincoln Memorial in Washington DC. There were thousands of people taking photos of it the evening I was there. 90% of them were lined up dead centre in front of this symmetrical landmark. My approach was to go in, get low and include both the statue and the carving of the Gettysburg address (light panel on the left) as well as the grand columns. To get good depth of field, I used a small aperture and slow shutter speed (on a tripod) and blurred the tourists as they walked around. This is ‘my‘ take on the Lincoln Memorial.
Shoot the postcard scene then take the time to capture your personal view. Try different angles. Go back at a later time to see how the lighting has changed. Do a long exposure. Get low – get high. Use a wide angle or telephoto to get a different perspective. This is one of the reason why I like to bring an ultra wide angle lens with me. On my first trip to Washington DC, I bought a 12-24mm zoom at a camera store there just to shoot the large buildings and monuments.
Shoot the People

I am not known for my portraits or other photos of people, but when I travel I try to get out of my comfort zone and shoot people. The more different the culture of your destination, the more interesting the people are to us. Before you start photographing every interesting person, make sure you understand the local cultures and know what is considered acceptable or not. If you are ever in doubt about whether you should take someone’s photo, just ask the subject.
If you are shooting the locals, think about what makes them different. Do they wear interesting clothes? Do they have some different rituals? Maybe they just have a joy for life you admire. What ever the reason is that makes them interesting you, try to capture that aspect.
Although our cultures can be very different, it’s very reassuring to learn that people are very similar around the globe. Treat people with the respect you would expect in your home and you’ll find that most people won’t mind posing for a quick photo. Many of the best memories are the ones which involve good times with complete strangers.
Off the Beaten Track

It’s very easy to follow the crowds and see “the sights”. If you’re traveling on your own, you might feel safer where there are groups of people, so it’s easy to miss out on some fun, interesting views. If you pay attention to your surroundings, you should be safe in most major tourist areas. If you are hiking a remote trail, it’s a good idea to let someone know where you’re going. Traveling is the best time to ratchet up your common sense.
This photo on the right is one I shot in Venice (it’s an old film scan). I was amazed at how products got moved around town without cars or trucks. While walking along some of the many narrow streets, I came up behind this worker moving a panel that was almost as wide as the street. It summed up perfectly my fascination with transport in this classic city. This isn’t a typical Venice image, but it’s a very typical Venice scene which takes place daily around town.
Getting away from the crowds can also be achieved by visiting locations first thing in the morning. My first morning ever in Paris was memorable as I was up early thanks to jet lag. I was able to watch shopkeepers open their stores, street cleaners sweep the gutters clean and watch the city come alive. On another trip, I had the ancient site of Ostia Antica near Rome to myself, just by arriving a couple of hours before the tourist buses.
If you are visiting any kind of popular tourist area, you’ll get a very different vibe by showing up outside of the busy hours. From sunrise until about 10am you are usually safe to avoid crowds. From 7pm to the end of the night you’ll get a very different perspective. You might see the masses nearby, but they’ll be in the restaurants and bars, while very few of you are enjoying a relaxing visit to the uncrowded sites.
Getting the Perfect Shot

Now you’re at the point in the lesson where you can put it all together. You’re on your dream trip. You’re relaxed and taking things as they come and adjusting to change. You’ve found a way to avoid the crowds and you’re ready to shoot that image that you just KNOW will be the one that goes up on the wall. Now what?
Thanks to digital technology, we aren’t limited by the number of rolls of film we brought with us. If you’re ready to shoot that special image, shoot a lot frames. Shoot at some different angles. Shoot at different exposures. After shooting for a bit, stop and reevaluate the scene and the situation. Think about the ONE thing that brought you this place and time. Try to capture that feeling!
Is the lighting not perfect? Maybe today isn’t the best day – can you come back tomorrow and try again? Don’t think of locations as a checklist, and once crossed off are not worth going back to. I rarely get the shot I want the first time I visit a spot, and never with the first frame. The photo of the egret in this section was the 37th shot I took of this bird. Not an extreme amount of frames for wildlife photography, but I was able to relax and let the bird walk around and get the right light with the right pose.
Relax, you’re on vacation (this is number 1 tip of travel photography). Don’t be afraid to experiment with your settings. Don’t be afraid to wait and see what happens. One my all time favourite photos is one I shot of the Rome Coliseum. I picked my spot and waited for an hour as the sun began to set. I found the perfect blend of dusk and the spot lights as they lit up the monument. I’ll look at the photo and remember the relaxing time I spent watching people and stray cats wander about.
Other Things to Remember

GPS – On my last big road trip, I brought my GPS attachment to record the latitude and longitude on the image file. This was a big help, because after shooting along coastlines for two weeks, it’s not easy to remember exactly which cove I took which shot at. GPS allows you to review your images, place them on a map and make sure you put the correct location with your photo.
Safety – Travel is almost always safe. If you’re going to a location where there are known dangers, pack accordingly. Don’t be flashy with cash or gear. Make sure your equipment is insured (itemized homeowner or renter policy). Keep your full memory cards in a safe place. Always be aware of your surroundings. It’s easy to get so focused on your photography that you lose track of something, like where you put your camera bag. Each location has its own particular concerns: learn them.
Computers – I used to travel with a laptop on every photo trip. These days I trust my memory cards enough to just fill them up and download them when I get home. Sometimes I will set up my dual slots so that I can record images to both cards with one backing up the other. Use quality memory cards and a quality card reader, there’s no reason to be cheap here.
If you have the space and want to take a laptop, then use it to back up your photos as you go. Don’t delete the original photos on the cards and they can be backing up your laptop (or save to the cloud). Don’t fall into the trap of spending time processing your images while you are away unless you have ABSOLUTELY nothing else to do.
Talk to People – If you are in a new area, ask your hotel staff, waiters and shopkeepers about any places to photograph. Most people are proud of where they live and will offer you their unique perspective and provide locations that you won’t find on the travel websites. If you shoot a location on someone’s advice, show them photos – let them know their advice was taken.
When in Doubt, Go Wide – If you’re not sure about how to tackle a new location or scene, start shooting wide to take it all in. The more time you spend somewhere, the more you’ll notice what makes it special and you can start to narrow down your view.

Capture the Details – Many of my favourite travel shots aren’t the vast open scenes, but just a small detail that was captured. Some little scene that helps tell the story of ‘place’. Look for interesting architectural details and get close. Look for details that you can include as part of the foreground for a wide shot. Did something just catch your eye? Take a moment to capture the little scenes most people pass by.
Set an Alarm – Yes, I know… you’re on vacation, but why miss the best light and the best time of day? Get up early, enjoy the morning light, avoid the crowds and see the world in a different light. You can always nap in the afternoon, then catch the golden hour as the sun sets.
Don’t forget about Composition – It’s easy to think that just because you’re in a stunningly beautiful location your shots will be awesome. It’s far too easy to start shooting and think you’re getting great shots just because you’re in a new place to shoot. I know from experience, my first shots near a landmark are boring, conservative and done to death. Once I get over the initial rush of finding something new, I can stop ‘looking’ and truly ‘see’ what is in front of me. Check out my guide to composition for more tips.
Do your homework – I find part of the joy of traveling is the pre-trip research. I love to look for special locations in the area I’ll be near and learn some of the history. Thanks to the internet, we don’t have to rely on 2 or 3 travel books to plan a trip. I’ll look at everything from restaurant reviews to Google Image searches. There is more information out there than you’ll ever need and if you have specific questions you can ask an online forum.
Learn to Use Your Gear – If you have a new camera or lens, 1000 miles from home is not the place to learn how it works. Take the time at home to learn how to control your camera, what the buttons on your lens do and how your flash works. Take the manuals with you. You really don’t want to miss a once in a life time shot because you didn’t know how to set your camera.
Find the Right Shooting Mode – If I’m shooting while traveling, I will usually be in Aperture Priority mode. I want to control the depth of field on most shots. If there is some action going on, or a special event, then I’ll switch to Shutter Priority. If you’re not 100% familiar with the settings you’re using, you just might miss ‘the’ shot. Don’t be full of regrets about the one that got away.

Keep a Journal – Writing a journal at the end of the day is an optimal way to review the day. It’s fun to look back on years after the trip and remember the little things that made a day special.
Remember it’s NOT about the Gear – Which will be the most memorable shot of your trip? The classic view of the landmark you shot at dawn with your perfect settings and the camera on the tripod – or – the group selfie you shot at dinner after a few glasses of wine with your new friends you shot on your phone? Which image will make you smile more? Which image will make you want to relive the moment? As long as you have a camera with you, you’re set.
Put the Camera Down – Ok, this might not seem like a photography tip, but it actually is. If you are continually shooting and carrying your camera and worried about the right f/stop, you’re missing out. Take time to actually travel and not just be a tourist. Traveling means that you are immersing yourself in a new environment. That’s hard do with a camera always on your shoulder. A camera can create a barrier as you use to view the world, and the world uses it to view you. (But take your phone with you, just in case.)
Look for the Story – All classic photographs tell a story. Try to get beyond taking a series of pretty pictures, and get to the soul of your destination. It’s fun to imagine yourself as being on assignment. Take that approach when you visit the local flower market – what makes the market special. What are the various jobs people are doing? Who are the customers? If you don’t know the story, ask someone.

Start Local – Going on a big trip? Not sure how you’ll do as a travel photographer? Just practice! It’s that easy. Drive to the next town or city and start shooting. Even if you’ve been there dozens of times, look again as a photographer. Try different settings, play tourist, see with fresh eyes. After the shoot, review your images and see what you like, what you don’t like and what inspired you to take the shots you did. You might not get the chance to travel to ‘dream destinations’ every year, but when you’re someplace special you will be glad you practiced.
Shoot Some Video – If you’re not familiar with shooting video on your camera, learn how to do it. It’s so easy to shoot a few minutes of video in a location and really capture the sights and sounds. It might only be a minute, but video captures an ambiance that still photography can’t match.
After the Trip
The first thing I do with my images after a trip is put them all in a folder on my hard drive, which is backed up. I’ll create a new folder with the name of the destination, then a sub-folder called ‘card-dump’ where all of my raw images go (and multiple folders if I’ve shot several cards). I won’t do anything to my image files until they are all downloaded and backed up.
Once that’s out of the way, review and enjoy the trip down memory lane. Seeing the photos for the first time on the ‘big’ screen of your computer monitor is always fun. Don’t start getting critical and delete a bunch. You might find that there’s a photo you can crop, or maybe you shot for a particular reason you don’t remember right now. For travel photos, I don’t delete my RAW files unless they’re out of focus or too poorly exposed to be used.
Some programs for organizing photos allow you to rank images in a 1 to 5 rating system. Do this if you like as you go through them. I usually copy some files into a ‘Keeper’ folder for later reference.
As you work through and edit your images, save your working file from Photoshop, Lightroom or which ever editing program you use and save out a smaller JPG for sharing. Organize your folders as you might have thousands of images to sort through.
As you organize and edit, remember that this isn’t your last chance. You can go back to review and re-edit as much as time allows.
Sharing
It is so easy to think you have 100 awesome shots from your trip. Maybe you do, but more than likely, you don’t. How you share your images is up to you, but most people enjoy sharing photos from their trip on social media. Before posting an album of 100 photos, consider thinning it down. Look at it from the viewer’s perspective. Are they going to want to view 100 photos if they are similar? How about if there is no clear subject? Be selective.
You can share albums based on different legs of your trip, or by destination. If you take the time to add a caption to each photo, people will enjoy the story behind the photos and become more engaged. Maybe you have 5 different destinations from your trip – consider 5 separate albums posted on 5 consecutive days. As the old show biz saying goes, “Always leave them wanting more”.
Another aspect of sharing is to send some photos to the people you met on the trip via prints, email or social media. If you have some fun photos from good times, share them with the people who made those memories.
Get some prints made. Depending upon your home, you might have room for a big enlargement, or maybe just an album of 4×6 prints to put on a shelf. Prints are always a good idea. What better way to relive a magical moment than walking past a framed print in your hallway.
Another excellent way to share and view your images is to get a book published. These days its quite affordable to design and publish a single book. Companies like Blurb and Shutterfly make it easy to upload your shots, add text and get a book in the mail within weeks. Look for sales and online coupons before ordering to get the deal. Books are also perfect for sharing your photos with traveling companions or friends you made during your trip.
Conclusion

This is a long lesson, but it really comes down to two words: Have Fun. Unless you’re a paid photojournalist on assignment, it’s not the end of the world if you don’t get every shot on your list. During every trip, you will be making decisions between relaxing and enjoying the destination or capturing the scenes in your camera. Don’t get too hung up on the photography side to neglect the traveling side.
When you are taking a photo, think about the image you expect to record. Shutter speed, aperture, ISO – the exposure triangle – all come into play on every shot, even in Europe! Actively think about composition. I love Paris, but I’ve seen some incredibly boring photos of the City of Light (some of them mine!). Taking a few moments to properly compose a photo is worth it, especially if you may never return to that location. Level horizon, rule of thirds, interesting angle… put some thought into it.
Be safe, and as mentioned earlier, each location has it’s concerns. Maybe it’s rattlesnakes in the desert or pickpockets in Rome, you need to use common sense and be aware of your surroundings.
I hope this page helps you get some killer shots on your next trip. If you have any questions, feel free to email me at: info@TheDigialProcess.com. You can see some of my travel photography on my blog: artwhitton.com/blog/
Thanks for reading – Art