Introduction to Budget Flash Accessories (Updated Mar 2017)
This post is about some of the various ways that I use my flash. I’ll show a number of examples of how you can modify the effects of your flash using cheap (or inexpensive) accessories. I don’t mind spending money when I need to, but if I can turn something into a 99¢ camera accessory, I will. 😀 I think all of these items shown below can be bought new for under $50 – most are under $20.
My gear might be Nikon, but this will apply to any camera brand. I’m using a Nikon D800e and a single SB-800 flash unit. The Nikon CLS (Creative Lighting System) allows me to put the flash off-camera and trigger it remotely from the built-in flash in the camera. I can also control the power settings using the camera’s menu system. I love this set up. I have 3 of these flash units and can give each one a different power setting if I need to. But for now, let’s keep it simple with one flash so you can see the effects of each modifier on the image. For each shot, the flash stayed in the same place and I added the modifier.

I’m not going to get into the technical details of how to set the flash, but if you have questions feel free to email me. All of these example images were shot on the same camera setting (Manual – f8 – 1/320s – ISO 100 – White Balance: Flash – Nikkor 50mm 1.4 lens. All of the images are as they came out of the camera other than being cropped and resized to better fit on the page. Depending upon the accessory I used, I changed the flash output to get a similar overall brightness.
What to look for in these examples:
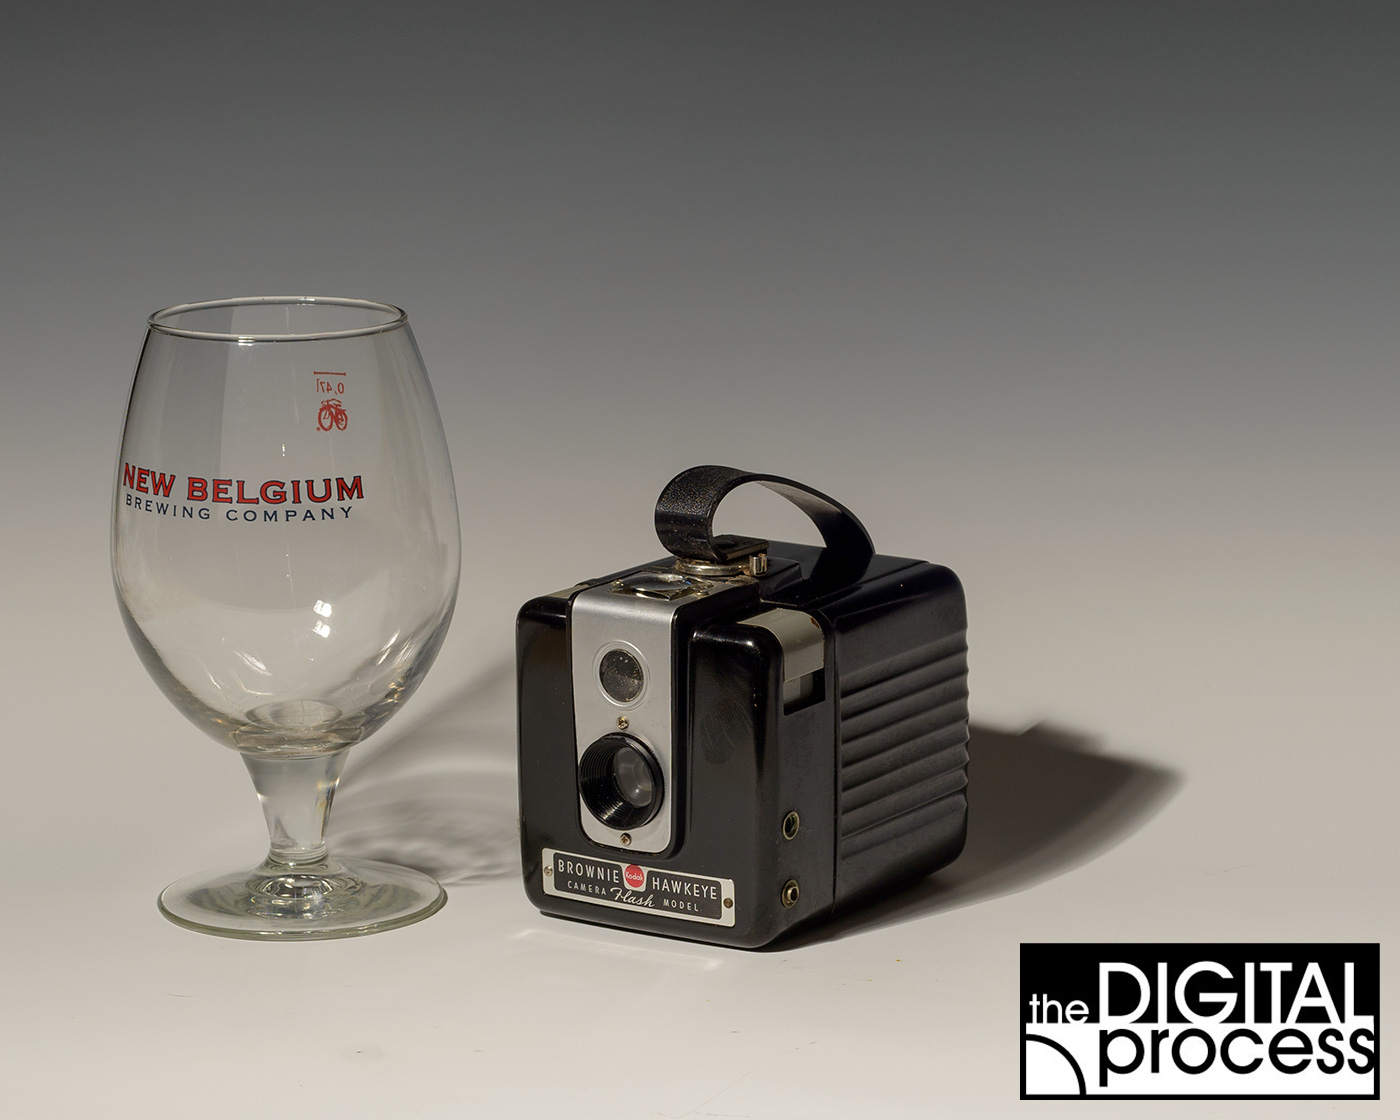
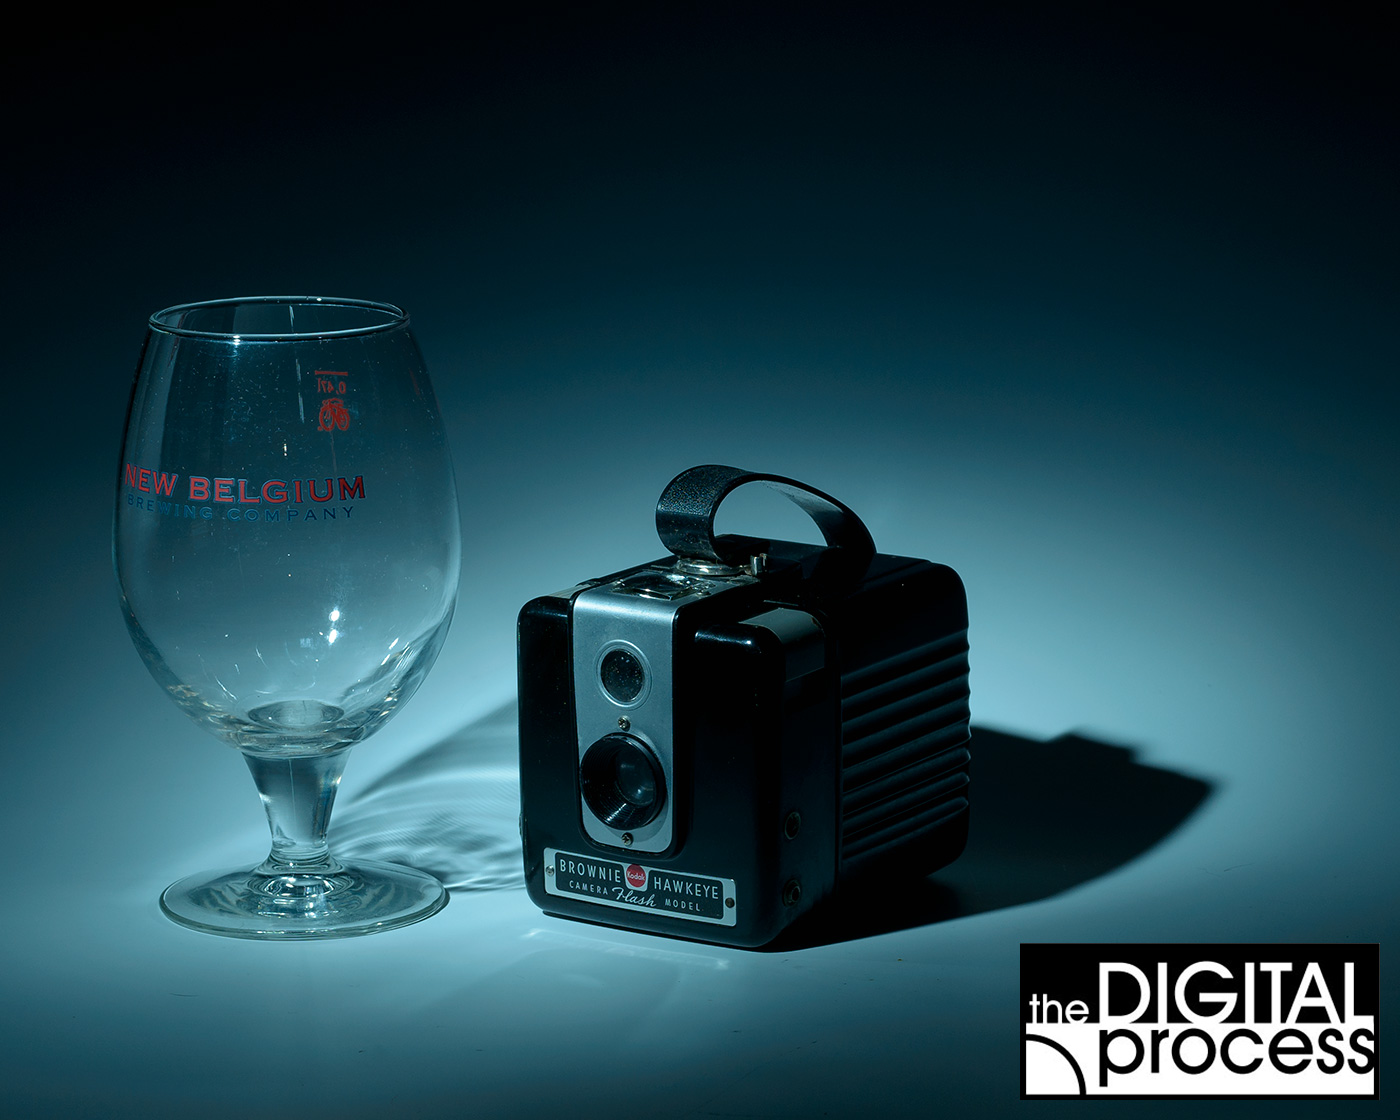
When I am working with any light source, but flashes especially, I try to be aware of two things: shadows and reflections. Shadows can give your image depth and feeling, but can also cause important parts of the subject to appear too dark. Reflections can cause unwanted bright spots that detract from the photo. Moving and adjusting your flash unit allows you to control these two potential problems. I choose a dark subject (old camera) and a bright subject (glass) to show how these reflections and shadows vary depending upon the subject.
Example 1: Full on Flash – no modifier

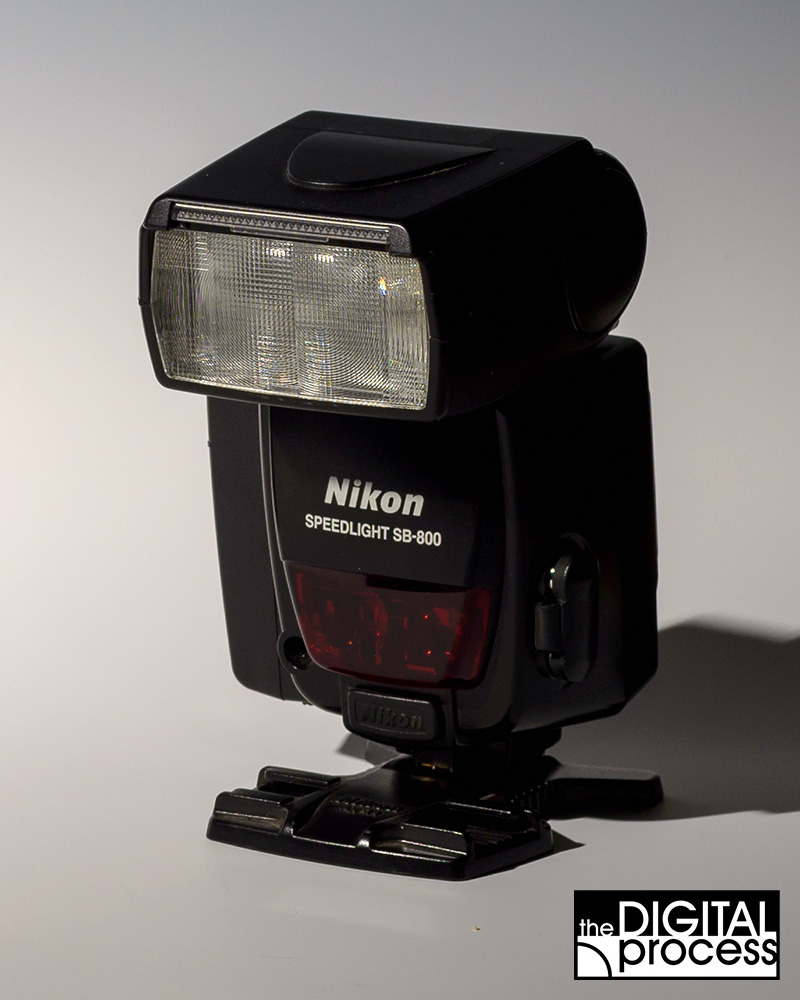 Here is the “Baseline” image. As expected, I have a dark harsh shadow behind the camera. As I have the flash up higher and at an angle, there aren’t any large reflections on either subject.
It is rare when I use the flash on the hot shoe of the camera, and I’ll usually position it somewhere at an angle to block reflections and awkward shadows. If you don’t have any way of diffusing the bare flash, you can always experiment by changing the distance of the flash to the subject. You can also use white cardboard to reflect the flash and also diffuse the light.
Example 2: Built in Diffuser

 Many flashes like the SB-800 come with a built in diffuser that can slide out over the front of the flash. I will use this almost every time I use my flash. I will get a little bit softer light when I use it without much loss of light.
In this example, I kept the flash power the same as the bare flash to show that you will lose a little power with the diffuser. At this somewhat close distance, the diffuser hasn’t made a great deal of difference.
Example 3: Built in Bounce Card

 Another option that I have built in to the SB-800 is a small white card that I can use to bounce the light off. This gives me an indirect light source. To use, I tilt the flash up 90° and extend the card. I’ll usually use the built in diffuser with this card.
Again, at a closer distance like this (about 3 feet / 1m) you won’t see a lot of difference, but this option is great for outdoor shots where you don’t want a lot of flash, but maybe just enough to light up your subject’s eyes. You can also duplicate this effect with a business card and an elastic band if your flash doesn’t have this built in.
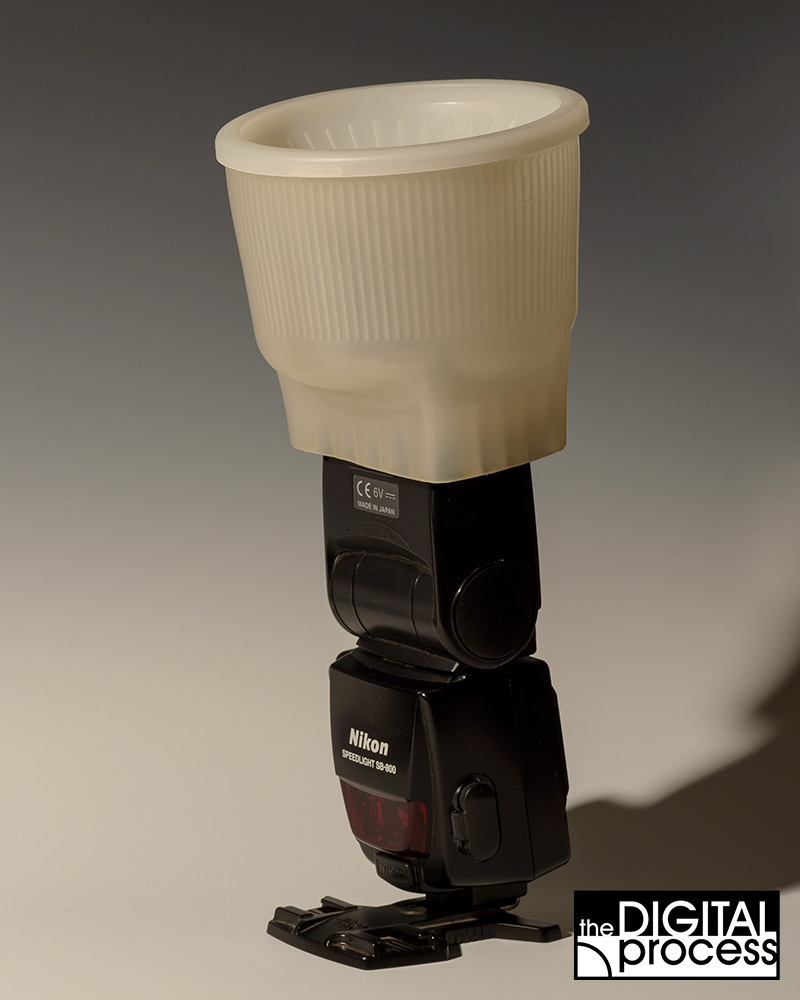
Example 4: Included Flash Dome Accessory

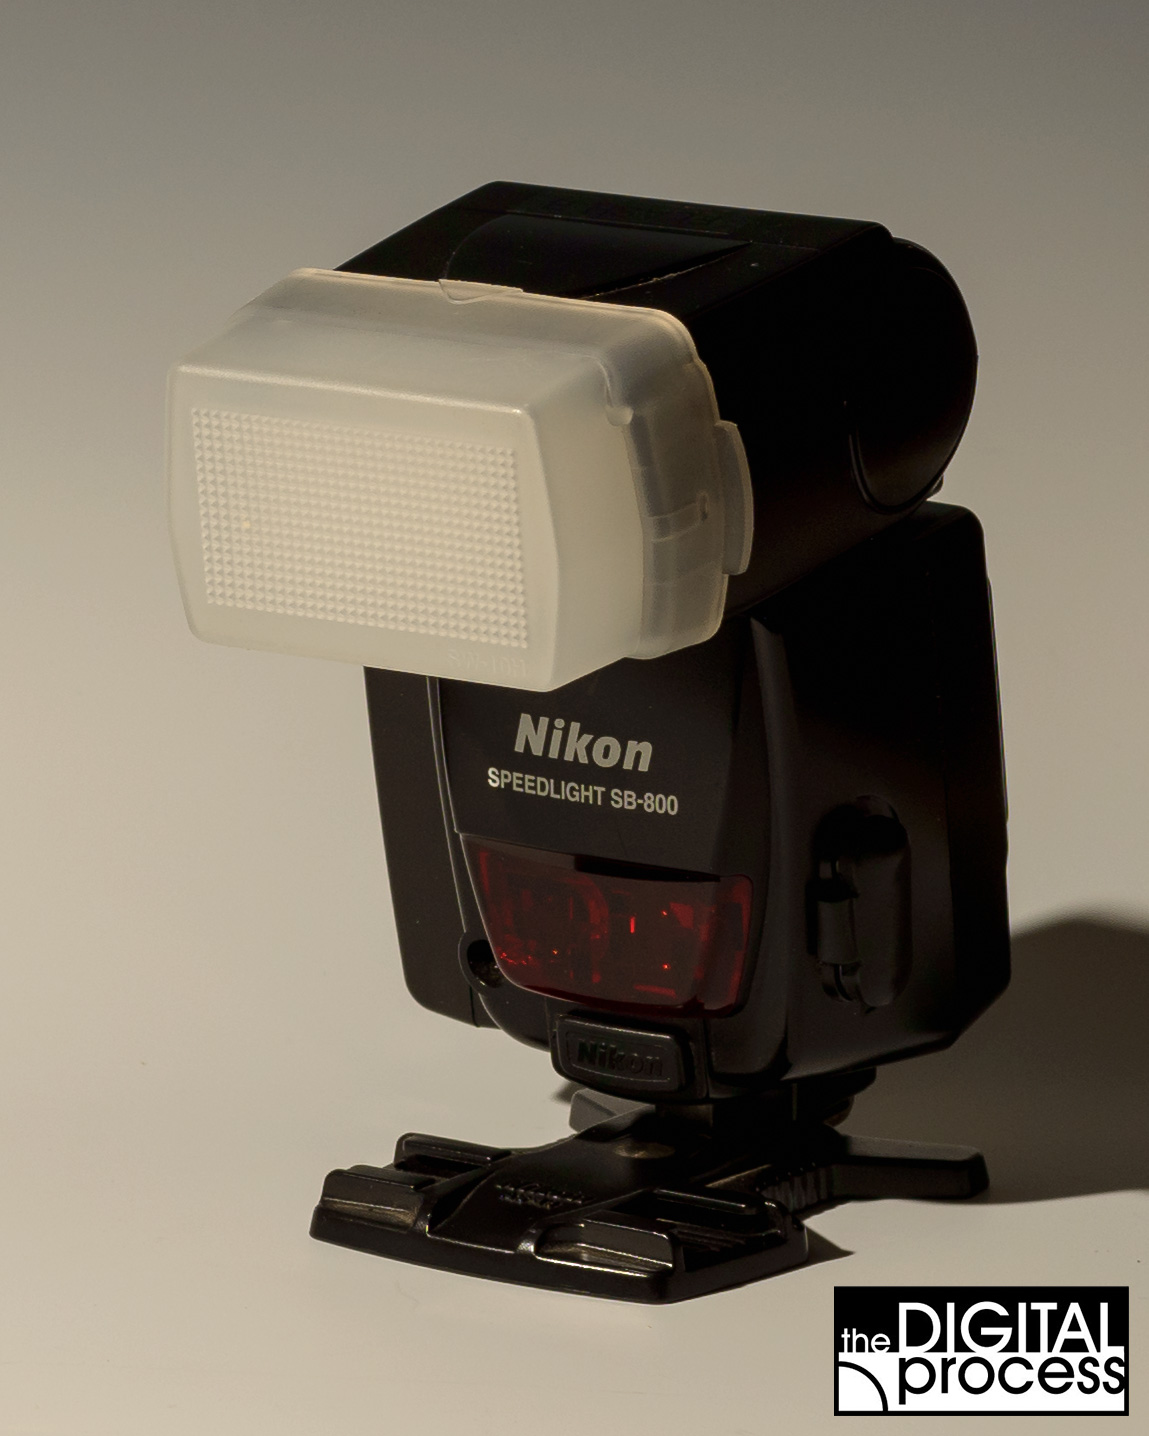 The next of the budget flash accessories I used was the plastic dome that came with the flash. This is just a plastic diffuser that fits on the end of the flash head and softens the light in all directions. I shot with the dome pointing at the subjects, but you can also point your flash straight up for even more diffusion and a little softer light (and less power).
So just with the options that came with the flash, I can use straight flash, the diffuser, the card or the dome. You also likely find these accessories on eBay for your flash if you don’t have them or the flash did not have them as standard equipment.
Example 5: Using a “Flash Sock”

 There might be a technical name for budget flash accessories, but I just call them my flash socks. They are a small cloth diffuser that is white on all sides, but the outside back panel is black to throw more light forward. They attach to the flash head with their stretch band and so they’ll work on almost any flash. And they are CHEAP! This is one of the best dollar-to-use camera accessories that I have.
These are a perfect accessory – cheap, easy to use, compact. I can put these anywhere in my camera bag or put them in my pocket. If you’re looking for a simple diffusing option, this is the way to go. ($5 at Amazon)
Example 6: Using a Snoot
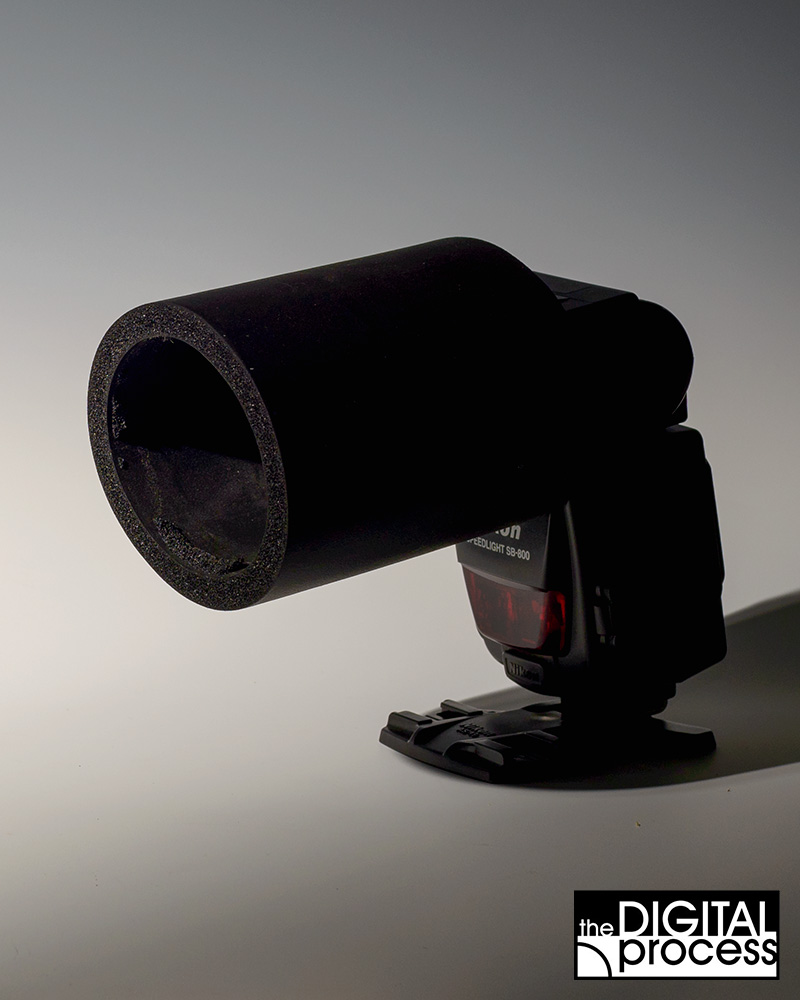 If you look online, you can find all kinds of snoots (which are a cone to shoot light through) and they can cost about $20 and up. I made my own for 99¢ from a black foam drink ‘koozie’. In fact, I splurged and made 2! To make your own flash snoot, just buy a black coozie and tear the bottom out. Stick it on the flash head and shoot.
What a snoot does is concentrate the light into a tighter beam. This is the opposite of diffusing the light out into a wider area for softer shadows. Here’s a shot with the flash pointing at the subject and the snoot added at 1:2 power.
Notice how the background is dark as the light is funneled towards the center. The shadows are harsh and dark. Snoots can also be used to get a little more distance from a flash or when you want a direct hard light.
Example 7: Using a ‘Fong’ Dome

 After the 99¢ snoot, this one will cost a little more. The Gary Fong dome
 will set you back about $55, but a lot of people like them. I don’t use this one a lot with macro work as I can’t adjust it much, but it does give off a nice diffusion.
This is a popular accessory for portraits as it gives off the soft diffused light that can help with an outdoor portrait, and the flash isn’t blinding your subjects. The top of the dome can either be removed (less light goes forward) or replaced with a warm toned cap to help with skin tones in a portrait.
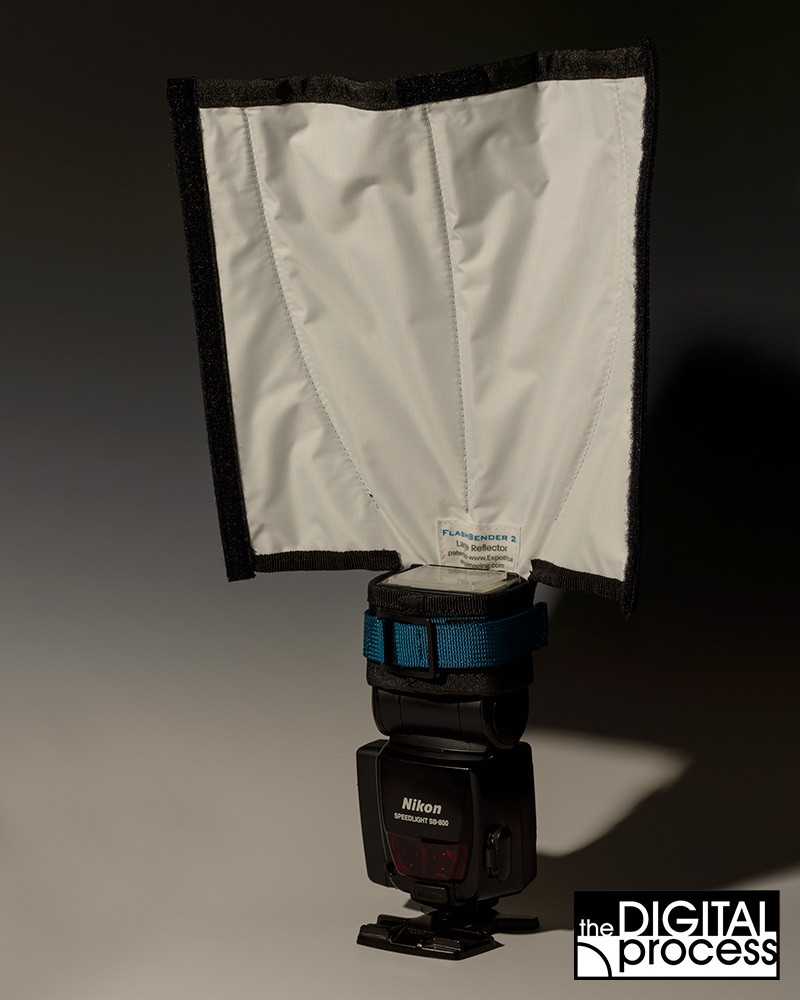
Example 8: Rogue FlashBender (small)
 This last accessory is one bought a year or so ago and I really like it. The small Rogue FlashBender
 (7″x10″ / 17x25cm) is like a white card you can attach to the flash head, but like the name implies, you can bend it to shape your light. When I use this with macro subjects, I can fine tune the light to get it where I want it and make adjustments as I work.
You can use the black side as well, but I haven’t found a need for that yet.
For a soft, versatile diffuser, you can’t go wrong with this one.
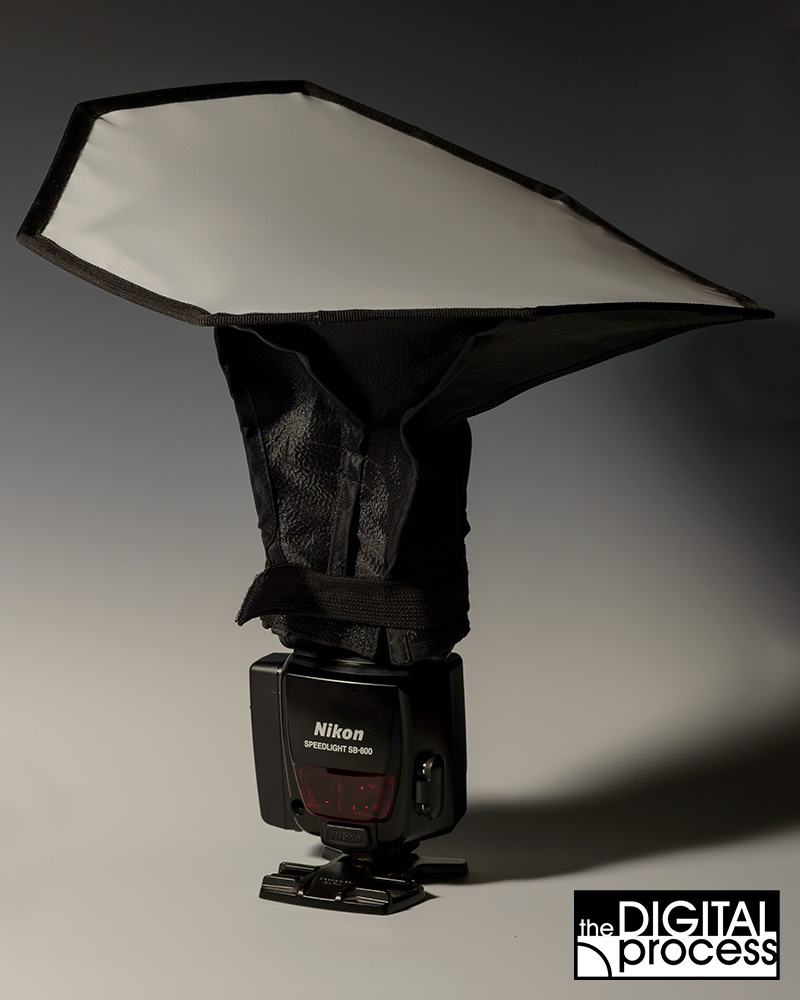
Example 9: Rogue FlashBender (large)

 I enjoyed using the small FlashBender so much, I recently purchased the large version
. It is 11″ x 10.5″(28cm) and gives off an even softer light.
The newer version (2) has a great strap and buckle method for attaching to your flash. Quick and easy! It also folds flat so it doesn’t take up much room in your bag. You can also curl the unit onto itself to create a snoot. These are so versatile that anyone using their flash a lot should have one.
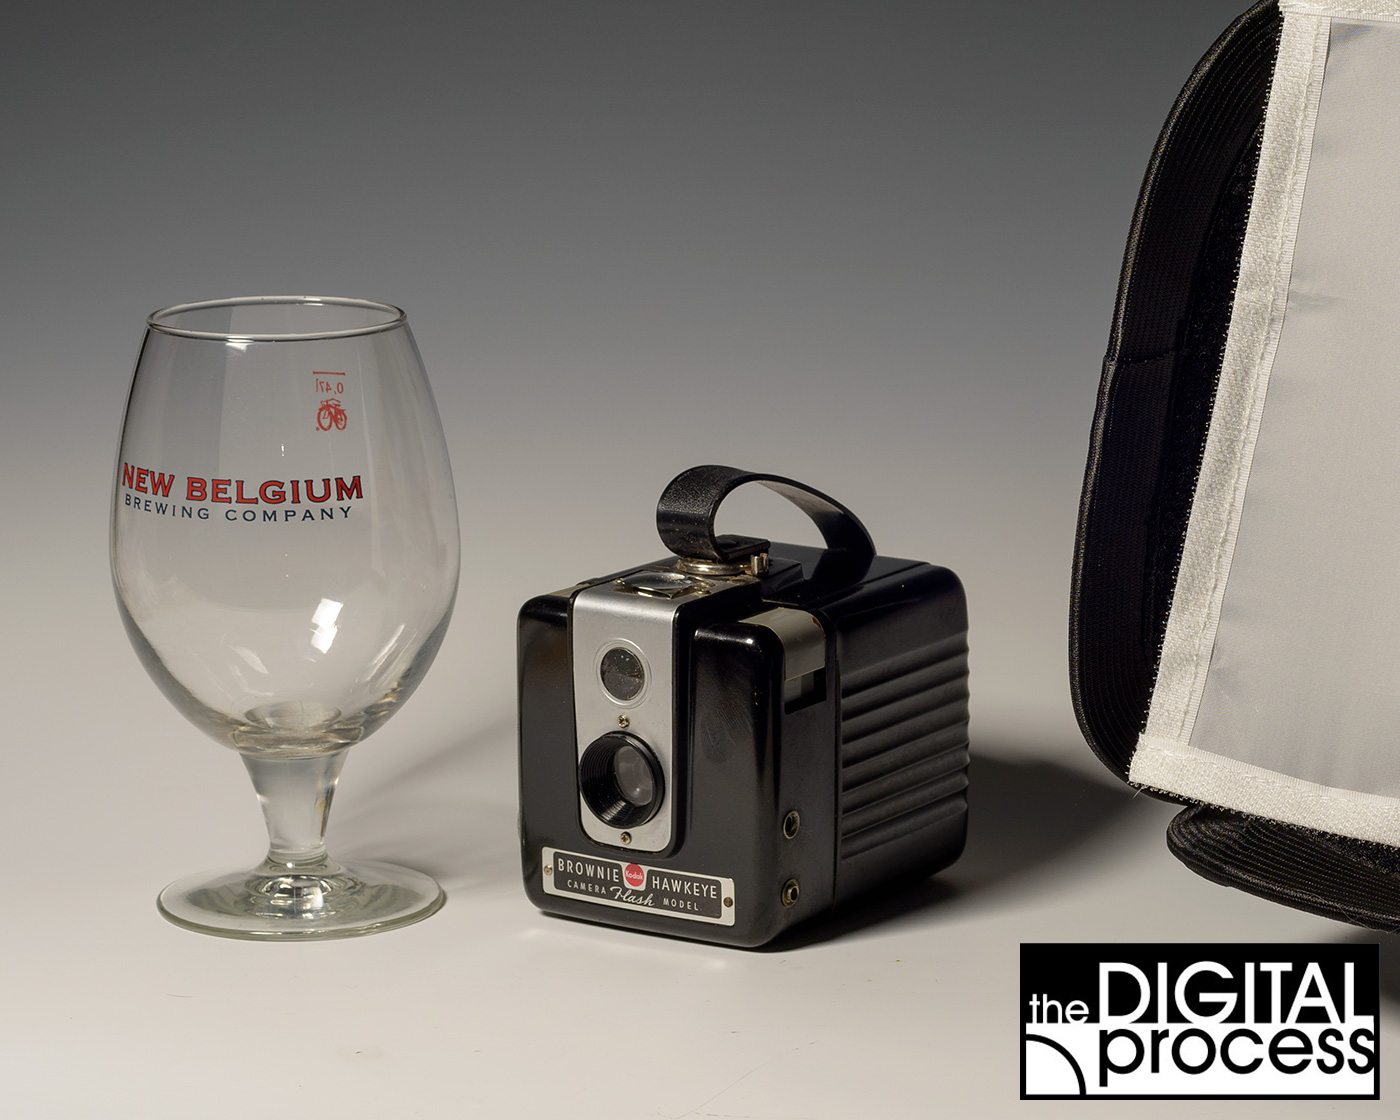
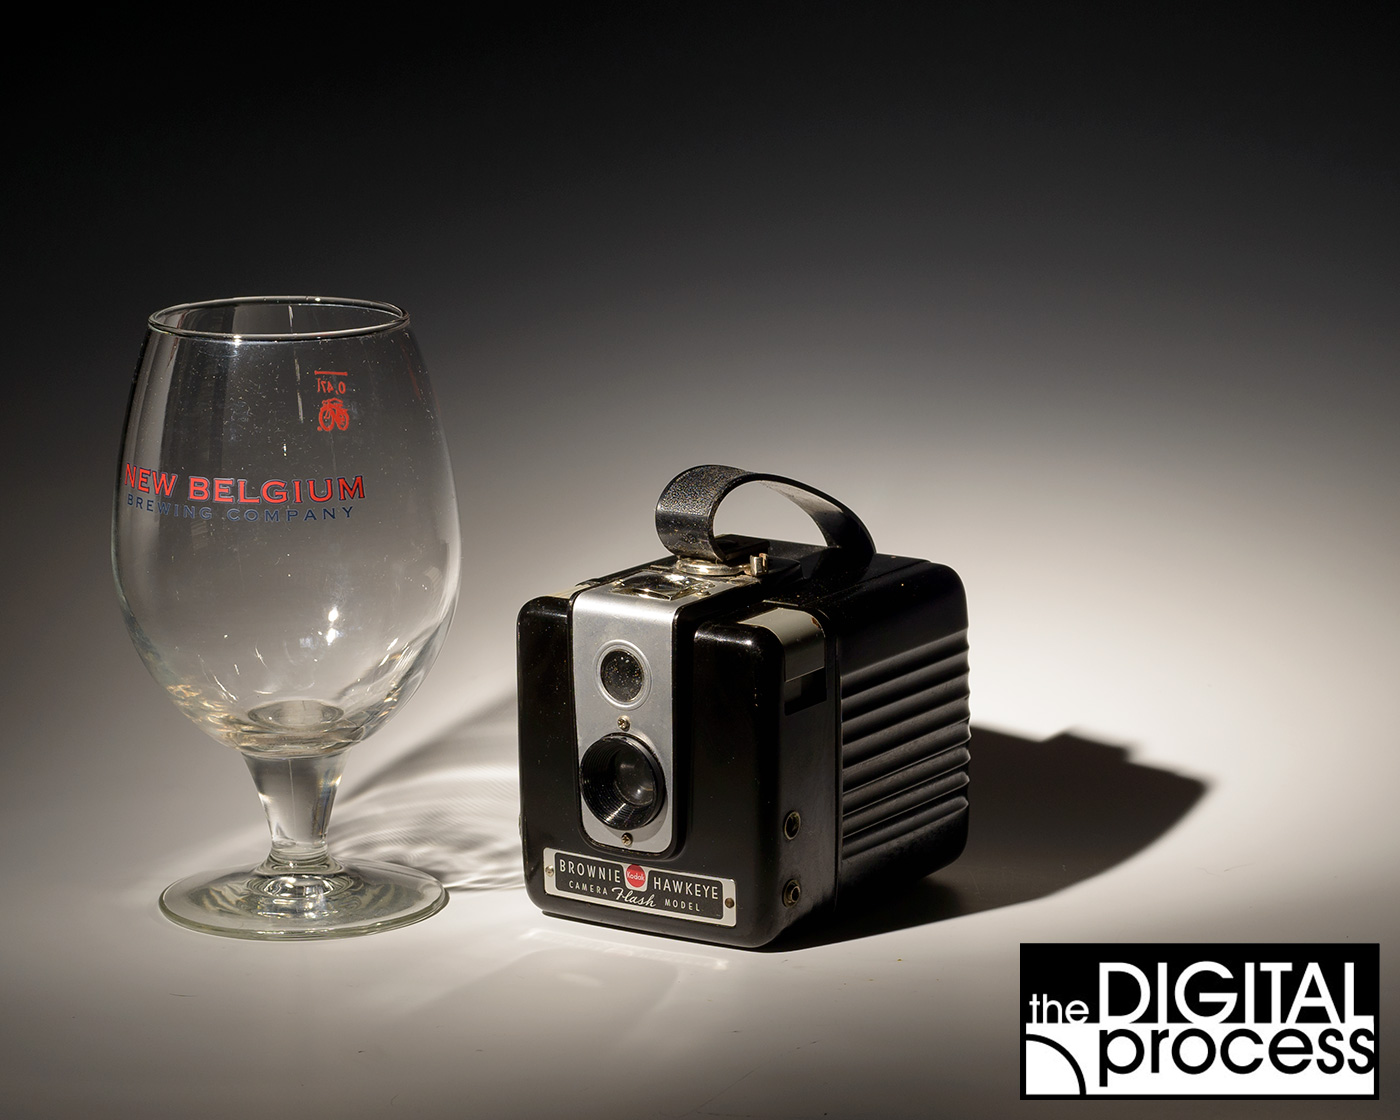
Example 10: Collapsible Octagon Softbox

 This is one that I use a lot. It gives me a wonderful soft light and soft shadows. It’s also another collapsible, compact accessory that fits anywhere in a camera bag. It’s an eight sided 12″ / 30cm unit. If you look at the glass in the sample above, you’ll see one problem. The larger your diffuser, the larger the highlights you might get on your subject. This applies to a glass and to people’s eyes, so you need to watch for this when using a larger diffuser.
Again, these Octagon Softboxes are cheap and one problem I see is that they don’t always expand the same way. You need to be careful to pull them out to their full size before using them. They attach easily to the flash with an elastic belt built into the unit.
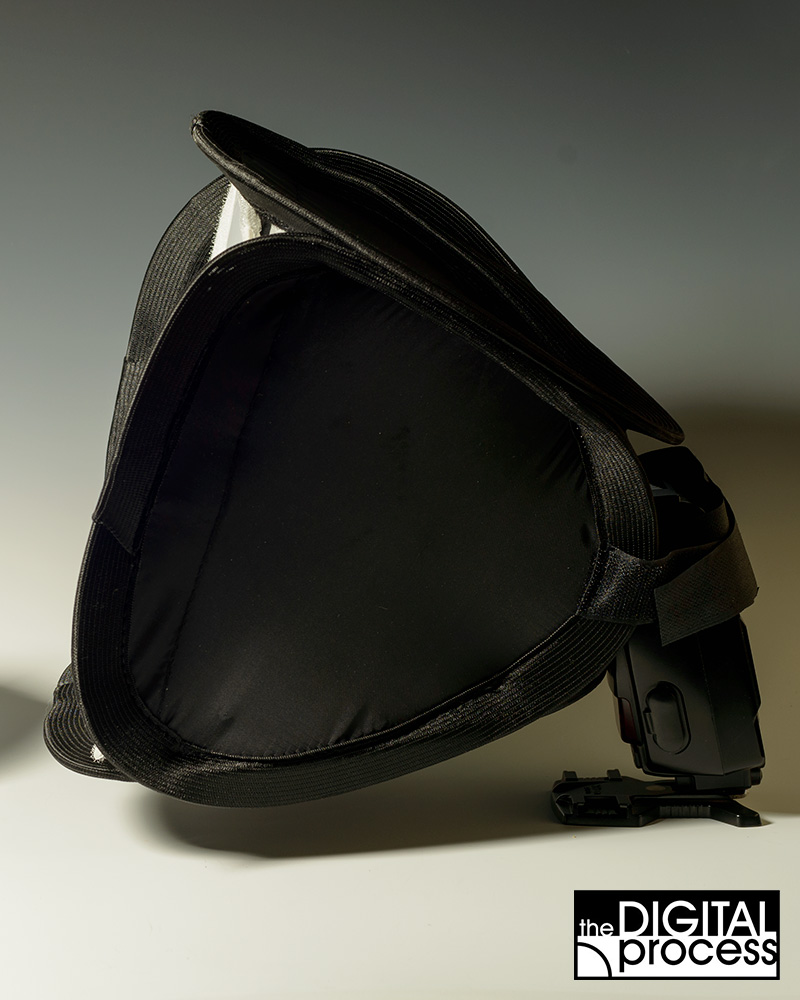
Example 11: 9″ Foldable Softbox
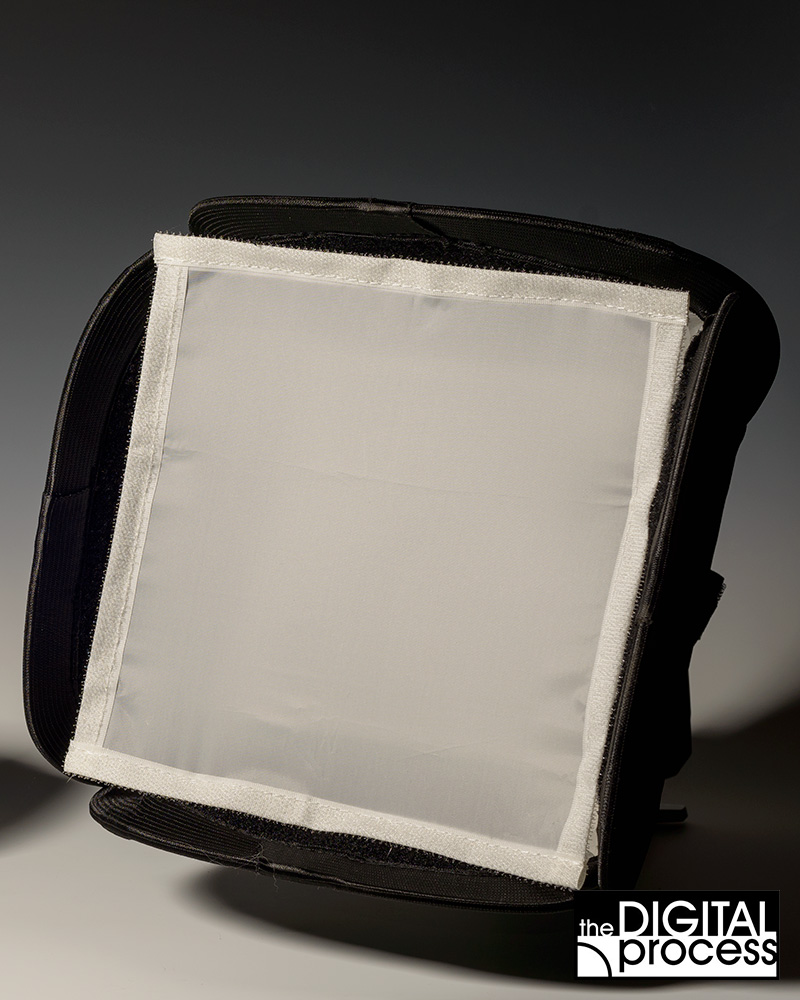 I enjoyed working the collapsible octagon softbox so much, I thought these 9″ foldable softbox
 would be nice step up. I
 jumped in and bought three, but after using them a few times, the jury is still out.
I like the soft light they give, but I don’t care for how they attach to the flash with 2 Velcro straps. It takes a little work to get them secure, and I don’t fully trust the connection, so I’m worried my flash might fall out from them. Although they are designed to be portable and fold down, it takes a little time to put them together. They have a small diffuser panel on the inside and a larger one on the outside. These both connect with Velcro. Maybe I’m spoiled or lazy, but if they connected a little better to my flash units, I would use them more. Also once I have them set up, I generally leave them set up. But they give off a nice soft light (though check for large highlights in the glass above) and just take a little more work.
Example 12: Rogue Grid
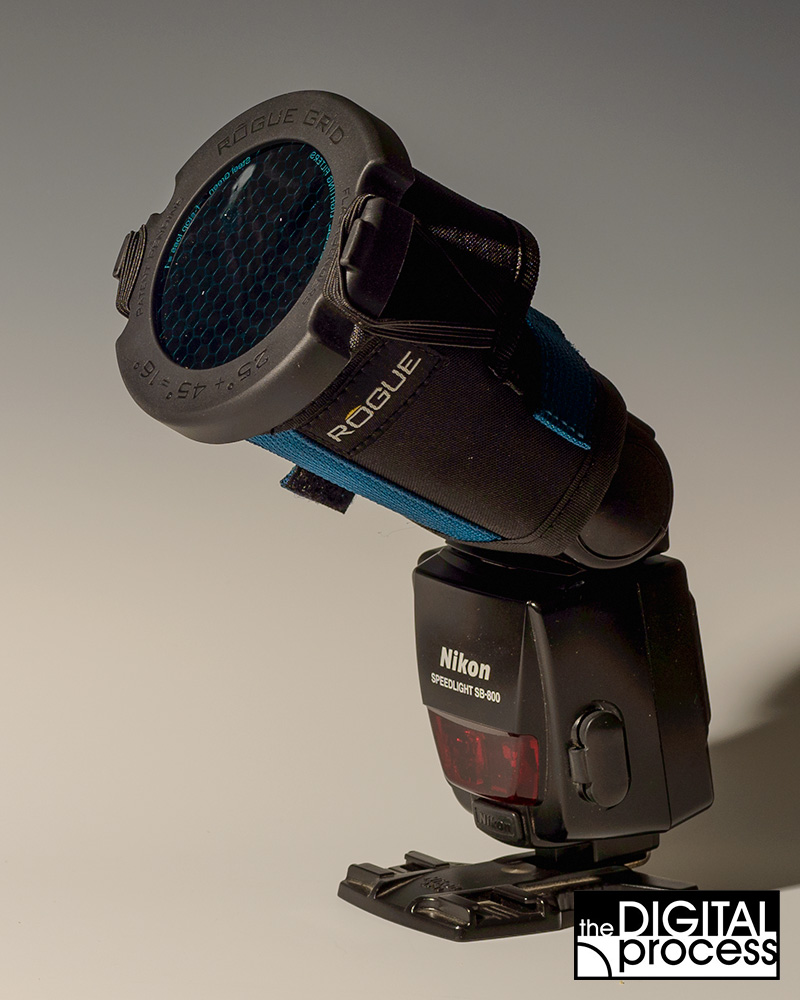 I liked using the Rogue FlashBenders so much, I decided to try out their Rogue Grid 2
 and bought one last week. In fact, this test today was my first chance to try it out. Of all of the accessories shown today, this one has the most unique look.
A flash grid will concentrate the flash beam into a narrow spot light and give you a direct, harsh light – but when you need or want this effect, the Rogue Grid is a great tool for it. It comes with 2 different lengths of grid that you can use separately or stack together. This example shows both grids in place. The RogueGrid 2 also has the new improved buckle system to attache it to your flash.
Another great feature is the ability to add coloured gels at the front of the grid. The unit comes with a sample pack of 3 colours, but you can buy the full set with 20 filters. Here is a sample shot with the included blue filter. Think of how you could use this as a background light, or side light – or other special effect.
Example 13: LED Light Panel

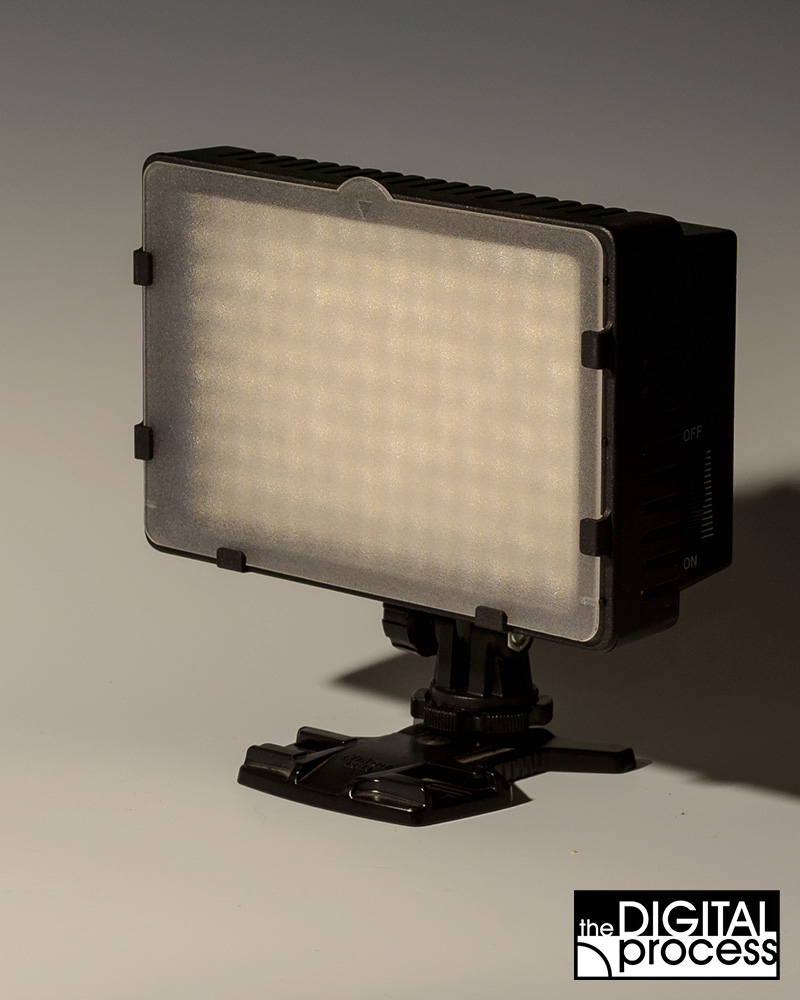 Although this isn’t a “flash accessory”, I’m including it as one more option to think about. Continuou-light LED panels are very affordable. This unit
 is bright enough for many situations and dimmable when you need a lower light level.
I use this in a wide range of applications and it is well worth the money. I can use it for video lighting, studio lighting (especially macro) and it’s very handy when I need to focus on a dark macro subject in Live View- I can add the light for focus, then use my flashes for the final shot. It has a standard hot shoe mount so it can fit on top of your camera, or on a stand with 1/4″ thread. The colour is a little warmer than flash, but close. I also found a series of gels that fit perfectly in the provided slot.
Summary:
Camera technology has come a long way since we stuck four sided flash cubes on the top of our cameras and hoped for the best. The main thing to remember from all of this is that you have OPTIONS. You can try all kinds of different effects and settings and use different modifiers, but the important things is to experiment and find out what you like and what tools you need to use to get the images you want.
I absolutely love the Nikon flash system (I’m sure Canon’s is similar). Having the power to adjust remote flashes makes shooting so much easier. Of course most DSLRs will allow some form of off-camera flash – even if it’s with a cable. I haven’t shot a photo with my flash in my hot shoe in a long time. I will occasionally use the built in flash for snapshots or when I’ve left the ‘big guns’ at home. Whether you’re working at home or in the field, it’s great to have these budget flash accessories at hand.
If you liked this, please leave a comment below. If you have a question, feel free to email me.
For further reading check out one of Joe McNally’s books – he’s a Nikon flash guru (but his writing will appeal to all photographers).
Sketching Light: An Illustrated Tour of the Possibilities of Flash (Voices That Matter)
The Hot Shoe Diaries: Big Light from Small Flashes