Selection and Magic Wand in Photoshop
Introduction
In the previous tutorial you were shown the methods for selecting parts of your image by using the Marquee tools. Most of the techniques that you used in that level will be applied here but with greater diversity. The Lasso and Magic Wand tools allow for more precise selection and all 3 methods can be used in conjunction with each other. To be an effective Photoshop user, you really need to master these tools. There is also a video at the end to help you review the concepts.
Selecting Specific Areas of the Image in Photoshop
Selecting with the marquee tools is quick and easy, but limited to certain shapes. What if you want to select something other than a rectangle or circle? For example, if you have a photo of a hand and want to select one of the fingers so that you can either remove or duplicate it, you’ll want more precision in your selection tools. That’s where these tools like the magic wand in Photoshop come into play. Have a look at the images below to see the flyouts involved in this tutorial.

On the left Lasso flyout, you will see that there are three options: Quick Key command “L” (Lasso)
| Option | Result |
| Lasso | Creates a freeform shape for selection |
| Polygonal | Creates a series of straight lines to enclose a selection area |
| Magnetic | Creates a freeform shapes, but recognizes boundaries between colors |
On the right Wand flyout, you’ll see two options: Quick Key command “W“(Wand)
| Option | Result |
| Quick Selection | Creates a selection based on parameters to define color |
| Magic Wand | Similar to Quick Selection but allows for more fine tuning |
This tutorial will deal with the Lasso tools first and then the Quick Select and finally, the Magic Wand in Photoshop.
Lasso Tools in Photoshop
The Lasso tool allows you to draw a free form shape to create a selection. Just select the tool and then left-click in the image and move your mouse around. You’ll see that you can be as detailed or as rough as you like. If you are trying to select the shape of a bird’s feather, you can zoom in and trace right around the feather – it takes time and patience, but can be done. Another example would be to select some text that doesn’t have a complicated background. You don’t need to be as detailed in that case.
Note: We may as well cover this now. If you want to Zoom into a part of your image, click the magnifying glass icon on the bottom right of the toolbar (or just press Z). You can select an area, or just click on the image to zoom in. Hold down the Alt key and click to zoom out. If you double-click on the Zoom Tool, the image will appear at 100% (full) size. Look for the Scrubby Zoom checkbox in the option bar. Uncheck it for more precise zooming.
Below is an image showing the 3 types of Lasso selection:

In the top left, you can see the shape made by the Freeform Lasso by left clicking and dragging the mouse around what you want to select. When you release the mouse button the shape will complete itself or you can hold down the CTRL key to end the shape (You will see a small circle on the cursor which means “close”). Below that, the polygonal has its distinctive straight edges. Start by clicking, move the cursor, click again, etc. each time you click a line will connect from one to the next. Either hold down the CTRL key or double click to complete the selection. I used the magnetic tool to trace around the bird. Since the bird is in front of a plain background, the tool did a good job just by using the default settings. You will be able to manipulate it like the standard marquee too
I will assume that you can figure out the freeform and polygonal Lasso tools on your own. Play with them and use some of the modifiers (add or subtract from the selection) that you learned in the previous tutorial.
Magic Wand in Photoshop
I’m sure you’ve all seen a person on TV select someone in a photo, click once and delete them? It’s usually the mother-in-law. Well, in theory that can be done with the Magic Wand tool. What the Magic Wand tool does is look for differences in color and contrast (pixel differences) depending upon various parameters you set. Below is how the Option Bar looks when you have the Magic Wand active.

Starting from left to right, I’ll explain what these do. The first icon has a flyout that allows you to select from a list of predefined tool settings (but not necessarily for the current tool). If you find there is a setting that you use often, you can save it by clicking on the option shown below. Set your selection option, tolerance level, etc. then save it by clicking on the New Tool Preset button to name and save it.
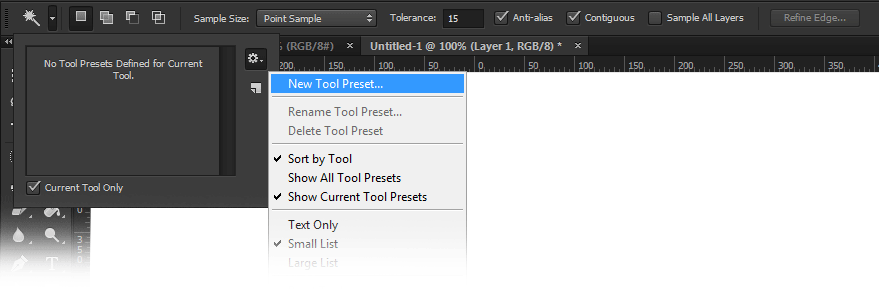
Remember this for later when you’ve worked hard to get ‘just’ the right setting and think you might want to use it another image sometime.
Next to the Preset list are icons that display if you are adding, subtracting or intersecting your selection. This depends upon if you are pressing the Shift (add to selection) or Alt (subtract from selection) Shift+Alt (intersect) keys. (see previous tutorial)
The next section allows you to select the amount of variance in the pixels or tolerance. The slider goes from 0 to 100. the lower number the less amount of variance in color range you will be able to select. The higher number will allow you select more variance. Below are 2 images showing what a tolerance of 5 (left) when selected looks like compared to 80. In both examples I picked the same place in the top left corner.
 |  |
| Tolerance setting = 5 | Tolerance setting = 80 |
When you are setting the tolerance, you’ll find that it will vary from photo to photo. You may have to do some trial and error to get the best combination. Play around with the settings and you’ll get familiar with what it can and cannot do. Later tutorials will use the magic wand tool in exercises, but for now just get used to working with it and the tolerance level affects it.
Checking the Anti-alias checkbox will give you a smoother selection. This is checked by default, and it’s a good recommendation to leave it on.
The Contiguous checkbox lets you decide whether you want the selection of the color range to be isolated (just the section you picked in) or overall. See below for an example of contiguous being turned on and off.
 |  |
| Contiguous = On | Contiguous = Off |
The left image shows that with Contiguous on, only the color range that is touching will be selected. With Contiguous off, Photoshop looks at the complete image and finds all pixels in the desired color range. Make sure you have the right setting when selecting, as it’s not always easy to see what’s selected in a large image.
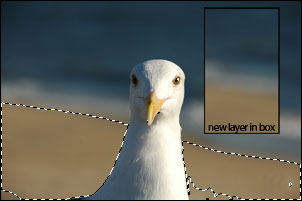
By selecting the Sample All Layers checkbox, you can have Photoshop find the color range in all the layers in your image. We haven’t dealt with layers yet, but simply put, layers allow you to combine different parts of an image to make them a whole. So you can create a design using a background image on one layer, some text on another, bigger text on another and a foreground image on another layer. So in the image below, I have taken part of the background and copied it onto another layer. The second layer is surrounded by a black box.
 |  |
|
Sample all layers = off |
Sample all layers = on |
You can see that the image on the right shows the color range in the new layer is also selected. This gives you a lot of versatility when working with designs for making color changes to the entire composition at once.
The options shown above give you an example of how using one tool gives you a lot of choices. When working with other tools, remember to look at the option bar and see if there are any settings that can help you.
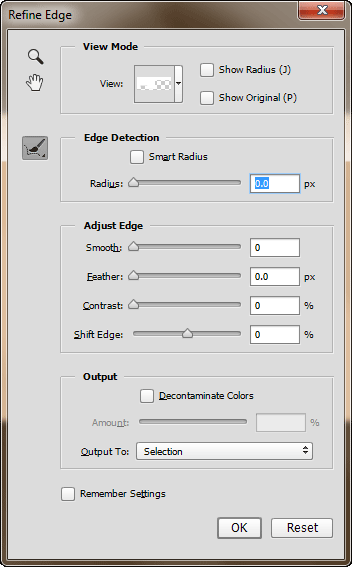
The final item that you have on the option bar is Refine Edge. This allows you to further refine the selection and fine tune it. Once again the options you choose here will depend upon the image you are working on. You will see your results as only the selection will display on your image.
Hopefully you can see the power of the Magic Wand. You will need to know how to use the options to use it effectively. Get use to selecting with this tool and know when to use it, instead of the regular selection tools. Work with the tool on a number of different images to see how contrast in exposure and color make a difference. After some practice, you too can remove your mother-in-law.
Quick Selection Tool
This tool allows you to (obviously) quickly select certain parts of your image. If you have worked with the Magic Wand tool for a while like I told you too, you’ll be able to see some similarities. Below is a look at the option bar for the Quick Selection Tool.
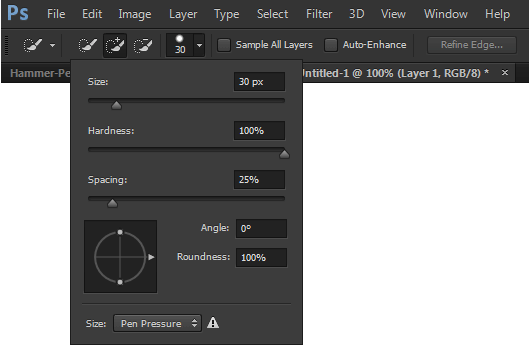
You’ll see some familiar options here. From left to right, you’ll see the dropdown for presets, the add and subtract options and Sample All Layers. You’ll also see a few new ones. First up is the Brush flyout.
Brush Options for the Quick Selection Tool
The brush is a common option for many tools. You’ll see similar options when you work with other tools. Starting at the top, you’ll see Size or Diameter. This should be self evident – it makes the brush smaller or larger (covering a smaller or larger area of the image) from a range of 1 to 2500 pixels.
Below the size slider is the Hardness setting. Hardness applies to the edge hardness. A setting of 100% gives the hardest edge. A hard edge will make a similar selection as a low tolerance setting. Think of a hard edge at 100% as a billiard ball, and soft edge of 3% as a feather duster.
After that you’ll see the Sample All Layers option. You’ll see other options here that aren’t used very often. Make the tool active and open an image. Click and drag over an area, and release the mouse button. You’ll see that areas are selected based on your settings. You can now add or subtract to the selection. Try different settings and see how they affect the selection. Here’s an image to try this tool on.
Summary
Between the this tutorial and the previous, you should have a good understanding of how to select. As you use the tools in different situations you will learn when each selection tool has its benefits and drawbacks. Knowing the differences will help you work faster and more efficiently – and you’ll be happier. Practice with this tools on a variety of images and try moving selections, deleting them and copying them. Have fun with it – go wild!
Reference
To see how to tie a Lasso with rope, click here
Get a fancy Harry Potter Wand (not guaranteed to work with Photoshop).