Introduction to How Cameras Focus
One of the top technological advances in photography happened in 1985 when the Minolta Maxxum 7000 was introduced. It was the first SLR to have autofocus built into the body and it changed everything. It also had a lot of other features that we would recognize in our modern cameras. It was the first “auto everything” SLR as it would focus, expose and then wind the film all automatically, but still allowed for manual exposure settings and manual focus.
Lenses had been previously introduced that would autofocus, but they were bulky and never caught on. After the Maxxum came out, the other manufacturers followed and in 1991 Kodak introduced the first readily available Digital SLR based on a Nikon film camera.
This short history lesson is to let you know that the technology we use today is quite young, especially compared to film cameras. Each new generation of DSLR cameras has a better sensor, better metering and better autofocus. I’ve moved from Nikon D70 to a D300 to D800e to a D850 – each step provided me with huge improvement in all areas.
But what we want to look at in this lesson is how the DSLR cameras of today use autofocus and how you can use this knowledge to improve your photography.
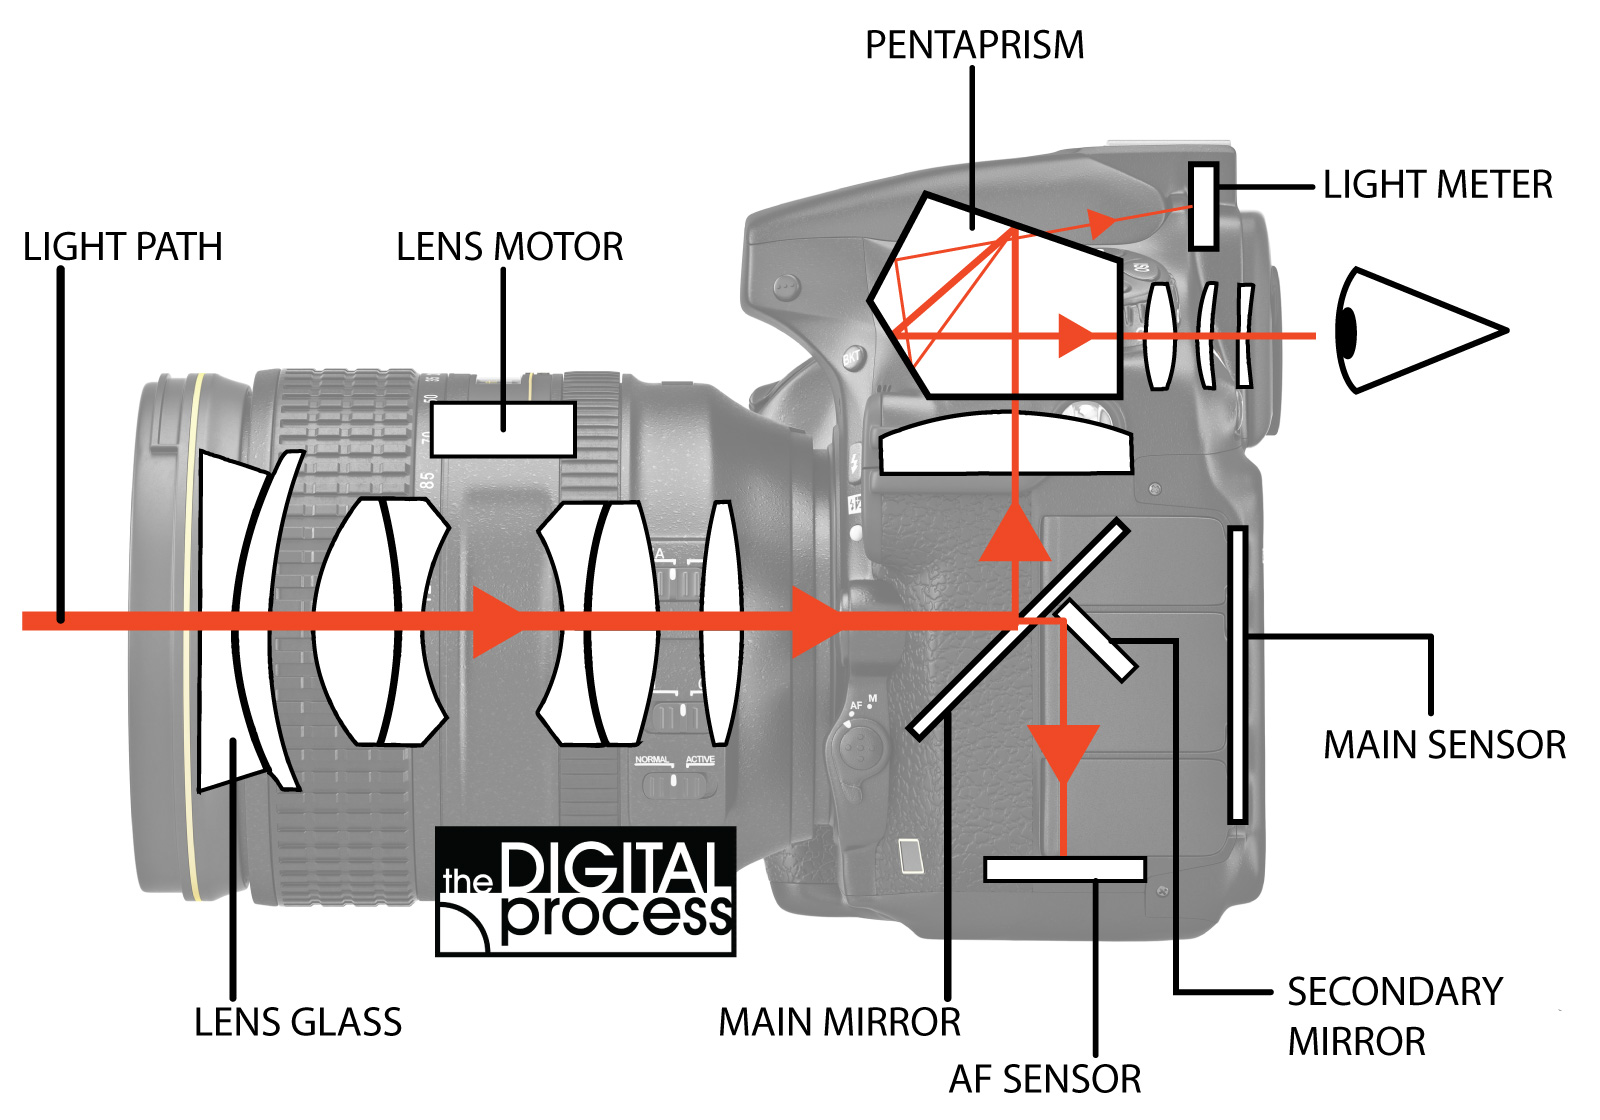
Here is a diagram that shows where the light comes in to camera and where the sensors are (generally) located.
As you can see, the light bounces around a lot to make sure the sensors do their job. Mirrors (in a DSLR) are used to direct the light to the Autofocus (AF) sensor. When you take a photo, the main mirror will snap up and let the light hit the main sensor.
I just wanted to show you what goes on inside the camera and now comes the fun part of explaining how it all works! My goal here is show the different types of Autofocus and how cameras focus so that you can use this knowledge to improve your photography.
How the Autofocus System Works
In simple terms, the autofocus system in your camera works like this:
- Light comes into the camera
- Light hits the Autofocus (AF) sensor
- The AF sensor determines if the scene appears in focus
- If it’s not in focus, it tells the AF motor to move the lens element(s) in the direction it ‘thinks’ will bring the scene into focus
- The lens elements are moved by the AF motor (in camera or in the lens)
- The AF sensor tells the lens to stop focusing when the object becomes focused
It sounds easy enough, right? But all of this (hopefully) happens in the fraction of a second. Of course this is a very simple explanation, but again – some amazing engineers make this system work better each year so that we don’t have to worry about the technical aspects (too much).
Note: It’s a lot easier to fix an exposure problem than it is to fix a focus problem in your photos.
Limits of Autofocus
Even though AF tech is very advanced, it still has its limitations. If it was perfect, we would never have an out of focus image and would never need to switch to manual focus. The great thing to remember is that Autofocus works ‘most’ of the time. If you know what it has trouble with, then you can start to look for situations where you need to either pay closer attention to the focus or switch to manual focus.
Available Light
One of the main things to remember is that autofocus works best in good light. The better the light in your scene, the better your camera can focus for you. This is why many cameras have an “AF Assist Beam” of some kind. Another concern that hinders AF is a small lens aperture. If you have a f1.4 lens (maximum aperture) it will let in more light than an f5.6 lens – and this means the f1.4 will be much better at helping your camera focus.
Low Contrast
If your scene does not have much contrast, it will take longer for your camera to focus. If you try to focus on a wall that is a single colour, you might be out of luck. If there is a door in that wall, then you could easily focus on the door frame, lock the focus and then recompose to shoot the wall. If you combine low contrast with low light, you’re in big trouble!
Vertical Lines
Due to a type of autofocus called “Phase Detection”, vertical lines can cause your camera fits when it tries to focus on them. If you’ve ever tried to focus on a picket fence with thin posts, you might have had some issues. This is becoming less of an issue in newer cameras thanks to “cross-type” focusing sensors. Sorry for throwing some new technobabble at you, but it’s just hard to avoid some times.
Small Subjects
Focusing on a small object that takes up a low percentage of your scene can be tough because your camera might not know exactly what your trying to focus on. If you try to take a photo of a butterfly from 10 feet away, your camera might not see the butterfly at all and focus on the leaves behind it. You’ll have to either move closer (so your subject takes up more of the frame) or switch to manual focus. A limited depth of field can also make your small subject appear out of focus. In some cases you try to focus on a person’s eye, but miss the target and focus on their ear.
Moving Subjects
DSLR cameras are getting better and better at focusing on and tracking moving objects – even fast ones. Sadly not every moving object in every photo is going to be perfectly in focus. Think about a moving subject in low light that doesn’t have much contrast and only takes up about 10% of your scene. In other words, the larger, brighter, more contrasting subject will be much easier to focus on while moving! Try focusing on a butterfly flitting around in the shadows of your garden. Imagine using manual focus on the flock of birds in the photo on the left! A subject with a predictable, consistent path is easier for your camera to track than one with an erratic path that changes speed.
Human Error
It’s hard to admit, but sometimes even we can make mistakes. With today’s camera systems there are many options we can set when it comes to autofocus. We can prepare and do our best, but sometimes we might come into a situation where our settings just won’t work. For example, most cameras have a setting to capture either stationary or moving objects (single or continuous might be one set of terms you see). If you are focusing on a bird while set to a single shot focus mode, and then it takes off in flight, your camera will not be able to follow the focus like it would in continuous focus. There are many other factors, but the goal of this lesson is to minimize the human error factor in focus problems.
Main Focus Settings
Single vs Continuous Autofocus
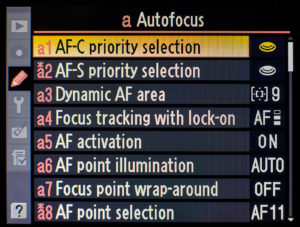
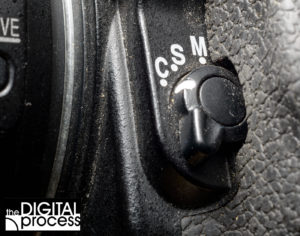
In very simple terms, most cameras will allow you set your autofocus for either a single, stationary subject or to continuously follow a moving object. Check your camera manual to see if you have this option and note that it may go by a variety of names. For now, I’ll just use the terms ‘single’ and ‘continuous’.
Single shot: This is the easiest setting to use as your camera will consider that you and the subject are not moving. It will focus on the subject and then stop so you can take the photo. Assuming that you have considered all of the potential problems I listed above, you’ll get a good sharp photo if nothing moves. When you are starting out in photography and learning how cameras focus, this is a good place to begin. Any testing and experimenting you do should start here.
Learn to see when your subject is in focus, and don’t assume that it’s sharp. Try focusing on smaller and smaller subjects to see how well you and your camera can work together. Try printing out some text and taping the paper to a wall and move around trying to focus on it. You should soon see where you start to have problems. Many cameras have a ‘good focus’ indicator in the viewfinder to confirm that your subject is in focus.
Continuous Focus: Even for experienced photographers, continuous focus is never 100%. It can be frustrating when you first start out, but as you get more comfortable with it, it’s very rewarding. With a setting of continuous focus, your camera assumes that your subject is moving and will do its best to track the focus in the direction it has determined that you subject is moving. Once again, the pitfalls of focusing I’ve listed above become critical – even more so with continuous focus.
There are other settings you may be able to make with your camera that tie in with continuous focus and I’ll explain those as well, but for now just think of various moving subjects and how you will focus on them. Remember from the earlier tutorial when I mentioned that ‘speed is relative’? It applied then to shutter speeds, but now think about focus. Any subject close to you will appear to be moving faster than if it is further away, so your camera has to work harder to stay in focus. I can take a photo of my dog running around the yard easier than if it is jumping up right in front of me.
Number of Focus Points
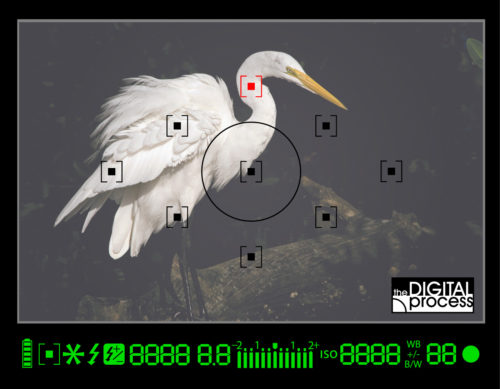
What are focus points? If you remember the last lesson when I explained spot metering, you can use that concept to think about focus points. A camera might use dozens of focus points to bring a scene into focus, or you could select one focus point to focus on what you find important.
If you look at the image above, you’ll see what might be a typical viewfinder for a camera. Each of the squares [▪] represents a different focus point that the camera can use. In some cases, you might use all of them or maybe just one. This is a good example of where you might just use one focus point (shown in red) to make sure the bird’s head area is in focus.
Many DSLR cameras will look at the metering of the scene to help it decide what to focus on. In a scene like this, the camera might realize that the subject is something bright against a dark background. A smart camera will ignore the focus points in the dark areas and just use the ones in the bright areas. Even though you have all of the focus points activated, the camera may decide which ones to use.
The problem with using all of the focus points is that what you want in sharp focus and what the camera thinks should be in sharp focus can be two different things. If you look at the bird sample, the camera would decide that the bird’s body should be in focus. If you have limited depth of field, then you might get the wings in focus, but the head and eyes will soft and possibly soft enough to ruin the photo.
Every camera is different, so I can’t give you specific instructions on how to set your camera, but here are some guidelines to use for your focus settings.
Using less focus points makes AF faster. I think it just makes sense that if I use all 51 AF points in my camera, the camera will take a little longer to focus and still might not focus on what I’m expecting. I can cut that down to 21 and focus will be a little faster. I can cut further, down to 9 AF points and now the camera has much less to look at. Or I can just use one, but I better make darned sure I have the one AF point directly on what I want in focus.
Focus points in the center of the frame are more accurate. In general, camera designers will put the more accurate (cross-type) AF sensors in the middle of the frame as that is usually where we are going to focus. The AF sensor isn’t just one big, single sensor, but is usually comprised of several smaller sensors so each area can function separately.
Continuous focus works best with multiple AF points. Even though I just said that less AF points are more accurate, you may need to use more if you are tracking a moving subject. If you try to follow a bird in flight with one AF point, you will possibly lose the bird and the camera will try to focus on the sky or trees behind it. If you have several AF points active, then the chances of your camera tracking that bird become much higher.
Not all AF points are cross-type. Remember when I mentioned that vertical lines can fool the autofocus? A cross-type sensor will work much better in this case, but only some of your AF points will be cross-type. If you do a lot of shooting with difficult focus situations, you need to research your camera’s AF points and know which are the more accurate cross-type.
Here’s a look at the five settings in a Nikon camera from 51 points down to 1 point.
Of the 51 AF points, there are 15 cross-type sensors (the 3 columns in the middle). If you are new to working with AF points, it’s good to know that you can move the ‘one’ point around the viewfinder (actually you’re just highlighting different AF points). On most cameras, you can move the 9 points around as a group.
Focus, Lock and Recompose
Another common technique is to focus on something, lock the focus and then recompose. With most cameras you can press the shutter half-way (this locks the focus and usually the exposure as well) and then recompose the scene and press the shutter button the rest of the way. This works on stationary objects.
Combine a single AF point with spot metering and you can make the camera work only of the part of the scene that you feel in important. This is also another way to help your composition. If you lock in the exposure and focus and then compose the scene so that your subject isn’t in the dead centre of your frame, your images will look more interesting.
I would recommend that this is one thing every new photographer should practice. Check your camera manual to see exactly how to do this, but in most modern cameras, it’s just press half-way, recompose, press all the way. Try it with any stationary object and practice your composition.
Note: With many zoom lenses (especially lower end models) when you change the zoom focal length, you also need to refocus. If you are trying the focus lock and recompose methods, you don’t want to change your zoom after you have locked in the focus.
Putting it All Together as a Photographer
Now that you’ve learned a little bit about how your camera determines what it thinks should be in focus, it’s time for you to start working with your equipment to get the best shots you can. Here are the first steps that are part of the long journey to working towards ultimate sharp focus.
Moving or Stationary? This is the first thing you need to consider. If you or your subject are going to be moving you want to select continuous focus. You have to (unless you plan on chasing the buffalo at an equal distance). If your subject is staying put, you should leave the camera in ‘single-shot’ focus.
If you are in the studio or shooting a still life subject, you might consider focusing and then turning the AF off. This lets you know that the focus will not change as you work on your scene. You can always check focus from time to time, but I do this a lot with macro shots or when I’m photographing artwork pieces.
How many AF Points? If you have a general scene like a landscape you can use more AF points and as you half-press the shutter, you will likely see many points light up to show which areas are in focus. This is a good tool to use as you generally want a lot of the scene in focus, so use more points and let the camera do the work.
If you have one small part of your scene that you want in focus, try the single point. Some cameras even have face recognition modes that will look for faces in the scene and focus on them. If you have trouble using one AF point, try the next setting like 9 AF points.
With fewer points active you need to pay closer attention to what the camera is seeing. Learning to work with this while learning composition and other camera controls can be quite daunting, so try not to tackle too much in one photo session. Try to experiment with a different aspect each time you go out shooting.
Learn Your Controls. Taking the time to learn more about your camera is always a great idea. Learning about how your particular camera focuses is a big step towards becoming a complete photographer. Open the manual, look through the menu and try new things. After working with various settings, I highly recommend that you set the camera back to the settings you are familiar with. Otherwise you might pick up your camera a few days later and forget you had some weird setting you were trying out.
Check you lens. Many lenses have switches for focus control. The most obvious is a switch to turn the autofocus off or on. Many telephoto lenses have a switch that allows you to select the distance range for focusing. For example, my 70-200 zoom lens has a switch for either the full range of focus, or I can limit the focus from 2.5m to infinity. The advantage of this setting is that the lens will not hunt for a close object and waste time when all of my subjects are more than 10m away. This is faster and leads to less error.
Combine the optimal focus settings with the correct choice of metering mode (previous lesson) and you are well on your to great photos!
Other Factors that Affect Focus
AF Fine Tune
Even with the latest technology and amazing manufacturing standards, there is still a chance that your expensive DSLR and lens combination doesn’t give you sharp focus. In some cases, you might see a perfectly sharp image in your viewfinder, but the final image isn’t quite as sharp. Of course there could be many reasons why, but in some cases the lens might be slightly out of alignment.
In this case, many DSLRs have a feature called “AF Fine Tune” which allows you to dial in a small compensation factor for a lens. Check your manual for this feature, and I’ll have a tutorial written about this some day. I also mention this with one BIG warning! It is very easy for a new photographer to look at some photos and think, “These photos aren’t sharp – obviously I need to fine tune my settings! It couldn’t possibly be user error!”. I strongly recommend that you use AF Fine Tune as last resort after you have done extensive testing to make sure the problem is not in your technique or settings.
Heat Distortion
If you have ever traveled down a road and see the air above the road look distorted and wavy as the hot air moves up, then you have seen heat distortion at work. If you are shooting with a telephoto lens, the distances are compressed and this type of distortion can make your images look very soft. This will happen over concrete or asphalt, as well as fields of grass and other surfaces. Depending upon where you live, you might see this often and it’s just something you need to be aware of. There really is no fix for it either than to shoot with a wider lens to lessen the effect. I see this effect when I shoot birds (cranes) in a field and can’t get a sharp image unless they are very close (they never are).
Dirty Lens or Filter
If you don’t keep your gear clean, you can’t expect it to perform at its top level. Just as you can’t see clearly through a dirty window, your camera can’t easily focus through a dirty filter or lens element. Always check your lens before going out to shoot and make sure there isn’t a greasy fingerprint sitting there to ruin that next awesome shot.
Subject is Too Close
Sometimes you are just too darned close! Every lens has a specification that lists the minimal focusing distance. If you do a lot of close up work, it is very handy to know just how close you can get to your subject. This information is either in your lens manual or available on the manufacturer’s website.
Limited Depth of Field
Even if everything works perfectly, having a narrow depth of field can make a photo look out of focus, especially if your subject is close. If I shoot an extreme macro subject, my depth of field is so limited that if I am even 1 or 2 millimeters off, the shot is ruined. In a portrait, you might get accurate focus, but on the bridge of the nose instead of the eye – and this can be enough to throw off the viewer.
Mechanical Failure
Even the best equipment fails at some point. If you have tried everything you can think of and still can’t get sharp focus in your images, then you might want to have your gear checked. If you suspect the camera is at fault, try different lenses. If you think it is your lens, try it on a different camera (it’s handy to have friends that shoot the same brand!). There can be problems in the AF motor, or even the range of focus can be limited due to mechanical problems. Test your gear thoroughly before sending it off for repair or replacing it. My D800e had focus problems, and once I sent it in to Nikon, then killed the Autofocus function entirely. (But that’s a story for another day.)
Viewfinder Diopter Correction
Many cameras have a small dial next to the viewfinder that lets you correct the viewfinder based on your vision. If you wear glasses for reading, you should adjust this in your camera. It’s easy, just dial in the right amount to make the letters and numbers in your viewfinder nice and sharp. If this is out of adjustment, you may have trouble focusing or think that your camera has problems.
Focus Problem or Camera Shake
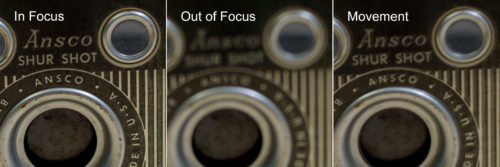
In some cases it is hard to tell if a soft image is due to focus or movement or both. As a general rule, something out of focus will be soft on all sides. If there is movement (camera or subject), the softness is usually towards one side, two sides but not all sides. Look at the image below and see how the shot on the right shows a definitive ‘2nd image’ as the camera was moved during exposure, while the out of focus shot in the middle is just blurry all over (Click for larger view).
Using Live View to Fine Tune Focus
The wonderful thing about digital cameras is that you have a sensor which records the image and most cameras allow you to do this in ‘real time’. Mirrorless cameras, ‘pocket’ cameras and camera phones don’t have a mirror and viewfinder, so you are looking at a display that shows what your sensor is seeing. With a DSLR, a mirror reflects the scene up to a viewfinder and the sensor is just recording when you take photo.
Live View is a way to get the best of both worlds. With a DSLR, you can use the digital display to check for perfect focus. This is easiest for stationary subjects so you can put your camera on a tripod, turn on Live View and in most cases, ‘zoom’ in to the scene and check your focus. If you shoot in macro mode, you might use Live View exclusively to confirm focus due to an extremely limited depth of field.
Here’s a short video showing how I use live view. I have an old camera I’m focusing on, with a macro extension tube, so focus is critical. My camera is on a tripod to keep everything as steady and sharp as possible.
Summary
As you have read, there are a lot of factors that go into making a sharp, well focused photo. There’s a lot that can go wrong, but if you are aware of how cameras focus and some common pitfalls, you can avoid them. It really comes down to making sure you have the best settings for each situation and then knowing what the camera can and ‘should‘ do. Even if you practice perfect form, there will still be some out of focus (OOF) images, but the goal is to limit those.
Great photos come from practice and experience (combined with timing and sometimes luck), so the more you practice and review your images after your shoot them, the more you will learn.


