Introduction to ISO Settings

So far I’ve shown you how Aperture and Shutter Speed settings can affect how your image turns out. I’ve also shown some examples of how you can control these settings to get the effect you want as a photographer. The settings explained in this lesson are less about artistic expression and more about helping you get the best shot via your ISO settings and helping you get better photos.
ISO is a setting that determines how ‘sensitive’ to light your sensor can be. Of course, your sensor doesn’t change physically, but the camera uses ISO to control exposure. A low ISO setting can be used easily in bright daylight while a higher setting would be used when less light is available (in a general sense – I’ll explain it in more depth below).
Each camera model handles ISO differently. The quality of a photo taken at 400 ISO on a high end DSLR will be better than a photo taken at 400 ISO on a cheap phone camera. Even between DSLR cameras, newer cameras with newer tech generally outshine older models in this area. Some new cameras allow you a setting of over 1,000,000 ISO!
ISO and Sensor “Noise” in your Camera
I explained in an earlier tutorial that film photographers change their ISO settings by using a different type of film. The sensitivity of the film was determined by the ISO or ASA number. When you choose a film, you may choose a film that is more sensitive to light so that you can use faster shutter speeds when the light is low. This film you chose was more sensitive because it had more or bigger silver crystals in it. That’s how film works, but what about a digital sensor that doesn’t use silver?
In simple terms, a digital sensor has a ‘base ISO’ usually around 100 or 200. To get it to be more sensitive to light, the signal coming in is ‘amplified’ and it will gather more information. Think of how you turn up the volume of a radio in your car when there is more road noise. To hear the song clearer, you need to turn it up, but the audio might get distorted. This is how your camera’s sensor works. If it has trouble ‘seeing in the dark’, you need to turn up the ISO. A higher quality stereo system will have less distortion than a cheap one, just as more expensive cameras generally have much less image noise than cheap ones.
This is a great system that brilliant engineers have worked on and it gets better each year – but I’m not going to explain the electronic engineering theory behind this, but for every benefit, there is usually a cost.
The cost for amplifying the signal to see more light is that there is more “noise”. Noise (or grain) is a term that we use to describe the general quality of an image. A photo shot at 200 ISO will have less noise than one shot at 6400 ISO.

Above is an image that shows two shots. On the left is a photo taken at 200 ISO, while the right side shows a photo taken at ISO 6400. Click on it to make it larger and look for the ‘noise’. You’ll see a lot more on the right side and if you consider how this might look in an 8×10 or larger print, you might not want to use it. Note the noise in the darker background. Look to see where it is more visible and where it is less noticeable.
ISO and Exposure
Your ISO setting also affects your exposure. Think of the ISO, aperture and shutter speed as the three corners of a triangle. If you change one of these settings, you need to change one (or two) of the others to keep the same exposure.
Here’s a video that explains how this “Exposure Triangle” works:
If you want to review this information, you can download a PDF file that shows the 3 diagrams used in the video.
Setting the ISO on your Camera
If you shoot in an Auto Everything mode, your camera will pick what it thinks is the best settings for the shot. This would also include your ISO setting. This is usually going to give you a decent average exposure. But what happens when you want more control over your photography?
If I want the best possible sharpness and resolution for my photo and prints, I want to use the lowest ISO possible. If I’m creating a landscape photo, I can use a tripod and use a combination of low ISO, small aperture and slow shutter speed. This will give me the least noise, the most depth of field and since I’m on a tripod, no camera shake (hopefully!).
On the other hand there are times when I’m forced to use a high ISO. Shooting race cars at a track during the night is one example. I’m not using a tripod, so I use a high ISO, small aperture and medium range shutter speed as well as a panning technique (which makes up for the relatively slow shutter speed).
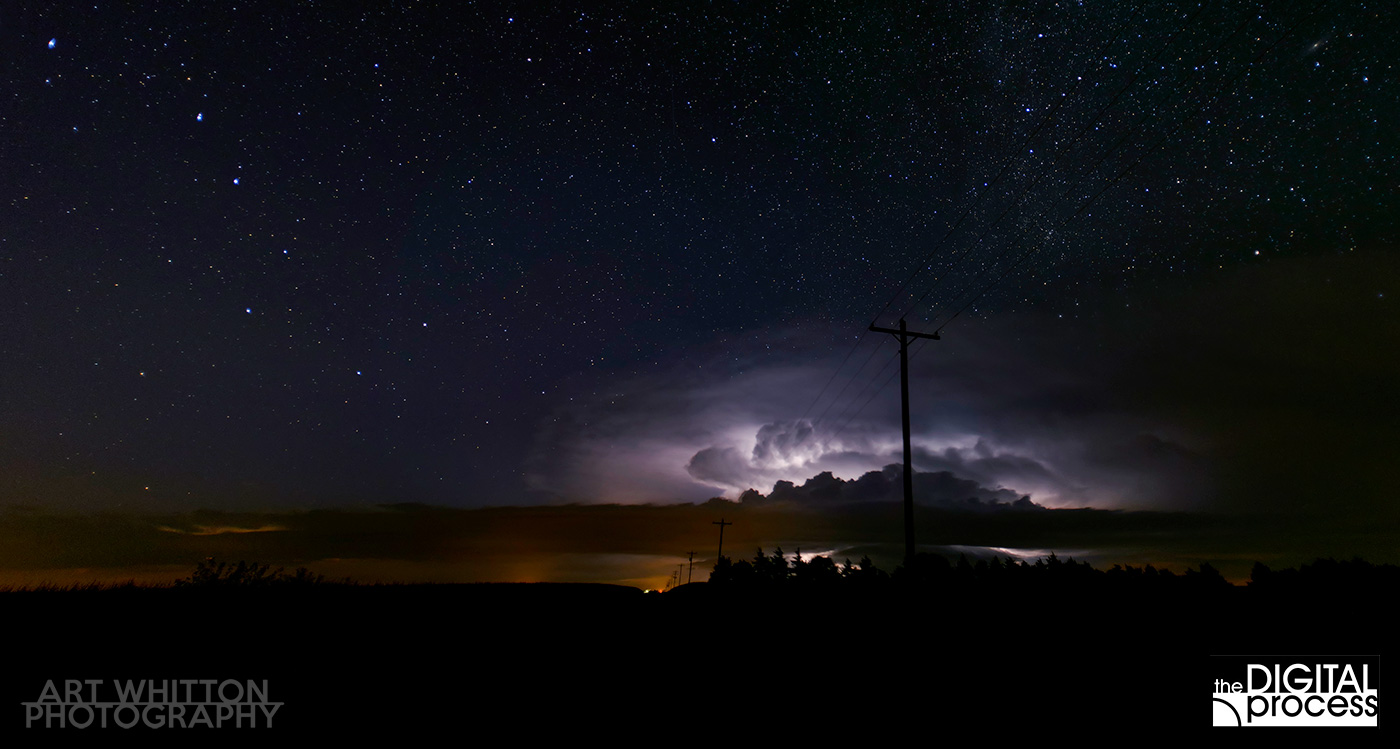
Another example is astrophotography. To gather as much light as possible from distant star light, I need to use a high ISO. In the example below, I used ISO 1000, f/2.8 and 20 second shutter speed. In this image I was able to capture a storm, the Big Dipper and a background of stars.
In this next example, I’ve used a low ISO to get the sharpest image for this macro shot. I shot this at 100 ISO, f/18 and 1/320s shutter with a flash unit. By adding artificial light, I was able to keep my ISO low and my shutter speed fast.

These two examples show extremes of how you can use ISO to best suit your needs. As you get more comfortable with the Exposure Triangle, you’ll be able to master the techniques needed to change you settings to suit your needs.
Auto ISO Settings
Many cameras these days have an “Auto ISO” setting that can be very handy in some shooting situations. How it works is that you may be able to set a minimum and maximum ISO that you want your camera to use, then you ‘set it and forget it’. Now you can shoot at the settings you want and still get a good consistent exposure.
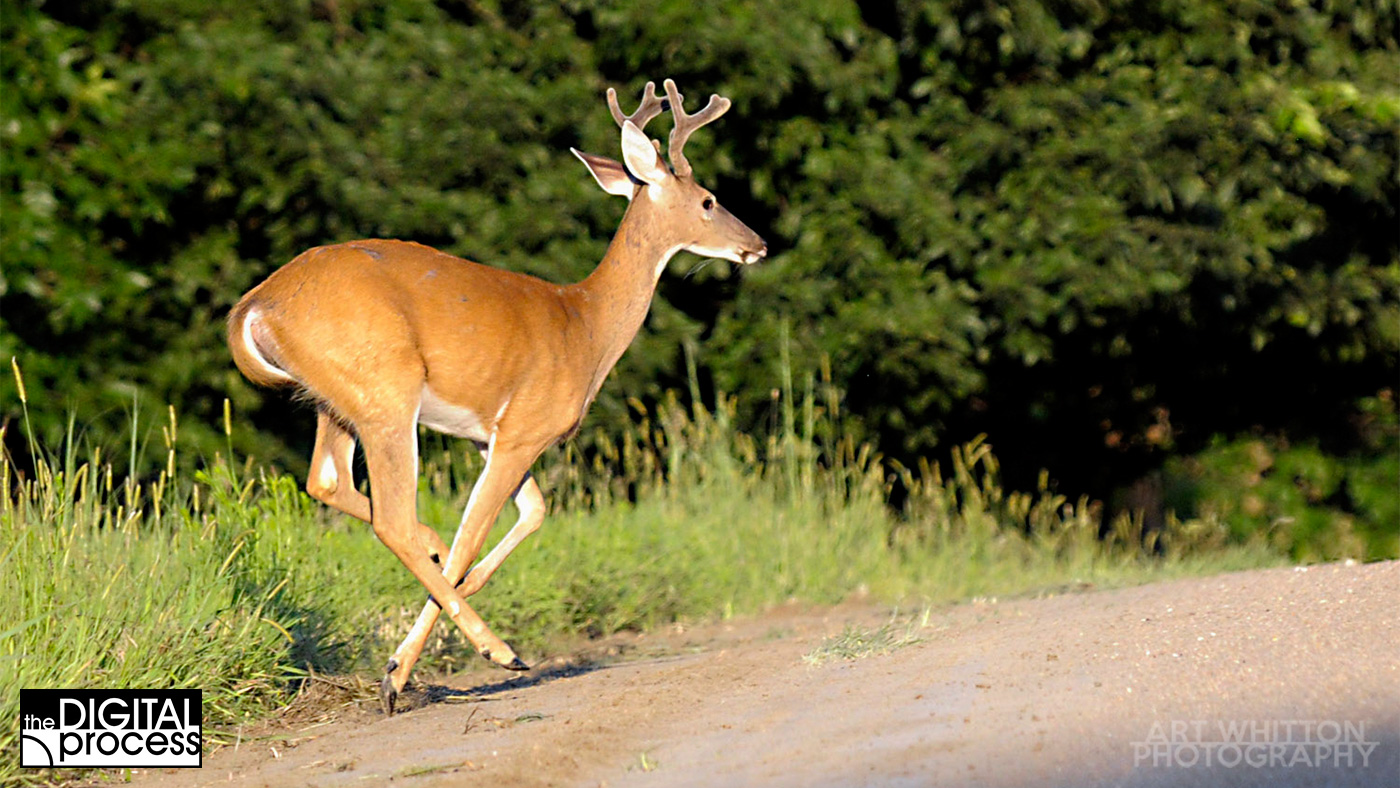
One situation I use this in often is wildlife photography. When shooting wildlife you have a lot to keep track of. You need a fast shutter speed to control the animal’s movement, you want to control the depth of field so that you get the animal in focus and possibly part of its environment. Then you have to worry about the animal moving which can mean it moves from shadows into bright light and back into shadows. Think of a deer running or walking through a forest. You’ll have a lot on your mind as you try to capture this graceful animal in your camera.
Rather than just leave your camera on ‘auto everything’ and possibly getting a slow shutter speed, you can control the image but have the camera help you out by getting the correct exposure. It’s not cheating; a lot of photographers use this technique.
Summary
If you have read the previous lessons, you should know 4 basic concepts:
- Aperture controls the amount of light that enters the camera and Depth of Field
- Shutter Speed controls movement of your subject and camera
- ISO controls how sensitive your camera is to light
- Aperture, Shutter Speed and ISO combine to create a photo’s exposure.
If are new to photography, this is a lot to absorb. But if you want to continue learning, these 4 concepts are the basic ‘building blocks‘ that you will base the rest of your knowledge on. Even with over 40 years of photography behind me, I am still using these basic rules to refine my photography.
The other thing to remember is that although every situation is different, many are similar. I will use a starting point when I am out shooting wildlife. I will use a different starting point in the studio. I will use yet another when photographing people. As you get more experienced and more familiar with your camera, you will develop your own starting points.
When you head out to shoot some scenery, make some basic setting adjustments to aperture, shutter speed and ISO before you leave. I do this each time I leave the house with my camera because I never know what I will see at any time. If I just used my camera in the studio with a slow shutter speed, low ISO and small aperture and then go shoot wildlife, I might see a deer right away and have the wrong settings as I grab my camera start shooting in an excited panic!
If you prepare just a little, the payoffs are huge! You can check out my Photographer’s Checklist and print it out to see what settings you might look at before shooting.
Bottom line? Don’t panic, learn the basics and then continue at a pace you are comfortable with.
Any questions? Leave a comment below or email me.