Introduction: Learn About Camera Lenses
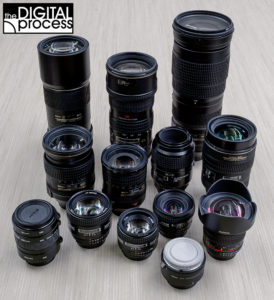
One of the biggest reasons people buy a more advanced camera is to have the option of changing lenses, or selecting a lens that helps their photography. If you are using a phone or other pocket camera, you will have a single lens built in, and maybe the option to stick accessories in front of it. Once you work with a system that provides a complete line of lenses, your photography can take on a new life!
There are so many great camera systems available to us these days. In the film days, if you wanted to use multiple lenses, you pretty much used a 35mm SLR camera or a larger medium format camera. Today, there are mirrorless (MIRC – Mirrorless Interchangeable Lens Cameras) and ‘Micro 4/3’s’ cameras that are more compact than a DSLR, yet still provide great results and the same versatility.
This lesson will explain the different types of lenses that are commonly used as well as help with some of the technical aspects of lens selection. I hope it will inspire you try new lenses or act as a guide when it comes to purchasing a new lens. Remember that each camera brand has a unique lens mount, so for example, a Nikon lens will not fit on a Canon or Sony – and vice versa.
I worked for over 15 years in the photo retail business and had countless people enter a store and say, “I want a new lens, what do you recommend?” My first question was always, “What type of photography are you into?” This approach means that what one person thinks is the perfect lens will not apply to the next person. Still, there are common groups of lenses that apply to specific fields of photography.
The more you learn about camera lenses, the more complete you become as a photographer. The good news? It’s really easy to understand how it all works!
Focal Length
The most important feature of ANY lens is its focal length. If you have ever heard of a 50mm lens, the “50mm” designates the focal length. A zoom lens might have a focal length of 70-200mm. But what does this all mean?
In simple terms, focal length is defined by the distance between the front of the sensor (or film plane) and the “point of sharp focus” when the lens is focused to infinity. Here’s a diagram that shows this concept and might clear things up for you.
Although this diagram shows ‘what’ the focal length represents, it doesn’t really matter in your day to day photography. What you do need to know is how one focal length relates to another and more importantly how to choose the right focal length for the shot you are taking.
Grouping Lenses by Focal Length
Almost everyone has heard the terms “wide angle lens” or “telephoto lens” and most people could give a reasonable description of those terms. In the photography world, lenses are put in groups or classes based on their focal length. Here is a table which shows common groupings of lenses.
| Focal Length | Lens Category (full frame cameras) |
| Up to 8mm | Fisheye |
| 10-20mm | Ultra-wide angle |
| 24-35mm | Wide Angle |
| 45-60mm | Standard |
| 70-300mm | Telephoto |
| 400mm and higher | Ultra Telephoto |
This is a good, general guide and is just used for reference and to clarify some terminology. These categories also apply to cameras which use 35mm film or a “full frame” sensor.
What happens when you don’t have a camera with a full frame sensor? A common class of camera is “APS-C” (DX in Nikons, EF-S in Canons, DT in Sonys), which uses a sensor about 2/3 the size of a full frame camera. These smaller sensors ‘crop’ out part of the images that a full frame sensor would see. This forces us to use a “crop factor” when looking at focal length.
When it comes to an APS-C camera, take the focal length and multiply it by 1.5 to account for the amount of cropping that will occur. This means our 35mm wide angle lens (on a full frame camera) acts like a 52mm standard lens on an APS-C camera.
If you have a Micro 4/3 camera, then the crop factor is 2. Our 35mm lens now becomes a 70mm short telephoto lens.
If you used the same lens on 3 different cameras, your image would vary, as shown in this sample below.
How does all of this affect your photography? You should know what size sensor your camera is using, and how the focal length on the lenses you are using will give you a certain view. Learn about crop factors, especially if you use the APS-C cameras as they can usually use the same lenses as full frame cameras.
One final thing about focal length and crop factor is a term called “35mm equivalent”. You will usually see this in a lens review or other discussion about a particular lens. The lens might be listed as as a 5mm lens for your phone, but be referred to as “28mm in 35mm equivalent”. The reason for this term is to give people an idea of the field of view that this lens might have in terms they are familiar with.
Field of View
If you read that last paragraph, you’ll notice I slipped in a new term: “Field of View”. The field of view in a lens refers to how much of a scene you can view while looking through a lens (measured in degrees). A wide angle lens has a larger (wider) field of view than a telephoto lens.
If you look at the image below (click for larger) you can see how four different lenses give four dramatically different views of the same scene.
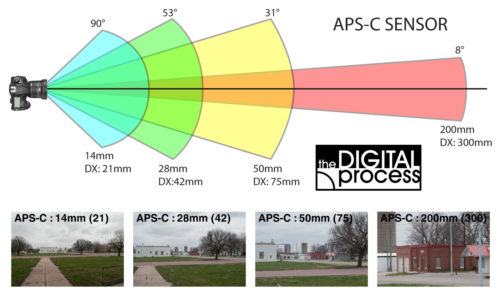
Here is a similar chart and sample photos but for an APS-C sensor.
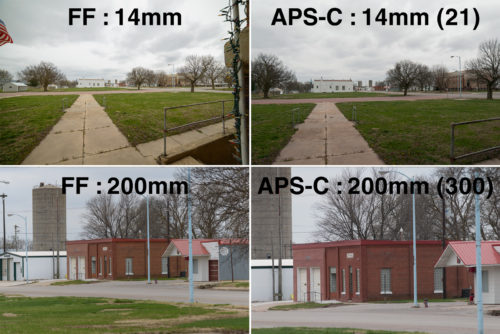
If you look at this image above you will see that the small sensor (using the same lens) has noticeably narrower field of view. Here are a couple of side by side images to show you the differences.
If you look at the bottom pair (telephoto) you can see the APS-C sensor will appear to make the distant subjects closer, while it is actually just cropping to a smaller field of view. Still this effect makes these smaller sensors popular with wildlife and sports photographers.
Most of us don’t need to memorize a list of angles for the field of view. What we DO need to know is how one lens relates to another so that we can choose the best lens for the scene we are shooting. No matter what type of camera you’re shooting with, you want to know what focal length will give you a wide view, normal view or narrow view. As you get more experienced, you can better visualize what the lens will see before you attach it to your camera or bring it to your eye. If you’ve ever seen someone frame a shot with their hands forming a rectangle, this is just a way of visualizing different compositions. Try this and move your hands closer or further to get the ‘zoom’ effect.
If you are buying a lens, you will need to know if your camera is full frame or APS-C. In Nikon terms, this is FX (full) and DX (crop) and they make lenses specifically for each body. You can use an FX lens on a DX body and it will just crop the image as shown above. You can use a DX lens on an FX body, but the image won’t fill the frame, so you can switch to a “DX Mode” when shooting with these lenses.
Lens Aperture
You have already learned about lens apertures and how it affects your depth of field and shutter speed. This section will talk about how the maximum aperture relates to various lenses.
A common 50mm lens might have a maximum aperture of f1.8. This means that it lets in a nice amount of light and can do this because is is a fairly small lens. The Nikon 800mm lens has a maximum aperture of f5.6. This is a very large lens that weighs over 10 pounds (4590g) and due to the length, it can’t have an f1.8 aperture.
What this means is that different lenses will have different apertures and in many cases that is based on the physics of lens design. You will also see that two similar lenses will have different maximum apertures. A 50mm lens might be available in different designs at f2, f1.8, f1.4 and f1.2 – even f0.95!
Usually, the wider the maximum aperture on the same focal length lens will be the more expensive option. The reason is that wider apertures require bigger glass and optical glass is expensive. With the larger glass, there is usually a larger lens designed to hold that glass and so everything just becomes more expensive.
Many consumer level zoom lens will have a “variable aperture” (example: 70-300mm f/4-5.6) to help keep costs down. So a zoom lens set to 70mm has a f/4 aperture while at 300 the aperture is f/5.6. A more expensive zoom would keep the aperture at f/4 throughout the whole zoom range.
Lens Build Quality
The longer you spent around camera gear, the more you’ll realize that there are two levels of equipment: entry level and professional. Professional gear is built to a higher standard and designed to put up with the abuse from professional photographers. Not all pros are hard on their gear, but camera and lens manufacturers need to cater to this market and provide gear that will withstand rain, mud, shocks and other traumas.
For example, a consumer camera like a Nikon D7000 might be engineered for a 150,000 shutter clicks, while a professional D5 is good for over 400,000. In lenses, there is not a similar stat to compare, but a pro lens will have better sealing against the elements, more metal parts, higher quality glass and coatings and usually faster apertures and focusing.
Here is a chart that compares two different Canon zoom lens with a similar range.
| Product | EF 70-200mm f/2.8L USM | EF 75-300mm f/4-5.6 III USM |
| Price | $1,349.00 | $234.99 |
| Elements | 18 elements in 15 groups | 13 elements in 9 groups |
| Dimensions | 3.3in. x 7.6in. / 84.6mm x 193.6mm | 2.8 in. x 4.8 in. / 71mm x 122mm |
| Weight | 2.9 lbs. / 1310g | 1.11 lbs. / 480g |
| Filter Size | 77mm | 58mm |
| L-Lens (Pro Level) | Yes | No |
One lens costs more than $1000 over the other. Can you tell why just by looking at this table? The more expensive lens has a faster aperture, more (and bigger) glass elements, weighs more (likely more metal parts) and is rated as a ‘pro’ lens. Other factors like durability and the quality of the glass and coatings are also a factor. Is the pro lens worth that extra $1000 to you? Only you can answer that question in the end.
Lens Distortion
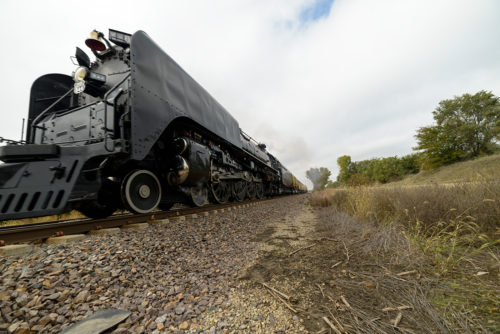
When looking at all of the many, many lenses on the market, you might wonder what sets them apart. ‘Lens distortion’ covers a lot of different areas. For example, most ultra wide angle lenses suffer from what’s called “Barrel Distortion”. This term is used to describe the effect of straight lines near the edge of the frame bowing out toward the sides and top to create a ‘barrel’ effect. The opposite of this is “Pincushion Distortion” which describes lines bowing towards the centre of the image.
The good thing is that this can usually be corrected now in software (another plus for the digital process over film). In Photoshop and other programs you will usually find a setting for “lens correction” to fix barrel and pincushion distortion based on specific profiles for each lens.
Have a look at the images below to see how lens distortion can be fixed in Photoshop
The only difference between the two images is that I added a lens correction profile to fix the barrel distortion on the Rokinon 14mm lens. Depending upon the quality of the lens, the distortion may or may not be a factor. A cheaper lens will have more barrel distortion usually to save the manufacturer from adding more glass elements to correct it.
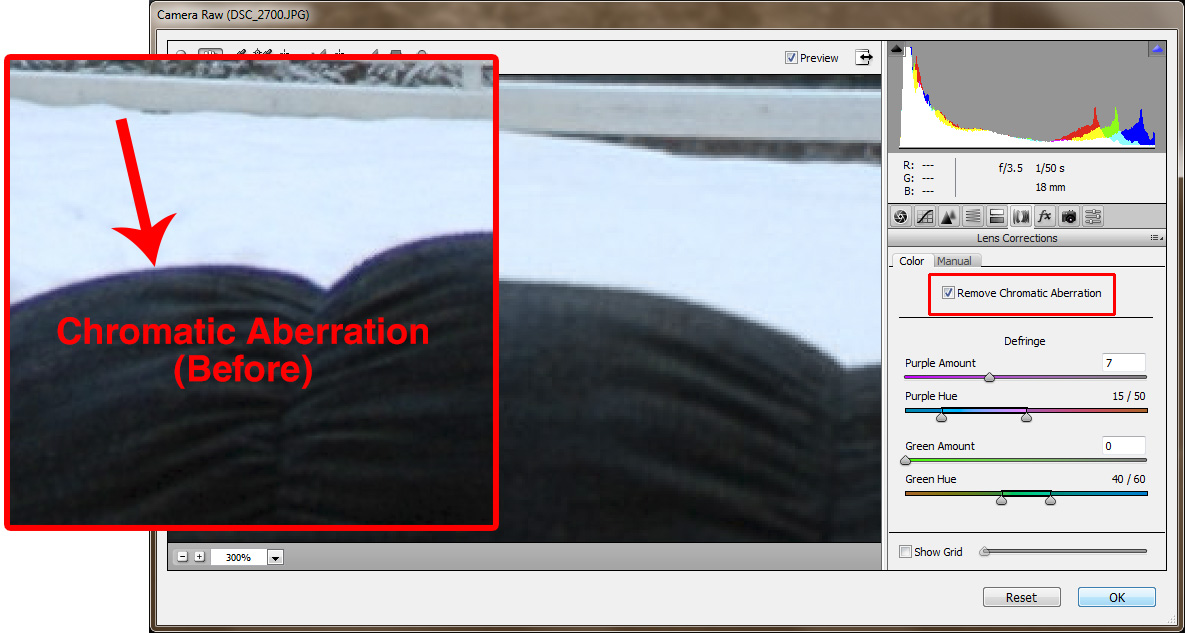
Another type of distortion is what’s called “Chromatic Aberration“. This is a name give to the color fringing that sometimes is seen in photos. This is usually more noticeable in backlit objects and at full magnification. You might not always see this, but it’s good to check for this before printing your images. Again, cheaper lenses will show this more than a pro lens. If you read lens reviews, this is usually rated along with sharpness.
This image below shows how it looks when you zoom in to see it and then you can see how it is fixed in Adobe Photoshop.
There are other factors when looking at lenses, and there are reviews on each lens you might consider buying. For an average user, you really need to be concerned with lens distortion and chromatic aberration (both of which can be fixed usually). Professionals who are hyper-critical about their work will consider features like subtle shades in colour and contrast when comparing two lenses.
Vibration Reduction / Image Stabilization
Another great advance in camera tech is vibration reduction (VR) as Nikon calls it or image stabilization (IS) as Canon calls it. I’ll just the term VR in this lesson as each camera brand has a different name for this.
VR can either be in the lens or in the camera body depending upon who makes your gear. In the lens, VR will make micro adjustments in a group of elements to stabilize the image while your camera is moving so that the image appears stable at the sensor. This is a great tool to help you capture hand held shots at shutter speeds slower than the golden rule “1/lens length”.
Each generation of VR gets a little better and today’s VR can provide help with up to 3 to 5 stops of shutter speed. This means that if you can hand hold a non-VR 300mm lens at 1/300s, you can hand hold a VR 300mm at 1/60s and (in theory) get just as sharp of a photo.
Does this mean that you should always have VR turned on? Nope! Although it sounds great in practice, and VR is designed to stabilize the elements while your camera is moving – you don’t want it turned on while you shoot at fast shutter speeds that wouldn’t normally be affected by hand held camera movement. The reason is that if the camera is not moving, but the elements ARE moving, then your sharp handheld photo can be blurred by these micro adjustments.
I also recommend that even if you use slow shutter speeds while your camera is on a tripod, you should still turn off VR for the same reason: your camera isn’t moving, but the elements will be.
Some lenses will have a switch to turn your VR from active to passive. This switch is there so that you can still use VR while panning. Check your manual to see which options your lens has and when to set it. Canon suggests “IS Mode 2” while Nikon will detect a panning motion, you can also set the lens to “Active” VR.
The last thing to remember about VR is just because it helps you when you hand hold a camera at slow shutter speed, it won’t help freeze the action of a moving object. Your camera stays steady, but if you’re shooting a race horse at 1/30s, you will get motion blur from the moving horse.
Zoom vs Prime Lenses
You’re familiar with zoom lenses, but what is a ‘Prime’ lens? The easy answer is a prime lens is a lens that does not zoom, or only has a single focal length. The popular 50mm f/1.8 standard lens is a prime lens. Primes lenses come in all focal lengths from a 6mm fisheye to a 600mm telephoto.
Why would anyone want a prime lens when a zoom lens is so much handier? At each end of the focal length scale, it is much more difficult to build a zoom lens. You won’t see a 6mm to 14mm zoom lens, nor will you see a 600mm to 800mm zoom. Sometimes, the design factors will limit your choice.
In general practice, a prime lens is usually sharper than a zoom lens. It makes sense that if a lens has one job to do, and only one focal length, it should be good at that job. If you want a quality lens and can’t afford a professional zoom lens, then you can look at a prime lens that will suit your needs. Instead of buying that 28-70 f/2.8 you have your eye on, consider 28mm f/2.8.
The most popular prime lens is the 50mm. For starters, they are very affordable. For Canon or Nikon you can a get 50mm 1.8 for $100-$130.They are fast lenses, commonly f/1.8. A 50mm lens also considered a ‘standard’ lens because with a full frame sensor (or 35mm film) the angle of view is similar to what we see with our eyes. It’s great in low light, will have great optics and is compact when compared to a zoom. I recommend that everyone consider adding one to their camera bag.
If you like macro photography, you can combine a 50mm lens with either a reversing ring or extension tubes to create some stunning close-up photos!
I have a few prime lenses and enjoy working with them. If I plan ahead, I know which primes to put in the bag and if I need to get closer, I “zoom with my feet”. I’ll also put on a 28mm lens to keep the camera much lighter than if I had put on the 28-70 2.8 zoom.
Finally, a prime lens has less moving parts than a zoom. I have found that primes will last longer than inexpensive zoom lenses. Consider them a long term investment.
Lens Accessories
When you purchase a new lens, it will usually come with some basic attachments. You’ll get the lens (of course) as well as a rear cap (for when the lens is off the camera) and a front cap (for when the lens is not in use). You may also get a case; either a soft pouch or a hard case. You might also get a lens hood depending upon which lens you bought.
All of these items should be considered ‘must have’ lens accessories. You need the caps to protect the glass. You need the case to keep the lens from dust.
The lens hood is usually the most overlooked accessory in a camera bag. The hood is there to keep stray light from entering the lens and causing ‘flare’ in your photos. I see a lot of people who don’t bother with lens hoods and don’t want spend the extra 1.5 seconds it takes to attach a hood. You don’t know when you’re going to need the hood, but it’s one more step to ensuring you get the best photo possible.
Lens Filters for Protection
I’ll have a separate lesson written about the many filters you can get for your lens or camera, but for now, let’s look at filters whose main job is to protect the front of your lens.
Filters are a personal choice and many people don’t use them. The argument against them is “Why should I put another layer of inferior glass in front of my $2000 lens?” This is a valid point as a cheap or even a good filter can introduce more lens flare into your image. The counterargument is “Why would I NOT put a piece of glass in front of my $2000 lens to protect it?” The choice is yours, and I recommend to people that if you don’t have the lens insured and can’t easily afford to replace it – use a filter.
There are various types of filters that are used for protection, with the three main ones being UV, Sky and NC.
UV: Designed to reduce Ultraviolet Haze in landscape photos
Sky: Designed to give a very slight warming effect
NC: An optically Neutral and Clear filter that won’t affect the image
Personally I use Nikon NC filters. I like the fact that they won’t affect the image, and are made to the same standards as the lenses. In the past I have used both UV and Sky filters and most people won’t notice a difference between the three types.
What I will recommend is to buy a name brand (Tiffen, Hoya, B&W) rather than a generic cheaper filter. The reason for this is that filters, like lenses, have a micro coating on the glass to reduce flare and reflection while retaining accurate colour. That is the goal on a well made filter. Your filter should also have a metal ring (rather than plastic) so that it won’t break or snap while you use it.
How to decide which lens you want
After reading all about lenses and what they can do, you must be ready to buy one! (I know I am). Now that you are armed with some good information about what lenses are all about, you can break down your decision into 3 steps. As you learn about camera lenses, this will become second nature to you.
Step 1: What do you usually shoot?
If you like to shoot wildlife or sports, the quick answer to look at a telephoto zoom lens. You can’t always get close enough to your subjects, so use the lens to enlarge the subject. The amount of zoom or length of lens will depend a little more on your personal vision. Do you shoot your kids at the ball field? If so, you can likely get fairly close and don’t need anything too extreme. If you shoot wildlife, then you usually want the longest lens you can afford. You will never get close enough!
Common Choices:
70-300 f/4-5.6 consumer lens
70-200 f/2.8 pro lens
300mm f/4 pro lens
If you shoot people or groups of people, you might consider a wide angle zoom lens. You want to be able to get the whole gang in with a wide angle shot, but still zoom in closer for an intimate portrait. If you shoot ‘general interest’ photos, then a wide angle zoom is also handy. Are most of your photos for the web and a few small prints along the way? Then maybe you can just get a nice compact prime lens and crop your photos as needed. On the other hand, you can get the popular “all in one” zoom like a 28-200mm zoom.
Common Choices:
28-200 / 28-300 f/3.5-5.6 consumer
28-70 f2.8 pro zoom
28-80 f/4 consumer
50mm f1.8 prime
28mm f2.8 prime
85mm f1.8 prime (portrait lens)
If you enjoy shooting landscapes, then you’ll likely want a wide angle lens to capture as much of the scenery as possible. After I moved to Nebraska, I found that the big skies out here cried for wider and wider lenses! I’ve always enjoy shooting extremely wide shots, and not just for landscapes. I like the challenge of composing a scene that has a lot going on. Of course you can shoot landscapes with any type of lens, the more you can bring into the frame, the more you can tell the story about where you are.
Common Choices:
14mm f/2.8 ultra wide prime
20mm f/2.8 prime
28mm f/2.8 prime
24-70 f/2.8 pro zoom
16-35 f/2.8 pro zoom
If you don’t have a special interest and just want to shoot everything you see from the kids to the dogs to little league and flowers, then you can look at the great all in one zooms that range from about 28mm to 200mm or 300mm. This new class of lens is great for people who just want to stick one lens on and GO! This is also a great option for travel when you are limited on space. These lenses may not do everything great, but they will do everything well. One of the first lenses I bought for my new DSLR was the Nikkor 28-200 zoom and I still have it.
Common Choices:
28-200mm zoom
28-300mm zoom
17-85mm zoom
Special Use
Many people will have a very specific reason to buy a lens. For example, if you love to shoot insects, you really want a macro lens. A macro lens is designed to give a 1:1 scale image and allows for very close focus. If you shoot a lot of architecture, you might invest in a perspective control (PC) lens. A PC lens lets you correct distortion when pointing the camera up a building (they’re also very expensive!).
Step 2: Pro or Consumer Lens?
For many people, their personal budget will dictate what type of lens they purchase. Although even if you have spare cash to spend on a pro lens, is it always worth it? If you don’t use the lens much, then you don’t need one that will stand up to the rigors of everyday use. Save your money and buy a nice flash or tripod to go with your new lens. Allocate your funds wisely!
If you are shooting in low light situations a lot, then maybe you need the faster pro glass. Before you shell out $2000 for a lens, maybe your new camera works great at high ISOs and you can get by with an f/4 lens and don’t need the f/2.8.
As much as I LOVE high end camera gear, I need to seriously consider how I plan to use the equipment, how often I’ll use it and if there is something else I can buy with the saving that will equally help my photography. It’s just like buying a car. Every one eyes the new Ferrari, but you can still get where you need to go in a Ford.
Step 3: Camera Brand or Other?
In the early days of photography, if you wanted a quality lens you bought the ‘name brand’ based on your camera model. There were other brands, but their quality was usually sacrificed to reach a lower price point. These days this is not the case. Advances in computer design have helped bring the cost down for manufacturers. In many cases there are lenses on the market that Nikon, Canon and the other camera brands just don’t have available. The cost of some of the lenses can still be high, but there is no reason to avoid the ‘other’ guys.
A few years ago I purchased my first non-Nikon lens. I wanted an ultra-wide lens for astrophotography and other uses. After much research I selected the Rokinon 14mm manual focus lens. I love this lens. It’s sharp and the manual focus is not a problem with such a wide lens.
Once you’ve decided on the focal length or zoom range you want, see what other manufacturers have to offer. Read reviews and look for feedback to guide your choice.
Step 4: New or Used?
Once I’ve decided on a lens, I will start shopping for a good price. I look at three categories of gear: New, Used and Refurbished. New is always a good choice if you can afford it. You get nice new lens in perfect condition and a manufacturer’s warranty. You really can’t go wrong buying a new lens.
If you want the security of a new lens, but don’t want to shell out top dollar, consider a refurbished lens. I have a bought a few lenses directly from Nikon or other resellers and saved some money because the lens was returned, or a demo and then checked out and marked down in price. There is still a manufacturer’s warranty and in many cases, the lens has been verified to work perfectly within specifications.
Buying used is a good plan IF you know what you are looking for (see video below). I’ve been looking at lenses for almost 40 years. I can usually tell when one is going to cause me trouble. If you are new to photography, you might want to avoid the used market unless you are buying from someone you know.
I have bought lenses from eBay and had no problem at all. With that said, I make sure the listing has several CLEAR photos. I check to see that the seller has over 100 feedback reviews and that they are 100% positive. I make sure the price is worth the potential risk of buying something used. If the photos look good, the buyer looks legitimate and the price is good, then I’ll consider buying on eBay. If one of those three things is missing, I’ll pass and keep looking.
Of course eBay isn’t the only place to buy used, but usually offers the best prices. Most of the bigger online and brick stores will offer used gear. It’s worth shopping around. Many of these stores will offer a short warranty as well. There are also companies online that specialize in used equipment (KEH.com is a popular one). Used prices vary greatly and so does condition. Make sure you thoroughly read any description on a used lens and make sure you are 100% comfortable before pulling the trigger on that ‘great’ deal.
If you are not in a rush for the new lens, you can keep searching and looking at websites and usually save some good money by waiting for the right deal to come along. If I can find a good deal, the lens will hold its value should I ever decide to resell it.
The last thing to consider when buying used is that there may be a few generations of the same lens out on the market. Do you research and try to find the newer lenses which might have better AF and VR. The more you learn about camera lenses, the easier this becomes!
Choosing and Buying a Lens: Review
So I like to look at the three steps and then do a final review before I buy. What will I use this lens for? How often will I actually use it? I won’t say I love buying lenses more than most women like buying shoes… but… I really do like my lenses! 😀 I find that if I think hard enough I can find a reason to buy a new lens, then I try to talk myself out of it. But when I do need one, I will do a lot of research on what’s available.
There are a lot of choices, but if you do your homework, it’s rare that you will get buyer’s remorse. Besides, you can always upgrade! 😀
I’ve added a short video (below) which shows the common things to look for when considering a used lens. It also gives a good over of what to look for with your own lenses to keep them in top operating condition.
Summary
Today’s lenses are continually evolving. When I started in photography in the late 70’s, the lens was just glass and aperture. It didn’t autofocus, it didn’t control vibrations, but it was still an important part of the process. I love the new technology that is engineered into modern lenses and who knows what we’ll be seeing in 20 years!
The most important thing to remember is that cameras with interchangeable lenses offer more tools to a photographer. A specialized tool can help you get the photo you envision and make your image stand out from the others. Consider your style of photography and if a new lens will help. There are even several companies that will let you borrow lenses so you can spend a week deciding if that new ultra-wide lens is right for you.
Finally, using different lenses expands the creative process. The more options you have, the more can experiment and grow as an artist.
If you have any questions, leave a comment below or email me: info@TheDigitalProcess.com

