Intro to Raster vs Vector Files
For those of you that have never used imaging software or graphics software, there are some basic concepts that should be covered. For example, is Photoshop the right tool for the job? How is it limited? Can I just take someone’s head off and move it onto someone else’s body in 2 seconds just like on TV? (short answer: no). So this lesson will deal with the benefits and limitations of raster imaging. This will give you a good understanding that’s needed before working through the rest of the tutorials and working your way up to doing layouts for magazine ads (or retouching Granny’s old photos). You can also check this out in the video at the end of this tutorial.
How Raster Files Work
One of the most important concepts to know about is “Raster”, and how it affects what you are working on. Raster is a fancy term that means you are dealing with Pixels (PICture ELements). When you take a digital photograph, it is recorded by turning the real world into pixels (little colored squares). So when you have a camera that has 12 megapixels, that means the image has about 12 million little colored squares. In theory, a camera that has 24 megapixels will take a better and sharper photo.
So what is a pixel and why should you care? Let’s say that you are designing a poster for your new business. You want it to be crisp and sharp. The photo you want to use is only 4″x6″, but your poster is 36″x48″ – that means you’ll need to enlarge that image about 9 times – and each pixel that looks good in the 4×6 image will be 9 times bigger in the poster. That will make it blurry or pixelated.
Here’s a visualization of how pixels work in the real world. Below is a photo of my dog Tosh. She posed for this so that you could understand how Photoshop works. I’ve taken a small section of the photo and then enlarged it so that you can see the pixels that make up a small part of the image – in this case her eye.
As you can see, what appears to be the white highlight is actually about 14 pixels of various colors. This is how digital images work.
This photo shows how Photoshop takes those pixels and converts them into more user-friendly format by blending the colors of the pixels to give you a smoother look (which in turn is made up of more pixels). This is called anti-aliasing. It changes the color of a pixel by averaging the color of two different pixels to produce a smoother blend between the edge of two areas, making the pixilation less noticeable.
And you could keep enlarging from there, but I think you get the ‘picture’. What this all means is that you want to work with the right size image for the job. It also means that if you design a 4×6 mail out postcard for you boss, and he likes it so much he wants to use it for a billboard – you’ll have pixel issues. The concept is known as resolution.
Now different jobs can require different resolutions. What works for a web image vs what works for a high end photograph are 2 different things. Below are some guidelines:
| Use of image | Recommended PPI / DPI |
| Internet images | 72 pixels per inch |
| Draft quality images | 100-150 ppi |
| Decent quality images | 200 ppi |
| Good quality images | 300 ppi |
| High quality images | 600 ppi |
See what I did there? I threw a new term at you. PPI or “Pixels per inch” The images you are looking at on the internet work at 72 ppi because that’s the highest resolution that (average) monitors will show. If you were to look at a printout of a web image, it will not be very sharp (especially compared to a high quality image).
Now of course a lot of this is subjective and open to discussion. For example I can print a 300dpi image on my $50 cheap inkjet, and I can print the same image on my $800 printer – will they look the same? No, because all printers are not created equal. I can print the same image on the same printer and use 2 different papers and they will look totally different. That’s why there is a such a cost difference in printers, ink and paper. (But do watch out for overpriced junk!)
How Vector Files are Different from Raster Files
Now that you know a bit about raster images and pixels, I’m going to show you something different. The other type of image you can make is a vector image. Vectors by definition are lines at a certain distance and angle. The lines, arcs circles, etc can easily be manipulated with points and handles to change the shape and keep a very straight and clean edge. As far as computer images are concerned, Vector images can be enlarged and reduced (scaled) without any real loss in quality. Adobe makes another program called Illustrator that is designed to work with vectors . It doesn’t have the power of Photoshop for editing images, but is great for clean text and shapes of all sizes. We often create a background image in Photoshop and then import it into Illustrator to use as a mask for text or a background.
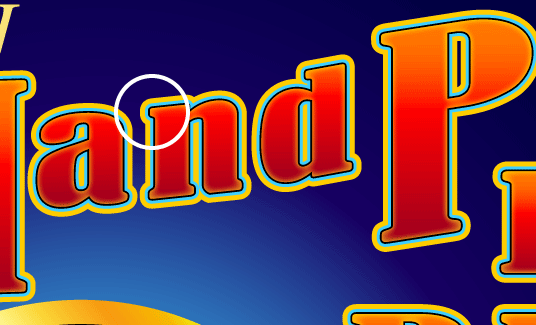
Below is a design I worked on for company that made slot machines. This is a section of the glass at the top of the machine.
Here is the enlarged area shown by the white circle

So even though the objects in the drawing are enlarged, they remain sharp because they are constructed of vectors rather than pixels. In the blended reddish area, you can see pixels because the display is set to preview in raster mode..
Now if you’re thinking that vector is sharper – it is, but it cannot be used for some images, photographs, and other procedures that require detailed drawings with complex blended colors. But there is some good news for you vector fans.

Photoshop has a few vector tools at your disposal. You can draw custom shapes as well as circles, squares, lines, etc. And this is great for those times when you need a sharp crisp object like a border around an image. Below is an image showing two lines I drew in Photoshop. On the left is the raster line tool, then copied and enlarged below it. On the right is the vector line tool, also enlarged. Can you spot the difference?
Video: See the differences of raster vs vector files explained in this short video by showing their differences in Photoshop and Illustrator and should clear up any questions you might have:
Summary
This tutorial has shown you the differences between raster vs vector based images. Photoshop is mostly a raster imaging program, but has some basic vector tools included. Photoshop is ideal for manipulating images with subtle gradients, photographs, etc. But it is not what you want to use for creating floor plans, or billboards with large text objects. Knowing the limitations and benefits of any program will allow you to do the best job.
Reference
For more about pixels, visit this Wikipedia page
For more about vectors, visit this Wikipedia page (warning: scary geometry stuff!)
Read about how Anti Aliasing works in raster vs vector files.