How to Hold a Camera Correctly

This might seem like a lesson you want to skip over, but I’ve included it for an important reason. I see a lot people who don’t know the better ways to hold a camera when taking photos. What I show here are techniques I’ve learned from decades of shooting, reading, seminars and watching other people.
When you are holding a camera, there are two main goals: don’t drop it and keep it steady when shooting. Secondary goals are to make it comfortable on yourself and to protect the camera.
Wow! Four things to remember about holding a camera? Maybe you want to keep reading! The goal of all these lessons is to make you a better photographer. You can have the best settings on your camera, but still get blurry shots thanks to bad shooting technique.
Carrying the Camera
If I’m out for a walk with my camera, I will likely spend over 80% of my time just carrying the camera from point A to point B and this could go on for several hours if I’m lucky. I’d like to be comfortable when I do this. The first step in this involves using a good quality camera strap.
The camera strap you use is a totally personal choice. I’ll tell you why I picked the one (below) I currently use.

There are two main features I like about this strap. The first is the padded, wider centre section of the strap. This makes it a lot more comfortable on my shoulder while carrying it around for hours at a time. I can carry it all day and not be sore afterwards. The second feature is the detachable connectors on each end. In the studio, I find that when I’m working on a tripod and using a cable release, the strap is usually in the way and not needed. Being able to take it off in a couple of seconds is a huge benefit. It’s also made from quality materials that shouldn’t degrade over time.
Compare this strap to the generic ones that come with most cameras.

The strap above is thin, lightweight and not padded. To remove it, I’d have to unlace the latches on either end and spend a minute or two to take them off or put them back on again. Who has time for that? Also these straps are great for advertising the make and model of your camera. The manufacturers like this – so do thieves.
The lesson here is that it can be worth spending an extra $20-30 on a strap that suits your needs, since you’ll be using it every time you pick up your camera (and then you can use it on your next camera).
Holding your camera while shooting
It can be exciting when you have the camera up to your eye and you’re all set to take a photo. We all get a little giddy as we line up the perfect shot, check our settings and shoot the photo. Just before you shoot, it’s good to check yourself and make sure you hold the camera securely and steadily. If you hold a camera without thinking about how steady you are, you might ruin your shot.
Here’s the mental checklist I go through when taking a photo without a tripod.
- Feet should be about shoulder width apart
- Knees slightly bent
- Eyecup pressed against my eye
- Right hand firmly grasping the body
- Left hand supporting the lens from beneath
- Elbows in at your ribs
- Lean against a wall or tree if needed
By placing my feet at shoulder width, I am better balanced. I don’t want my feet close together because I could wobble and move. You’ll find that with this stance and your knees slightly bent, you should be comfortable and steady. You might be a little steadier if one foot is in front of the other slightly.
Now that your ‘base’ is established and steady, it’s nice to get three points of contact on your camera. Your eye can be one point of contact. This helps steady the camera more than if you are a little ways away from the eyecup.
Most people know what to do with their right hand, camera designers go to great lengths to make sure we get a good, comfortable grip on the right side of the camera. Use all of your fingers to grasp the camera.
Many people don’t know what to do with their left hand, though. A lot of photographers will hold the left side of the body just like they do on the right side. This approach does nothing to support the lens. If you have a long lens, gravity will want the lens to drop down.
Other people grab their lens from the top and focus. I have no idea why. I guess that’s how some people learn and then it sticks. Again, this does nothing to support the lens.
Your left hand should be under the lens (long or short lenses). This allows you to support the weight of the lens yet still easily focus and zoom. With your left hand under the lens, your right hand on the camera and your eye on the eyecup, you have three secure points of contact.
One last thing to think about: your elbows. If your elbows are out away from your body, your hands are less stable. If your elbows are stuck in to your ribs, your hands are now steady and that means your camera is steady. Take the shot!
Is this a lot to think about when you’re shooting? At first, yes. Like many things in life the more often your repeat a task, the easier it is. It won’t take long to develop good habits when it comes to photography. These techniques will soon become second nature and you won’t even know your doing it after a while.
If you find that you need to use a slower shutter speed than you think you can safely hand hold a camera, lean against a wall or tree to steady yourself. Press the shutter release while you exhale. Put your camera on ‘continuous shooting’ to fire off a few frames at once. This removes the ‘stabbing’ of the shutter button and can make the next images a little sharper and then you can select the sharpest of the series. You can also put your elbows on a table or the hood of your car and turn your body into a tripod if you have that option.
Here’s a short video that demonstrates the way I like to carry my camera:
Some examples
Here are two photos taken with the same settings, but different holding techniques
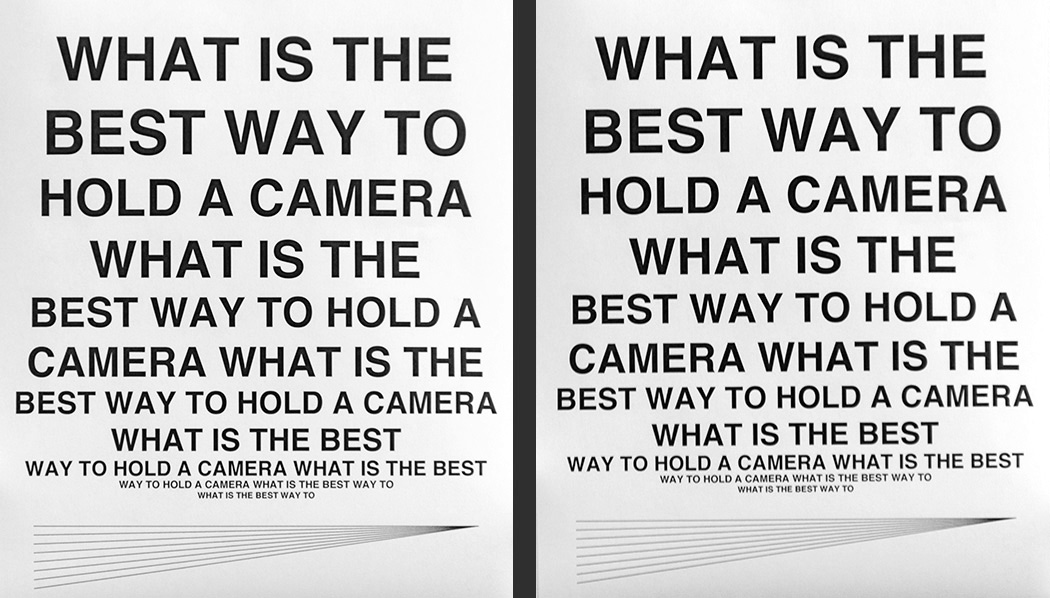
You likely can’t see a difference at this size, so click on the image and view it a little larger. Can you see a difference now? Maybe not because these photo have been cropped and resized smaller than the original image. If you only use your images for small web, Facebook photos this might not matter. But what if you shot a great shot and want it printed as a 16×20?
When looking a blurry image, how do you know if the problem is camera shake or focus issues? In almost every case, focus issues cause the blur to be even around the subject, while camera shake will have blur in (usually) one direction.
Now look at a 100% crop of the first ‘What’ in the top left corner:


Now do you see a difference? Click on each image to view it larger if you need to. The top photo was shot using bad technique (feet together, elbows out, hand over the lens, eye away from the camera). See how the top photo has blurring at the top and bottom of the text? That’s a sign that the camera moved up and down while the shutter was open. The bottom photo used all of the better techniques I listed above including shooting multiple, continuous frames. It’s still not as sharp as it would be if I used a tripod, but it’s a lot better than the first photo. With some work, I could make a decent print from the less shaky image.
For reference, these photos were shot with a 200mm lens at 1/40s | f/3.2 | ISO 500. Note that I should handhold this lens at 1/200s or faster, so this is quite a bit slower than we normally shoot at handheld, even with vibration reduction turned on (which it was).
Here is another video which shows how I hold my camera while shooting:
Summary
Even with today’s great cameras and amazing vibration control technology, you still have to be aware of how you hold a camera when shooting. Building good habits when you shoot is crucial to becoming a consistent photographer. You never know when you will REALLY need to use these techniques I’ve outlined above, so it’s good to just make it part of your usual photography.
With all of that said, you will still find times when you’re standing on your toes, reaching over a crowd with your arm extended and firing away! Do what you have to do to get the shot (but be safe!).