What is the Difference Between RAW vs JPG files?
Introduction
Digital cameras can usually record your images in two different file types: RAW and JPG. If you have been looking at photography websites or magazines or talking to other photographers, it’s very likely that you have come across the RAW vs JPG discussion. This lesson will explain the differences between these two types of image files and how they can affect your photography and how they impact you when you edit your photos.

What is a JPG image file?
Almost everyone is familiar with a JPG (jay-peg) image by now. It is the most common image file used today and a vast majority of the images you see on the internet are JPG files. JPG files are popular because they are a ‘standard’ image file that can be seen, used and edited by almost anyone with commonly available software.
A big advantage to JPGs is that they can be saved in varying levels of quality depending upon the end use. You could save a JPG at a very high quality and upload it to a photo lab for printing, or you could save the same image as a low quality to put on your website to make it load quickly. JPGs are the best common file for photograph display.
As you can imagine, the world of digital images revolves around the JPG. It is by far the most useful image format used today.
One disadvantage of shooting and saving files as JPGs is that they lose a little image quality each time you save it. If you save a JPG at 80% quality, close it, open and edit it, then save it again at “80%” – you’re only saving it at 80% of the 80% – not 80% out of 100% original. This will have a cumulative effect the more you work on your files.
What is a RAW image file?
A RAW file is an image file recorded by a digital camera. You can set your camera to record to RAW, JPG or both (in many cameras). RAW files are so named because they record the ‘raw’ data that comes directly from the camera sensor and will give you a large file which contains the most digital information that can be used when editing.
Each camera produces a RAW file and each camera manufacturer uses a different file format. For example, Canon uses .CRW (Canon Raw); Nikon uses .NEF (Nikon Electronic Format); Sony uses .ARW (Alpha Raw), and the list goes on. As you can imagine, there can be some confusion and there is no common ground between major brands. There is a .DNG format (Digital Negative) that is by many software programs as way of saving RAW files for later use.
What this means is that you can shoot a RAW file image with your camera, but you can’t really do much with it until you edit and save it as a JPG. Many free or cheap photo editing software packages don’t work with RAW files, so you will end up buying software to work with them – or even view them.
RAW files are also much larger (file size in kb) than JPG files. For example, the images used in the video at the end have files sizes of 5.2mb (JPG) and 13.4mb (RAW). This will mean that you might need larger capacity memory cards or a larger hard drive to store your photos.
Which is better?
The short answer is both have their advantages. The long answer is in the rest of this lesson. But if you are serious about your photography I will STRONGLY recommend that you shoot to a RAW file and then edit it into a JPG. I’ll explain why.
Advantages of JPG over RAW
More versatile in end use
Less editing (in some cases)
Smaller file size
Advantages of RAW over JPG
Better image quality
More versatile when editing
Can easily change an incorrect white balance setting
Color and “Bit Depth”
Remember the previous lessons that talked about RGB? All digital information is binary – 1’s and 0’s (bits) and image files are no exception. A digital image file uses a certain number of ‘bits’ per channel and this is what limits the range of colours it can display. If a file had a bit depth of 1, it would show just black and white – no greys at all. It goes up from there as shown in this chart:
| Bit Depth | Tones per channel (RGB) per pixel | Total Possible Colours |
| 1 (21) | 1 | |
| 2 (22) | 4 | |
| 4 (24) | 16 | |
| 8 (28) – JPG | 256 | 16.78 Million (JPG) |
| 12 (212) – RAW | 4,095 | 68.72 Million (RAW) |
| 14 (214) – RAW | 16,383 | 4.39 Trillion (RAW) |
| 16 (216) | 65,532 |
As you can see, the increase in the number of “bits per Channel” increases exponentially and the difference in the number of possible colours between an 8-bit JPG and a 14-bit RAW are dramatic. Does this mean that every RAW file will have over 4 trillion different colours? No, but it has the potential to record that many.
Now you might be thinking that a JPG file with over 16 million different colours would be enough for your photos. In many cases you could be right. But if you look at a sunset, you see an almost infinite number of colours ranging from blues to reds to yellows, and then there is the deep greens of the grass and in many cases, the JPG just can’t handle the full range of colours that it is trying to record.

When this happens, the camera will ‘guess’ at what colours it should use in the JPG and try its best. Also you want to think about dynamic range and how a JPG with less possible colours will have less dynamic range.
When this happens, you will see what’s called “Banding” in the image, and once it’s there, you can’t easily correct it.
At this point, it should be obvious that if you want the best possible image, you should set your camera to capture RAW files. Many cameras allow you capture both RAW and JPG, so that’s another option, but I find personally that it just makes for too many files to deal with and adds to confusion.
When to Shoot JPG files
When I started out with digital photography I shot in JPG because that is what I was familiar with. In most cases I was happy with my photos, but as I learned more about digital imaging I started shooting RAW. I look back at some older photos and truly regret that I shot them in JPG.
There will be times when you want to or need to shoot JPG files. It’s rare I set my camera to JPG only, but when I do it’s usually because I am shooting photos for someone else to use. Not everybody wants to (or can) deal with RAW files, so provide them with JPGs. There some occasions when I am just shooting some snapshots like a family gathering and know that I won’t be doing much with the photos except emailing them to friends and family. It can save me time to just send the JPGs and not spend any time editing them.
If you don’t have the software to edit a RAW file, you may want to shoot both JPG and RAW. Then you can always save the RAW to edit some other time when you can.
When to Shoot RAW files
Always. If you want the best possible results from your camera, shoot RAW. If you can’t edit them now, you will be able to do it later. Storage on hard drives is cheap, so why not save your best images in the original format?
Another advantage of RAW vs JPG is that if you make an error in exposure, you’ll have more latitude to fix the problem with a RAW file. As there is more ‘data’ to work with, you have more information to pull out details that would otherwise be lost in a poorly exposed JPG.
Real World Example
Here is a photo that I shot in 2009 with my camera set to record in RAW and JPG. It’s a tough exposure of a white bird against a dark background.

The photo above is the JPG image as my camera recorded it. If you look at it larger you’ll notice that the back of the bird is overexposed and I have lost all detail there (the dreaded “blown highlights”!). No matter what I do in Photoshop, I will never recover any detail in the feathers. Here is the same image after editing:
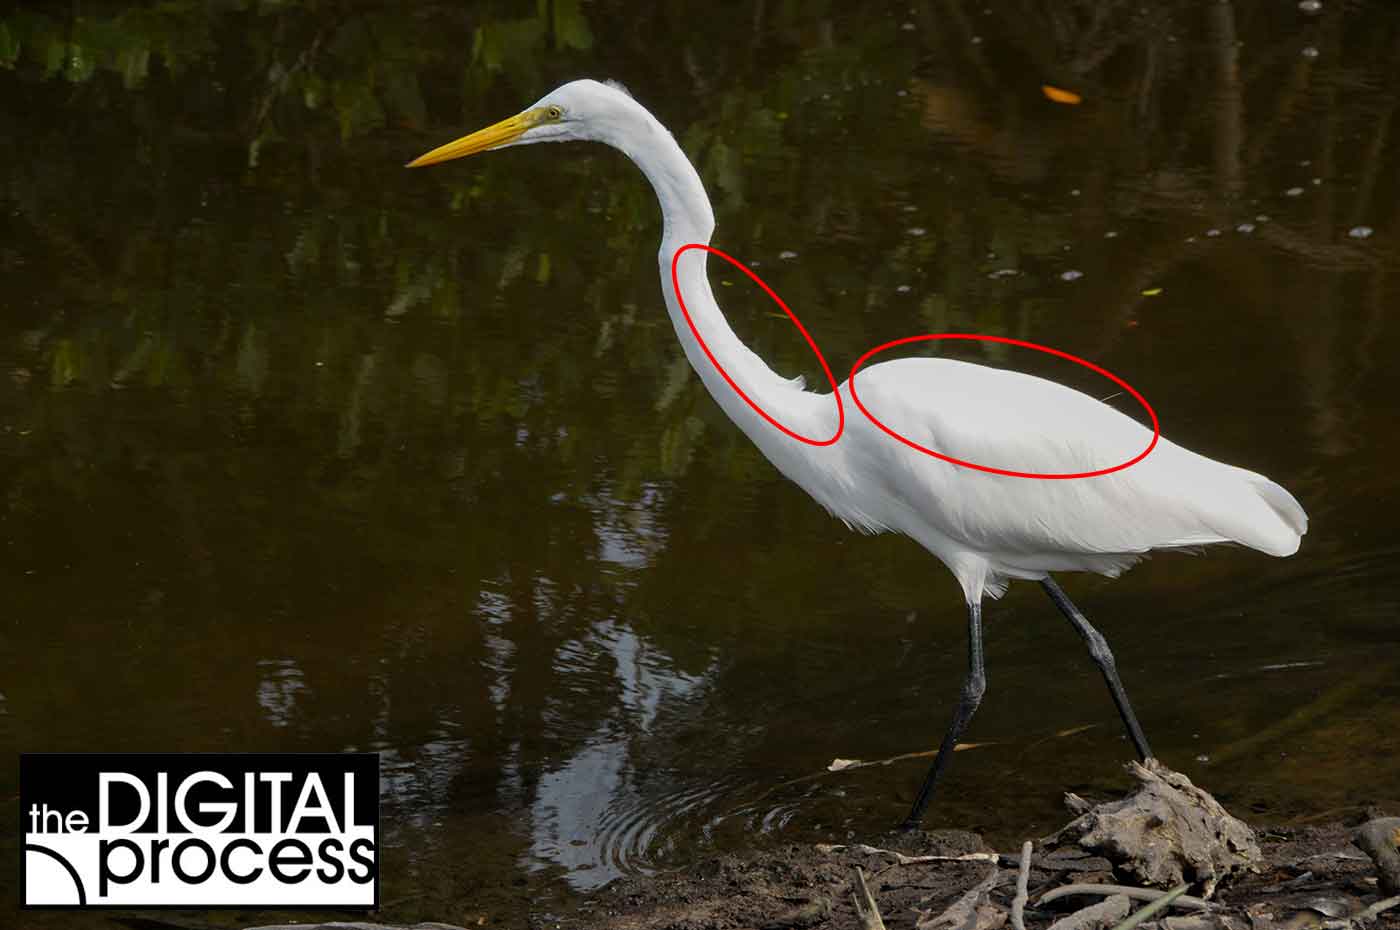
The areas circled in red show that there is still a bright white with no detail despite my best efforts to recover that part of the image.

Here is the same photo, taken with the same setting – except that it was saved as a RAW file. You’ll notice the bird is still overly bright, but you might notice more colours in the background. It’s a subtle difference, but it’s there.
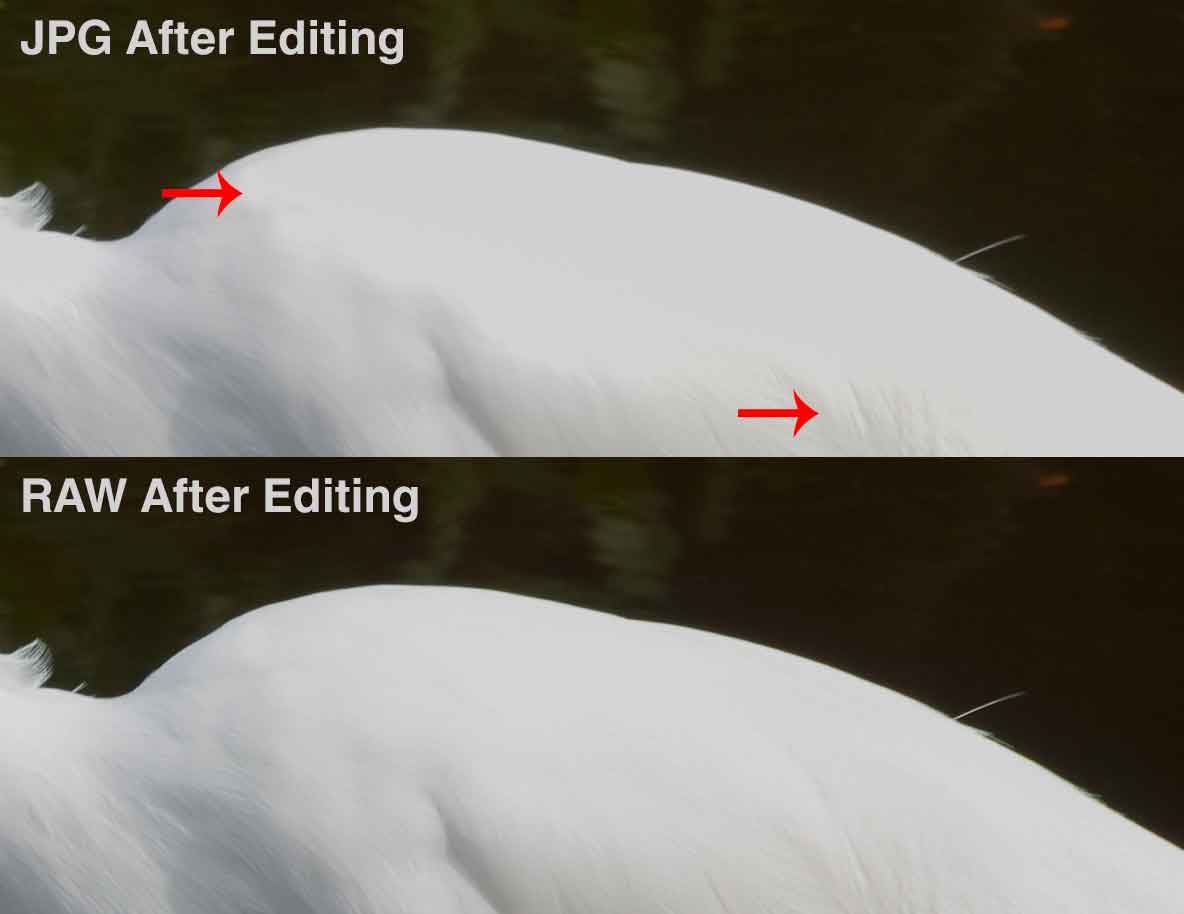
Here is the RAW file after editing in Photoshop and now I have retained some detail and tone in areas that were lost in the JPG file.

For a direct comparison, here is a closer look at the egret’s back feathers. Look closely at the areas shown near the red arrows. See how there is a ‘edge’ where I have lost the detail.
Now here is another image and instead of looking at over exposed area, this scene was generally under under exposed.

Notice how the colours are little more vibrant in the edited RAW image?
Now what is really interesting is if you look at the histograms of each of these images. The originals are both very close – but if you compare the histograms of the two edited photos, you’ll notice a big difference.
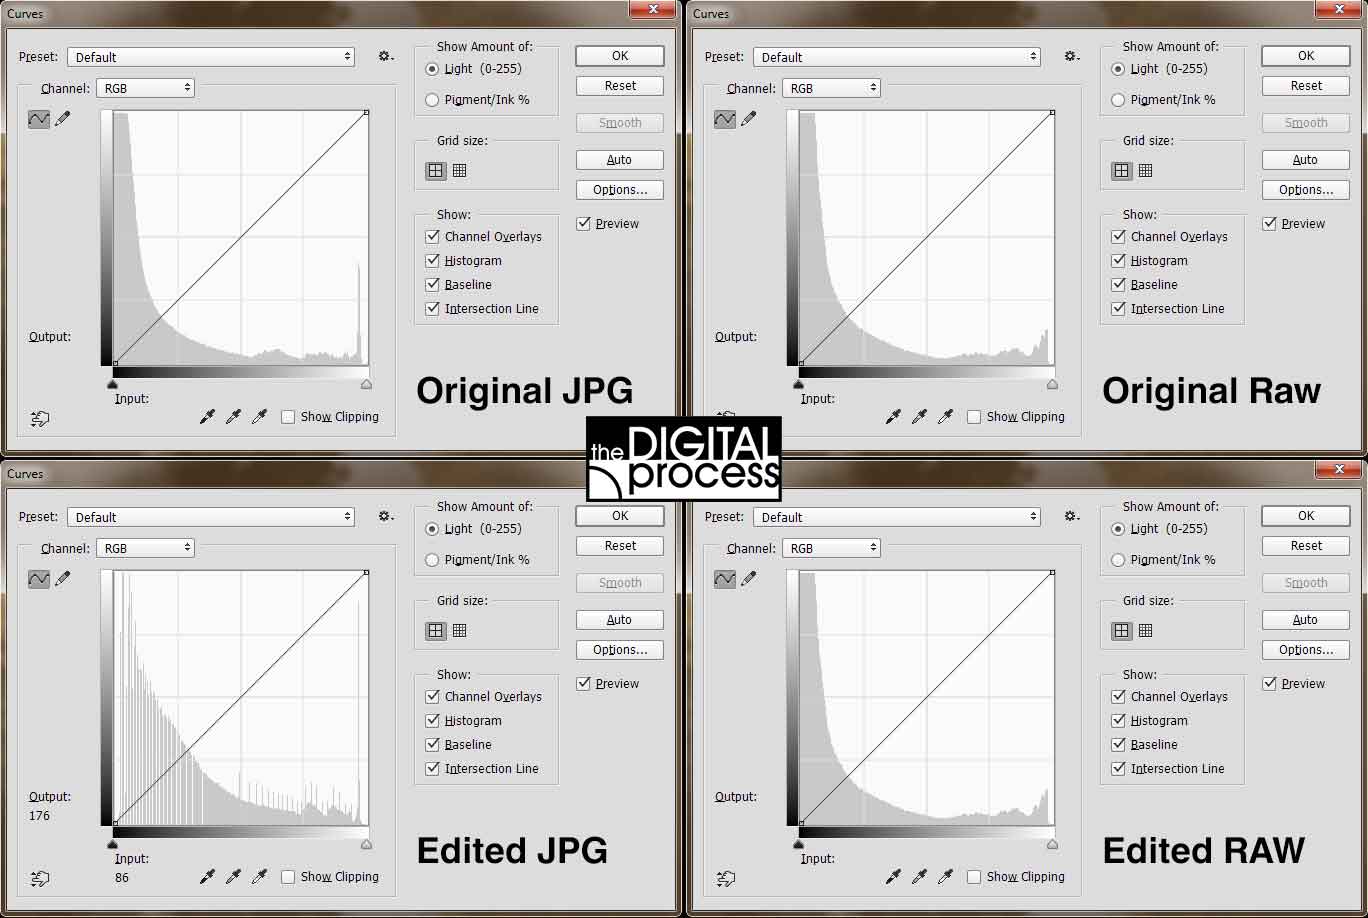
Look at the edited JPG histogram and see that there are actual visible “gaps” in the data! This is showing us that in my efforts to bring out the detail in the shadows, Photoshop had to make some decisions and ‘fake’ it a little. There are no gaps in the edited RAW histogram because Photoshop had more data, more colour and more bits per channel to work with.
I think this should serve as a visual reminder to you whenever you make the decision about shooting in RAW vs JPG. You may not see the difference in every photo, but it will be there.
Here is a short video that shows how I edited a RAW and JPG image to try to get the most dynamic range and best exposure.
Summary
I have shown you how you can take the same photo with the same settings and still get two very different results. One file is a JPG, one is RAW. I recommend that if you have the ability to process and edit RAW files that you just start shooting in RAW. If you can only edit in JPG, then shoot RAW JPG and save the RAW files for when you edit them at another time.
Some cameras give you a choice of 14bit or 12bit RAW files. You may save some space on your card by shooing 12bit, but you might as well just set it to 14bit and move forward. More data in your file is always better.
Using a RAW file can help you when you under or expose a photo, or even use the wrong white balance. The bottom line is that you will have much more versatility when you shoot with RAW.