Introduction to Aperture and Shutter Speed
In the last tutorial, I said that “It was all about the light”. And while this is true, there are two other things that make a photo: Aperture and Shutter Speed. One is the opening in the lens (aperture) and the other is the amount of time that the sensor or film is exposed to the light (shutter speed). These settings are sometimes made by the camera (Automatic shooting mode) and sometimes made by you. The goal here is to understand these settings so that you can control one or both of these settings when shooting.
Apertures and F-stops and Depth of Field

Every camera has an aperture. This is the opening that lets the light into the body. The aperture can be anything as simple as a pinhole in a cardboard box, or as complex as an automatic blade system that is in the modern lenses. But simple or complex, they do the same thing.
If you’ve been around cameras a bit, you’ll have noticed something called F-stops (or F-numbers). For example, when somebody says that they shot the image at “F8”, it means that their aperture was set to an F-stop of 8. The great thing about this numbering system is that it is a constant number and is based upon the length of the lens you are using. In general terms, this means that I can set any camera and lens to F8 and get the same amount of light hitting the sensor in the same lighting situation.
The aperture also controls what is called the “Depth of Field” in an image. This is a photo term for the amount of focus that you have in an image.
Less depth of field means that you will not have much of the foreground and background in focus. If you’ve ever seen a portrait and the background is all blurry – this due to the F-stop used while taking the photo. Another example is a landscape photo where everything looks sharp and in focus. The next tutorial will explain this more.
Depth of Field is dependent upon:
- the aperture (F-stop)
- the distance from your sensor to the main point of focus (your subject)
- the focal length of your lens
The F-stop used will be the biggest factor in the depth of field. A small number (f/1.4 for example) will have a much larger opening and allow much more light than a larger number (f/22 for example).
The distance from your camera to the subject makes a difference as the close you get, the less depth of field you will have. When I shoot a macro closeup photo, I have a very limited depth of field and my focus must be exact.
The focal length of your lens also affects the depth of field. In general terms, a wide angle lens (20mm) will show more depth of field than a telephoto lens (300mm) with all other settings being the same.
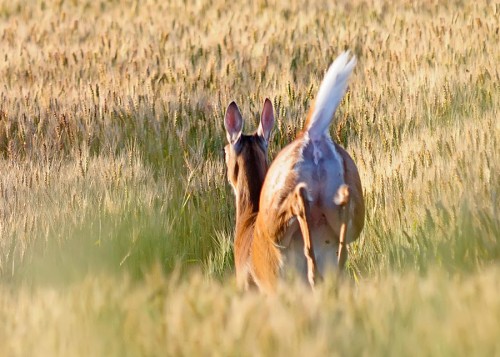
Depth of field is obvious in the above photo. The foreground is out of focus, while the deer is (mostly) in focus, and the background is out of focus. This was shot at an aperture of F2.8 towards the end of the day (note the warm light).
This topic is discussed further in the next lesson, but for now remember that the aperture lets in the light, is designated by an f/stop number and controls how much is in focus. Keep reading to learn how aperture and shutter speed work together.
Shutter Speed
This is an easier concept to grasp. Shutter speed is simply the amount of time that the sensor is exposed to light and is controlled by the shutter being opened and then closed. This can range from 1/8000th of a second to 20 minutes or more.
Think of how you could use the shutter speed to your advantage. If you are shooting a photo of a race horse running to the finish line (and making you some money) – you can use a fast shutter speed to freeze the horse in time. Capture the hair flying, the jockey’s face and the tense muscles. Alternately you could put your camera on a tripod and leave the shutter open for 10 seconds to capture a cityscape at night. This is all part of the creative process.
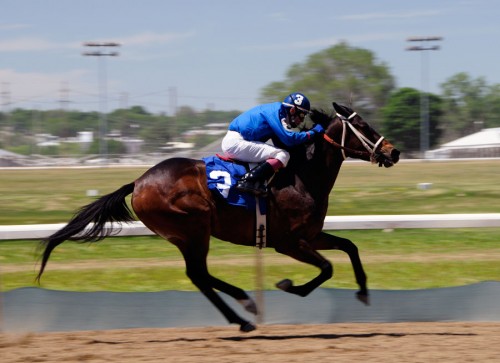
This photo of a horse was taken at 1/500th of a second. In this example, I moved the camera in the same direction as the horse running past (a technique called panning) so that the horse would be sharp and the background slightly blurred. This gives the impression of movement.
The shutter speed you can use is limited by how steady you can hold the camera. If you looked at your photo and it was blurry like someone shook it, that’s because the shutter speed was so slow the camera moved during the exposure. A general rule used to avoid this is to keep the shutter speed at “a ratio of 1/ lens length”. This means if you have a 50mm lens, then you shouldn’t hand hold a shot at slower than 1/50 second and should use a tripod instead.
Putting it all together
In these first few tutorials, I have introduced the 3 major components to taking a photo. You have the light that you are looking at, the aperture that controls how much of that light comes into the camera and the shutter speed that controls how long that light hits the sensor. If one of these elements changes, it can effect the other two.
If it is bright outside and you are letting in a lot of that light through your aperture, then it makes sense that your shutter speed will be quite fast so that too much light doesn’t hit the sensor and overexpose the image. If you have dim light and not much of it is coming through your aperture, then it stands to reason that your shutter will be open longer.
Oh – one more thing

Back in the film days, we could choose between different films depending upon what situation we planned to shoot in. If I was going to shoot outside on a bright day, I would choose 100 ASA daylight film. If I was going to shoot a horse race in daylight, I would choose 400 ASA film. Why? Because 400 ASA film had more (and larger) silver crystals in it and was more sensitive to light. But the trade-off was that the higher the number, the more ‘grain’ that was in the film. So when I was shooting film I could choose from 25 ASA (needed a lot of light, and gave very sharp images) up to 1600 ASA (needed much less light, but provided grainier images).
Cameras these days control this with their ISO settings. ISO and ASA are virtually the same thing. In simple cameras, the ISO is set automatically so that you don’t have to worry about it. More advanced cameras have this option, as well as letting the photographer choose what setting they want. The best part? I can change this from image to image if I need to, instead of having to change film each time. New cameras rock!
This adds a fourth element to the picture taking equation. You have the light, the aperture, the shutter speed – and now a setting to control how ‘sensitive’ your camera’s sensor is. Is this getting complicated yet? Hope not – because I need to tell you about just one more thing! (Sorry)
The last thing – I promise
Now that you have the four elements to your process, how about if I just add one more? This is “White Balance”. Did you notice in the last paragraph how I mentioned that I bought ‘daylight film’? This was film that was color balanced for shooting in daylight. I could also buy ‘tungsten film’ which was color balanced for shooting indoors with artificial light. Any other light sources would require a colored filter screwed into the end of my lens to get the correct color. Unlike Aperture, Shutter Speed, Light intensity and ISO, White Balance does not affect the exposure – only the colour of the image.
Digital cameras have this great setting called White Balance. It tells the camera what type of light you are shooting in. This can either be set on “Auto” or turned to settings like Daylight, Flash, Shade, and a few others. Some cameras allow you create your own custom white balance. Digital cameras rock!
Summary
I’ve introduced 5 factors that determine your final image:
- Light
- Aperture
- Shutter Speed
- ISO
- White Balance

It sounds like a lot to worry about. But the great thing is that you can set all or some of these settings on Auto or manual. For example, I can examine the light and the subject and then set my White Balance, ISO and Shutter Speed all on Auto, while I am only controlling the Aperture (F-stop) manually to control the depth of field.

The rest of the tutorials in this section will explain this in more depth, then provide some projects for you to use these concepts.
I know that it’s a lot to learn at first, but these are the basic building blocks upon which all of your photographic knowledge will rest upon. I’ll also say that there is a lot more to depth of field, and that people will write thick books about this topic. For now, this will get your started and ready to move onward.
Now you know why I called the site “The Digital Process”. Photography is a process that can be broken down into various steps and controlled by you – the photographer. For now, think about how aperture and shutter speed can affect your photos.
If you have any questions about these topics so far, feel free to email me with your questions.