Learn about Capturing the Light
What do I mean when I say that it’s “Capturing the light”? Simply put – without light, you don’t have a photograph. But it also means that the the light is the most important part of creating an image. Light can vary from moment to moment. Think of a sunset and how it changes as the sun sets. This change will affect how you shoot it. It will force you to change your camera settings and will likely make you change your composition. Look at the light that comes in your window: this changes dramatically as the day grows longer.
Remember this when taking a photo, “Capturing the light”. Don’t worry, I’ll mention a few more times along the way.
Light has a few characteristics that combine to become what you see through your eye and through your camera. These interact to become a single source that your camera sees and you react to.
- Direction of light
- Intensity of light
- Color of light
Direction of Light
The direction of light determines your shadows, highlights and reflections. In some cases, you cannot control this. If the sun is in the sky, you can’t change it – but you can change your position and possibly your subject’s position. If you have a flash, you can use it to control the shadows. Direction of light will be a factor in how you compose your shot. Where do you want the shadows to fall? What part of the scene do you want lit? Will you expose the image to lighten the shadows because they are important? Will you underexpose to darken the shadows?
This photos of an iris are interesting because of the direction of the light. I shot this with a flash that was set up off the camera and pointed towards the flower. Notice how changing the position of the flash in relation to the flower makes a dramatic difference. Can you look at each image and figure out where the flash was located and where it was pointing?
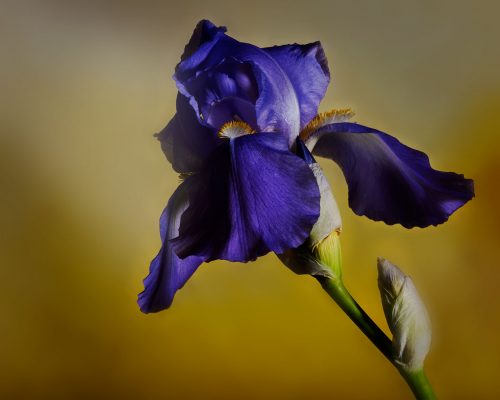

Remember the opposite of light is shadow. How you work with the light you are given or create will determine where the shadows fall on your subject. The top iris photo has the flash to the right and is casting shadows on the left. The bottom iris photo has the flash above it and it casting shadows below.
It’s easy to forget about shadows. You might be so worried about making sure your subject is smiling and not notice the branch that is casting a shadow across her face. In a studio setting, you can control all of this and expose accordingly. You’ll have the time to plan and account for the direction of light. Outside, you might be more spontaneous – but still, it is worth double checking this element of your photo.
When it comes to direction of light you need to think about how it affects your subject. Do you want the light to be straight on or to the side? Do you want it directly overhead (high noon) or angled (evening time). Do you want backlighting to provide a halo effect?

When you have time look at the work of the great portrait artists and see how they worked with light. A prime example of this what’s called “Rembrandt Lighting” where the light source is high and angled to the subject. Look at the image below and see how the artist used shadows to add depth and tone to the subject’s face. Try to imagine how boring the portrait might look if he painted the face in even light.
Intensity of Light
This is the most obvious property of light. How bright is it? How dark is it? (this is the ‘glass half full / half empty’ aspect of photography). The intensity of the light will directly affect how you will expose the photo. Think of how you have to expose your image for a snowy landscape on a sunny day versus exposing for a sunset. Intensity of light can also vary – how much less light is there when the sun goes behind a cloud? How is it different when your subject is on the beach compared to in a forest? Indoors, the intensity can be controlled by a flash unit or location to a window. Your camera has a built in sensor to determine the intensity of light and calculate what it thinks is a good exposure. How this is done will depend on the particular model of camera you are using. Some are more advanced than others and do a better job in more situations.
The photos below show the same iris shot with a flash, but at two different settings. Notice the flower on the left is duller and lacks contrast, while the flower on the right has more highlights and shadows as well as deeper saturation of colors. In this example the camera’s setting were consistent, but the amount light produced by the flash changed.

When shooting, keep in mind that the light can change in brightness. This will also affect your shadows. Think of a park on a sunny day. In bright sun, you get lots of light and harsh shadows. When the cloud blocks the sun, you get less light and smoother shadows. If you move under a tree in bright sunlight, you can get a mix of bright light and dark shadows.
When your camera exposes for light, it doesn’t care about the angle of light, just how much light is hitting the exposure meter. In simple terms most cameras will average out the amount of light and calculate the scene as if it were an even scene of 12 to 18% grey.
When you point your camera at a scene and ask the camera to figure out the exposure for you, it doesn’t know if you’re shooting a black car, a white cat, a grey horse or person against a black wall or anything else. It will just take all of that light and ‘guess’. If you’ve taken a photo of someone with a lot of light behind them and they came out like a silhouette, this is how that happened; the camera saw all the bright light in the background and underexposed to get the ‘grey’ it was expecting. By underexposing the whole scene, your subject became even darker.
That’s just one example of how the intensity of light is very important in photography. As the lessons go on, I’ll show you ways of adjusting the metering to get better photos.
Color of Light
Light is rarely consistent unless you control it. Outdoors, the color can change depending upon the cloud cover and the time of day. It can change if you are shooting a subject on the grass or under a tree or in the snow or on the beach. It may be similar enough that you don’t have to worry about it in many cases, but it’s still something to think about.
Once again, you can control the color of light with a flash unit. You can even contrast the color of incandescent light with the color of light from a flash. Outdoors, a flash can be used to brighten the scene and it will be very close to ‘standard’ daylight colors.

The light at the beginning and the end of the day is warm and in the example above, the setting sun has cast a warm glow across the landscape.
The color of your light depends highly upon the source. You can have light from the sun, fluorescent lights, incandescent bulbs, flash units – and they will all be different. The color of light may not affect your exposure or your composition, but it will greatly affect the look of your photo. In general, warm colors (red, orange, yellow) will convey a particular feeling, while cool colors (blues, purples) will convey something totally different.
White Balance
Digital cameras have a setting called “White Balance” (WB). This is how the camera controls the color of light. Just like when the meter sets the exposure based on the amount of light, the camera’s white balance will look at the color of the light and make it’s best guess when on the Auto White Balance setting.
All cameras have an “Auto” setting for white balance, while many have more choices. Some examples of White Balance settings that your camera may have are “Daylight”, “Cloudy”, “Flash”, “Fluorescent”, “Incandescent” and more. Your camera might even have a custom White Balance setting you can manually set.
Here is the same photo with two different White Balance settings (yes, you can change this after you’ve shot it in some cases). The second photo shot as ‘Daylight’ is much closer to the actual yellow sky I saw that evening. (click for a larger view)

We’ll talk more about White Balance later, but for now just be aware that it is one more aspect of digital photography that you can control when needed.
Summary
The point of this tutorial is to make you aware of the light that will be hitting your subjects and backgrounds. It’s something that you need to remember and is the key to your photos. The light will affect your exposure and likely your composition. It can also be used to convey a tone of warmth or coolness to your image.
Using light and learning what to look for are concepts that you will learn as you advance as a photographer. Light is a tool almost as much as your camera is. Work with it. If there’s not ‘enough’ figure out to work within that situation. Digital cameras are great at capturing scenes in poorly lit conditions. Use this to your advantage.