Learn Aperture Priority Mode
Now you that you have learned some basic photography theory, it’s time to change from concept to real-world practice. This lesson will review some concepts and then have you take a series of photos using Aperture Priority and then review the results.
By the end you should have some good visual reference to help relate how the f/stop controls depth of field. Keep reading and dive in!
From earlier lessons (review), you should know:
1) Aperture is the opening in the lens
2) Aperture controls how much light enters through the lens
3) Aperture controls depth of field (how much is in focus in front and behind your subject)
These are the three concepts we’re going to think about while working through this exercise. But first, lets take a look at the actual aperture that we’re talking about:
Set your camera to Aperture Mode
The first thing you need to do is set your camera to Aperture Priority. This is usually done with a simple dial on top of your camera. Look for the “A” (“Av” if you have a Canon) and make it the active mode.

What this will do is allow you to control the aperture, while the camera sets everything else. Depending upon your camera, you may or may not be able to still control the ISO, but in this mode, the shutter speed will be set based on the aperture you select.
Learn how to control your Aperture Setting
The next thing you need to do is learn how to control the aperture on your camera. This is where your amazing manual comes in handy! It may be thick and boring to read, but it is very handy when you need specific information. If you don’t have a manual, you can usually find one online – or just search the web for “Aperture priority setting for Model XXX“
Now that you have your camera set and you know how to control it, work through the dial or buttons and see what range of apertures is available. This will be dependent upon the lens you are using. If you can change the lens on your camera, change it and see how the settings may change.
Review:
Have a look at the diagram below to review the relationship between the aperture opening, the f/stop and the effect on depth of field (DoF) and shutter speed.

Step 1 – Shooting Close
For this simple exercise, I’ll ask you to take a series of photos while shooting at something close (about 3 feet / 1 metre) to the lens and then another series where the subject is more than 10 feet / 3 metres away. If you have different lenses, or a zoom lens, repeat this exercise at different focal lengths but the same distance.
Find a subject that you can shoot that will fill about 1/2 the frame while you stand about 3 feet / 1 metre away. Almost every camera can focus this close, so it’s a great place to start. Make sure that you have something in the background, and not just a plain wall or sky.
If you have a zoom lens, zoom to the widest setting.
Start at the lower f/stop you can on your lens or camera and increase by 1 or 2 settings until you reach the highest f/stop you can use.
If you have a zoom lens, zoom to the longest telephoto setting and repeat the shots.
Once you taken your photos, check out the images on your computer. Looking at them on your camera’s screen will give some idea about the photos, but you’ll be able to inspect the differences much easier on your monitor.
What you are looking for?
Almost every photo viewer will allow you to see the properties of the files you look at. For example, even with “Windows Photo Viewer” and many others, you can right-click on the image and select properties and you’ll the settings you used. Find your aperture setting (f-stop)
When you are shooting something close, your depth of field is more shallow than if you shoot something at a distance.
For example, if you shoot at f/2.8 with a 50mm lens and focus on a subject 3 feet / 1 metre away, your DoF is only about an inch / 2cm. If your subject is 10 feet /3 metres away, the same setting will get you a DoF of about 2 feet / 0.6m.
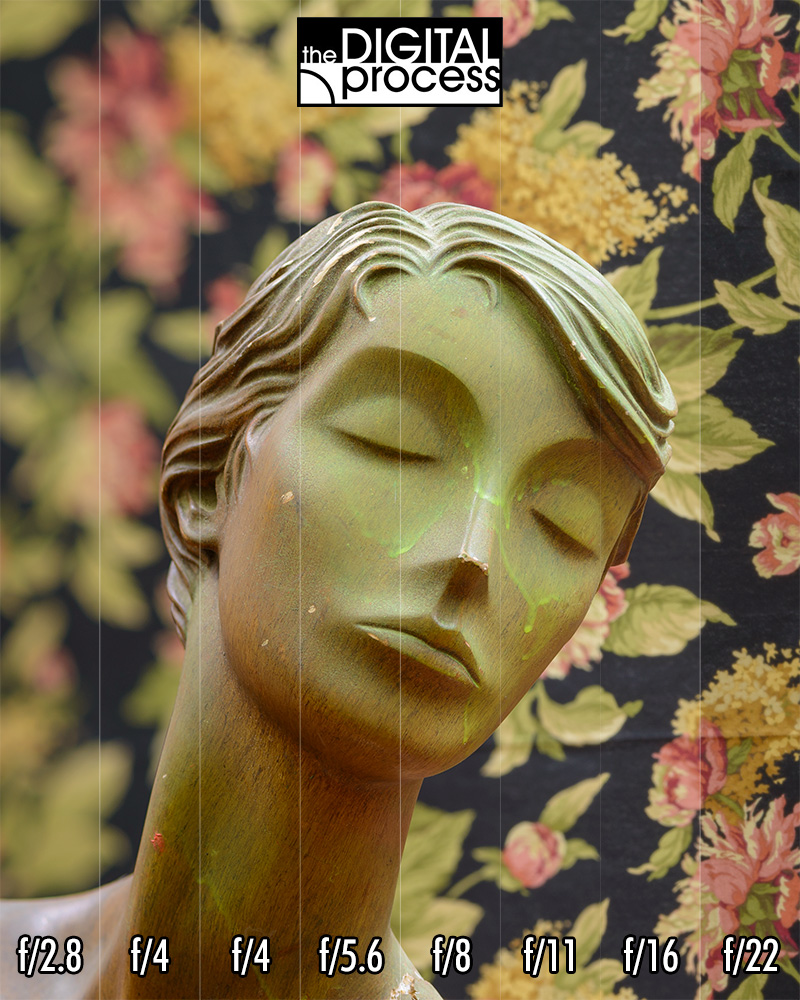
Here is what I shot with my subject (a mannequin) 3′ / 1m from the camera. The background was another 5′ / 1.5m behind the face of the mannequin. I shot on a tripod so that I could use the same basic lighting (overhead fluorescent tubes) which caused my last image to be shot at f/16 and 8 seconds.

I’ve taken a strip of each image and put them side-by-side to show the changes from f/1.4 to f/16. Click on the image to view it larger – or view the much larger full size image. You’ll see there are subtle changes from one setting to the next, but if you compare the extremes (below) there is a very significant difference.

Now that you know what to expect, you can start testing more. Use different focal lengths and different distances to your subject and see how each affects your depth of field.
Here is another series of images, but this time I used a 105mm lens and doubled the distance to the subject.
What you might notice is that the two sample images look very similar. In fact, if I use the same aperture, and double the focal length of my lens and the distance to the subject, I end up with the same depth of field.
Below is a calculator that will let you see what your DoF will be when you enter in some parameters (lens, camera, aperture, distance, etc).
Summary
So what was this lesson all about? The goal was to take your camera off the “auto everything” mode and try using Aperture Priority Mode. You should now know how to set your camera to this mode and adjust your aperture. You should have a good idea about how the aperture affects your Depth of Field by reviewing your test images.
Why is this good to know? The main reason is that by controlling your DoF, you are making a creative decision about your photograph. Do you want a soft dreamy background in your portrait? Do you want as much in focus as possible in your landscape? You should know how to achieve this now.
If this is all new to you, and you’re still not feeling 100% sure about it, keep shooting! The beauty of the digital process is that you can shoot thousands of images and review them right away. It doesn’t cost anything but time to experiment and try new settings.
If you have questions, you can email me info@TheDigitalProcess.com or you can leave a comment below. I’d love to hear how you have learned about apertures and how it’s helped your photography.