Overview to Photograph a Solar Eclipse
Introduction
Here is a collection of resources that I have compiled to help me learn how to shoot a solar eclipse in 2017. (Schedule of upcoming eclipses)
I’ll explain some of the equipment you might need and talk about preparing for the eclipse. I’ll tell you how I plan to shoot my first eclipse as well. I live very close to the area of ‘totality’ and have many locations to choose from. I’ll explain what I’ll be looking for when it comes to shooting this unique opportunity.
This page is also a work in progress, I’ll add any more new and relevant info as I find it.

Safety First
** Don’t point your camera at the sun without first placing a solar filter on the lens. **
** NEVER look through a camera, binoculars, telescope without a solar filter – even if you are wearing solar glasses. **
When I began looking into how to photography a solar eclipse, I soon realized that I needed a solar filter to protect both my eyesight and my camera gear. Both of these are very important to me, so I bought a solar filter right away as I thought they might get scarce closer to the event. I looked at a few and found a handy screw-in filter from ThousandOaksOptical.com. They make a few different kinds and you can basically choose between the convenience of a screw in filter or a ‘cap’ type filter that you place over the end of your lens.
The “Full Aperture” filters are designed to be placed over your lens like a big lens cap. The advantage with these is that you can quickly remove it as the lighting conditions quickly change during the eclipse. In a matter of minutes, you’ll go from shooting sunlight to night-like conditions. The changes will come quickly and you’ll be fighting with exposure settings and the extra 30 seconds it takes to remove a screw-in filter, lens hood and get back to shooting could make a difference. You can find the Full Aperture filters on this page.
Everything I have read has told me that a neutral density filter will not protect you and your sensor during the time you’ll be pointing your camera (and eye) at the sun.
If you use a square filter system, you can buy a sheet of solar filter material and cut it to fit your holder. Check out the options available here.
Here is a list of other manufacturers of solar filters you can check out.
- Alpine Astronomical
- Astro-Physics, Inc.
- Baader Planetarium
- DayStar Filters
- Kendrick Astro Instruments
- Orion Telescopes & Binoculars
- Rainbow Symphony
- Thousand Oaks Optical
With a month to go before the eclipse, some stores are selling out of solar filters, but you can still make your own. As long as you have a piece of solar film large enough to cover your lens, you can find many methods online to creating your own filter. Check out this YouTube video for one option.
Another thing to consider is that the day will be hot and your equipment might get warm sitting out in the sun for a couple of hours. The black camera and lens will absorb light and heat, so consider placing a white cloth over it to reflect the light if you can’t shoot from the shade.
Finally, consider getting some ‘Solar Eclipse Glasses‘ for you and anyone that might be with you during the shoot. These will protect your eyes for those times when you are not looking through your lens’ solar filter.
A note about safety and Neutral Density Filters from NASA:
The Sun can be viewed directly only when using filters specifically designed for this purpose. Such filters usually have a thin layer of aluminum, chromium or silver deposited on their surfaces that attenuates ultraviolet, visible, and infrared energy. One of the most widely available filters for safe solar viewing is a number 14 welder’s glass, available through welding supply outlets. More recently, aluminized mylar has become a popular, inexpensive alternative. Mylar can easily be cut with scissors and adapted to any kind of box or viewing device. A number of sources for solar filters are listed below. No filter is safe to use with any optical device (i.e. – telescope, binoculars, etc.) unless it has been specifically designed for that purpose. Experienced amateur and professional astronomers may also use one or two layers of completely exposed and fully developed black-and-white film, provided the film contains a silver emulsion. Since all developed color films lack silver, they are always unsafe for use in solar viewing.
Unsafe filters include color film, some non-silver black and white film, medical x-ray films with images on them, smoked glass, photographic neutral density filters and polarizing filters.
Planning and Preparation – Location
While you’re waiting for your filter to arrive, you can start thinking about how you want to shoot the eclipse. What lens options do you have? Are you shooting images or video? Do you have a sturdy tripod? Do you want to invest in a tracking head to follow the sun across the sky? Where will you shoot the eclipse?
Like any kind of photography, it’s easy to just ‘wing it’ and hope for the best, but if you want to successfully make some great images and not rely on luck, you need to prepare and practice. I still have to answer some of these questions myself, as I am a world class procrastinator.
I know that location wise, I want to be somewhere down a quiet country road, or in a field without much light pollution during the darkness. My vision is to capture the extreme change from light to dark to light, so street lights could get in the way of that as their sensors will turn them on. I also plan to shoot with a telephoto for detailed shots of the eclipse and a wide angle lens to capture the whole scene in a time lapse. My location needs to work with both shots.

I have a couple of good tripods, but I don’t have a way to track the movement of the sun. I also don’t plan to invest in a tracker for a single event, although I could use one for Milky Way shots and other astrophotography. One tripod will be set up for the wide angle time lapse, but the other one will need to be constantly adjusted as I follow the sun.
The totality (time when the moon completely blocks the sun) will vary from 2 to 3 minutes depending upon your location. The complete event will last almost three hours. You can check out a good online map here to see the best location for the longest totality.
However long you plan on shooting depends on you (and the weather). Here in Nebraska we are usually seeing clear skies through the summer, so it will be a popular location to view the eclipse during the mid-day sun.
If you plan on shooting a wide angle time lapse you want to consider what your scene will look like. Can you find a nice looking landmark to include? What people consider a great location varies, but it is worth your time to find a spot you’ll like and check it out during the same time of day to see where shadows fall.
Remember that if it is a hot day and you are shooting near a city, you will likely deal with heat waves coming off the surfaces and this could greatly impact the sharpness of you images. Keep this in mind as you shoot where ever you set up, and move if you need to avoid this.
To select a good location, here are the two tools you’ll want to look at:
Use the NASA interactive map to find where the 2017 totality will be near you. Use the Photographer’s Ephemeris to plot the tracks of the sun and moon to get correct angles for your selected location.
Which Lens to use?
I think for most photographers, if you want to get the largest image of the sun you will want your longest telephoto or zoom lens. If you are shooting through a telescope, you might need to consider the possibility of getting too close. During the eclipse, there will be a corona where light rays will be visible around the moon and if you’re too close these will get cropped out. According to this Nikon page, you’ll want a lens shorter than than 1400mm for an FX (full frame sensor) camera, or 900mm for a Nikon DX camera (APS-C). My longest lens is a 200-500 zoom, so I should be safe shooting all stages at 500mm.
At the other end, if you want to shoot a time-lapse, then you might consider how wide is too wide. You might decide you don’t want the sun in your shot and just shoot down a country road and let the power line shadows show the sun’s progress through the sky. Maybe you’ll have foreground object cast a shadow. I’ve added a handy time-lapse calculator to the bottom of the page to help with your shooting interval planning.
I really like shooting with my 14mm for wide angle images and time lapses, but I’m thinking it might be too wide for what I’m planning. I’m thinking a 28mm lens will still catch the scene without taking in too much sky. Again – this will depend on where I end up shooting.
How to Focus
When it comes to focusing on the sun, you would think that you will just slide the lens to infinity and leave it there. It’s been my experience when shooting the moon and sun that infinity doesn’t work on all lenses at all times. Sometimes I need to dial it back just a little to get ultimate sharp focus. Once I have the sun in focus, I will continually check the focus as the heat can throw things off a little. It can be a very subtle change that ruins your image as you ‘think’ you have perfect focus but haven’t checked it for 10 minutes.
If you have a ‘live view’ feature on your camera, use it. This will be the best way to check your focus and framing. Remember that live view will use up battery power, so keep an eye on power levels and bring a spare battery if you have one.
Exposure leading up to Totality
This will be the hardest part of shooting the eclipse for most people. To begin with, most of us don’t usually shoot the sun during a bright day – we try to avoid it. Some of us might be more experienced at astrophotography and moon shots. Shooting a solar eclipse will be the ultimate mix of exposure range as we go from bright daylight to night and back again in a few minutes. When we are shooting during totality, the moon will be blocking the sun, some rays will be escaping and the stars should be visible.

Our eyes will adjust a lot faster than our camera, so you’ll want to review your images as you shoot them. You will also want to be reviewing your histogram and checking your image review for exposure and focus. You will be busy during these few minutes when you photograph a solar eclipse, so make sure
you know how to quickly and easily access all settings and viewing options in your camera.
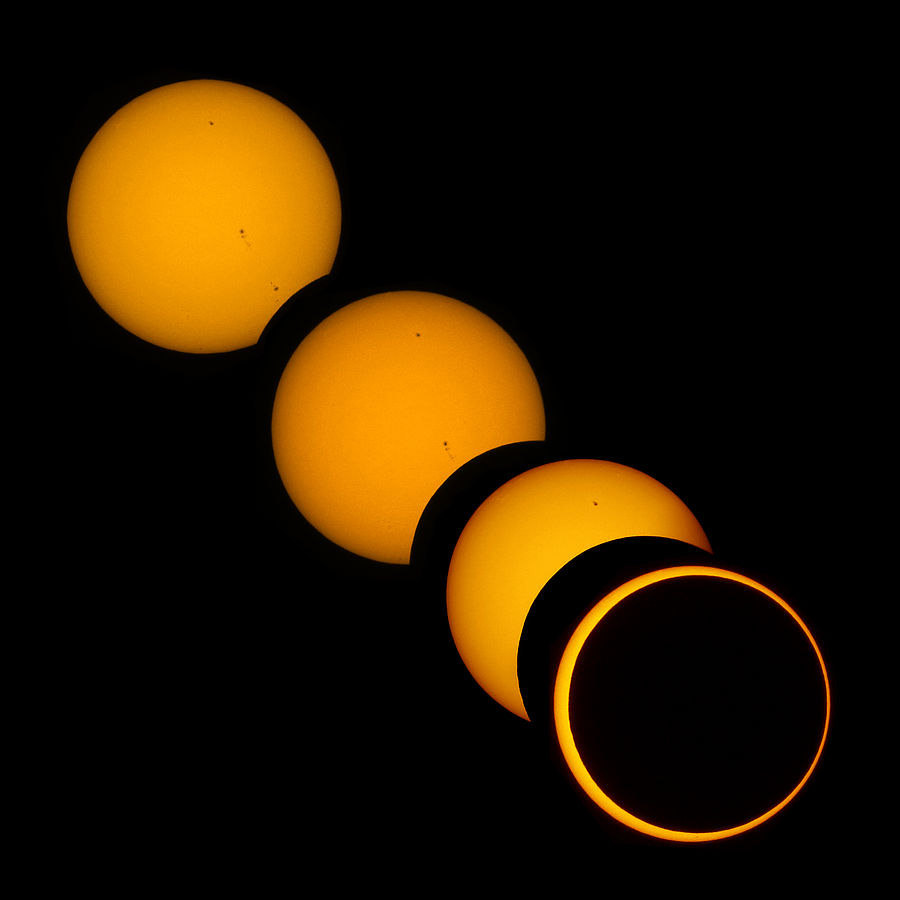
When it comes time to expose for the sun while it is not behind the moon, you can try a few settings before hand and then lock that in. This is the easy part. I shot this photo at 1/400s | f/10 | 100 ISO and like the orange ball look. Some people like a more yellow sun, but the choice is yours. You can always adjust the exposure in software, but you want to get it close in camera as you may have dozens (hundreds?) of images to deal with. Also, you might want to produce a series of images that show the progress of the eclipse and all of the images should have the same exposure for consistency.
I plan to shoot with the same exposure from when the moon first crosses over the sun and then change when the sun becomes fully covered. This exposure will be very close to what I used for the image to the left. What exposure should you use? It will depend on a few factors.
Remember, you can dial in a good setting and still bracket exposures. Write down this setting so you can quickly revert back to them after the totality.
ISO – Choose a low ISO, you won’t need a high ISO at this point, so go low for best image quality.
Aperture – Choose an aperture that is best for the lens you are using. For example, most lenses are at their sharpest around f/8. You can check online reviews and find the ‘sweet spot’ for your particular lens. Depth of field will not matter, so I want to use my lens’ sharpest option.
Shutter speed – This is the last part of the exposure triangle, so you can now set your camera to manual, dial in your ISO, aperture and then set your shutter speed to get the exposure you want.
Exposure during Totality

At some point, the light will change dramatically and you will need to get busy. If you have ever shot night photography, astrophotography or Milky Way shots, you might have a good starting point. If you are new to this, then you might feel a little lost. I don’t blame you – it’s tough. If it was easy, everyone would do it, right? But – it’s not impossible and it’s incredibly rewarding when you get a good shot!
At this point, we need to take our solar filters off (keep it handy, you’ll be putting it back on in a few minutes). The sun is hidden behind the moon and is safe to view.
Look at the photo to the left. That is a huge range of tones and exposure. This is one reason why we shoot RAW files. We want to capture as much image data as we can so that we can work to get the photograph we were envisioning.
Most of the scene will be dark. Depending on conditions, you might see stars around the eclipse. The big thing to keep in mind is that the earth is still spinning and the sun and moon are moving across the sky. If we use too long of a shutter speed, then it will blur.
ISO will need to be bumped up: I would start at 1000 ISO. Now instead of setting my aperture first, I want to set my shutter speed to make sure I don’t get blur. I will still have the camera on a tripod, so I can go to slower shutter speeds and not worry about camera shake. I’ll start about 1/100s with the lens wide open and see how that works. I’ll quickly review and dial the best as soon as possible. Once I have a good setting, I’ll still bracket a LOT – because there are no second chances. Every site I have checked doesn’t recommend a specific setting, but recommends bracketing. Depending where you are, time of day, etc- the corona (white area around the moon shown above) will vary.
Here is a great exposure calculator that you can use to get a starting point for your exposures. Plug in the data for your camera, lens, aperture, ISO and then find a close shutter speed for each phase. Write these down, or take screen shots – but make big, easy to read notes so you can read them in the dark when this is happening!
As the calculator shown above displays, you will see a few different phenomena happen during the eclipse. You’ll see the Corona, Bailey’s Beads, Diamond Rings, Prominences and other features you likely haven’t heard of before. You don’t need a degree in astrophysics, but you DO need to know how to bracket your exposures.
After a few minutes of panic, camera settings, awe and wonder – you’ll see the sun start to reveal itself again. At this point, you want to attach your solar filter again. Safety first! Put on your solar glasses if needed, and protect your camera when you photograph a solar eclipse!
Based on the camera settings I entered into the online exposure calculator, here are the settings that I will use as a starting point for each stage of the eclipse.
| ECLIPSE STAGE | ISO | APERTURE | SHUTTER |
|---|---|---|---|
| Partial phase — 1/100000th - with filter | 100 | f/8 | 1/800s |
| Baily’s Beads - with filter | 100 | f/8 | 1/200s |
| Baily’s Beads (total - without filter) | 100 | f/8 | 1/6400s |
| Chromosphere | 100 | f/8 | 1/3200s |
| Prominences | 100 | f/8 | 1/1600s |
| Lower corona (less than 0.1 solar radius ) | 100 | f/8 | 1/400s |
| Inner corona (less than 0.2 solar radius ) | 100 | f/8 | 1/50s |
| Diamond Rings | 100 | f/8 | 1/50s |
| Inner corona (less than 1/2 solar radius) | 400 | f/8 | 1/100s |
| Middle corona (less than 1 solar radius) | 400 | f/8 | 1/25s |
| Upper corona (less than 2 solar radii) | 800 | f/8 | 1/25s |
| Outer corona (more than 3 solar radii) | 800 | f/8 | 1/13s |
Exposure after Totality
Now you will be back in familiar territory and can set your camera back to whichever settings you used before totality took over. Remember, you want these consistent (and you wrote them down, right?). If you were bracketing your exposures, set that again and finally, relax and enjoy the show. The hard part is over.
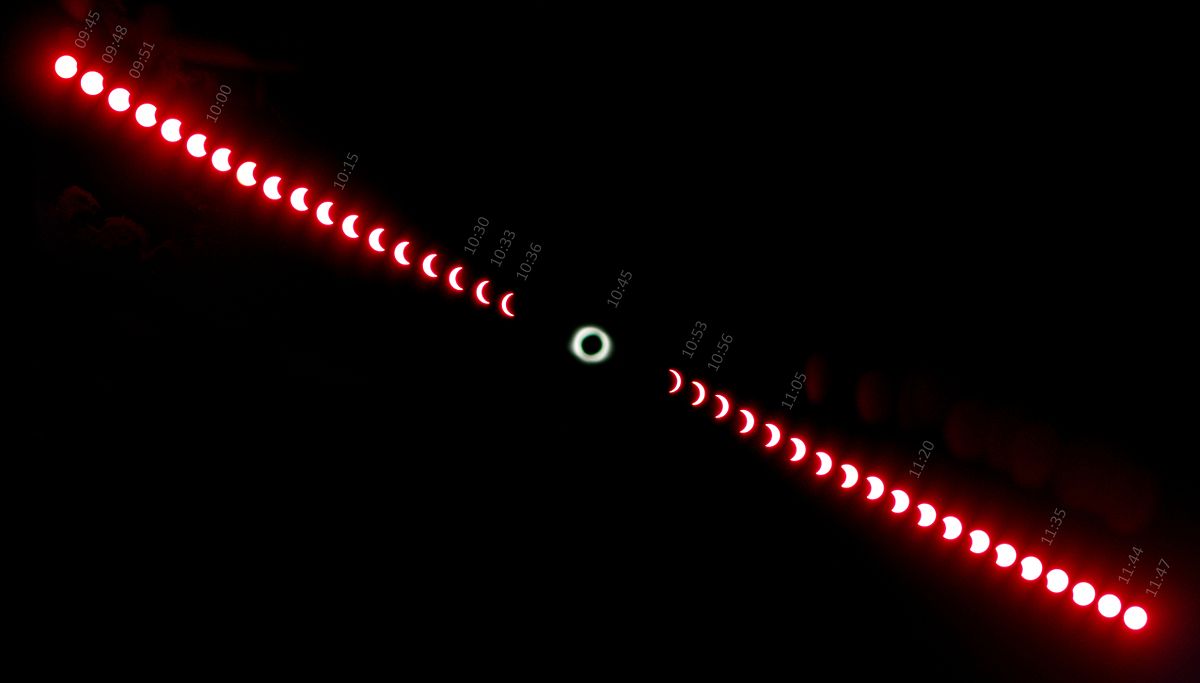
If all goes well, you might end up with something like this:
What you need
To help with your shoot, here is a list of some things you want to take with you to photograph a solar eclipse.
Here’s a handy checklist you can print out to make sure you don’t miss anything in the excitement.
- DLSR
- Telephoto lens
- Solar filter
- Eclipse Glasses
- case for your filter
- Tripod
- Cable or Remote Release
- Notepad
- Flashlight (preferable with red filter)
- Phone with a stop watch to time the eclipse
- A friend or two to share the experience (and hold stuff while you panic)
- Spare Camera Battery
- Spare Memory Cards
- Water – remember, it’s mid August
- White cloth to place over your gear
- A Chair – you’ll find that you might be shooting almost straight up, so get comfortable
Other Good Resources
Here are some other website that will help you get the most out of your experience.
- Mr Eclipse
- Wikipedia page about Solar Eclipses
- Nikon Page about shooting a Solar Eclipse
- NASA’s Solar Eclipse Photography page (no Space Shuttle required)
- Solar Eclipse Photography by Space.com
- Photography Life page about how to Photograph a Solar Eclipse
- Mr Eclipse’s Solar Eclipse Exposure Guide (printout)
- NASA Safety Page for Solar Eclipse Viewing
- Interactive Map for August 21 Eclipse
- The Photographer’s Ephemersis – will help you plan your location
- Online Exposure Calculator for Solar Eclipse
- Phone App – Solar Eclipse Timer
- Time Lapse Calculator
- Weird Things that can happen during a total eclipse
- How to post-process your HDR Eclipse photos
Summary
As photographers, it’s easy for us to get worked up over how to shoot something ‘just right’ and then miss out in the moment. Remember what is making this moment special. It’s likely the only total solar eclipse you will see in your lifetime. Take a moment to breathe, relax and enjoy the literally once in a lifetime moment.
Don’t forget to shoot the scene around you! You’ll have people getting excited and emotional as the sun goes dark. You might have 100’s of people wearing strange glasses, so look for fun crowd shots and video opportunities.
With that said, you’re also excited as hell to shoot this thing! 😀
Remember to keep your camera stable. BE PREPARED. Make lots of notes beforehand if you need them. Practice your camera settings.
Shoot in RAW. Shoot in Manual Mode.
Find a good base exposure and then bracket.
Practice taking your filter and lens off quickly.
Make sure you know how to make the settings on your camera that you will on Eclipse Day.
Enjoy your day!
If you like this post, please leave a comment below or send me an email: info@TheDigitalProcess.com. Thanks for reading, – Art
Here is a video that sums up a lot of this information, and provides some great info on scoping out your locations:
If you are planning on creating a time lapse, here is a great calculator that will help you plan your shooting intervals.
Here is a time lapse of the 2017 eclipse. First, I was surprised I had to use my 8mm lens (on a APS-C format camera), but I shot at 8 second intervals for over hours. This is about 45 minutes less than I plan to shoot during the eclipse, as dense cloud cover came in and dulled the sky. My friend Cindy Chinn made some metal art to frame the changing sky. 1100 frames into 45 seconds, from 11:45am to 2:12pm.